

Kitchen Sink Replacement in St. Petersburg, FL 33702

When your kitchen sink is out of commission, everyday life gets disrupted fast. For a homeowner in St. Petersburg, FL 33702, a new kitchen sink was going in as part of an update, and they needed it installed correctly so it would stay secure, drain properly, and work reliably for years to come.
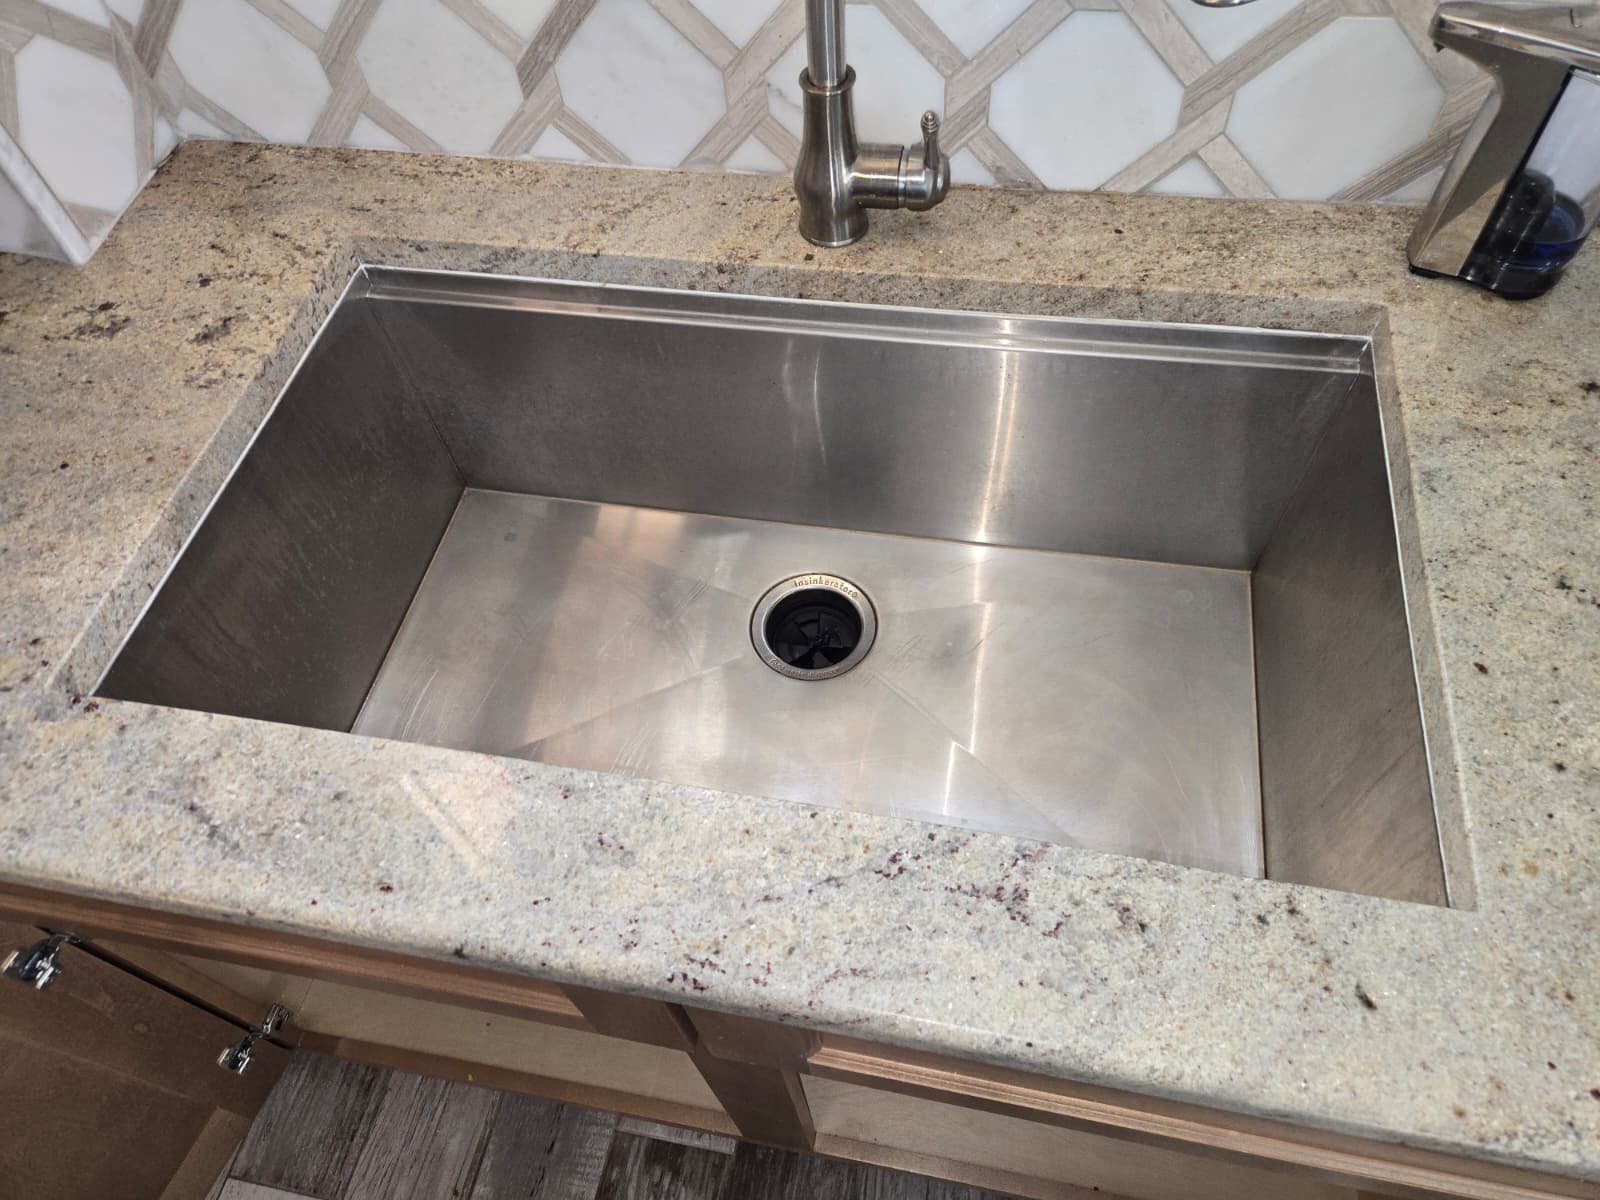
On this project, our plumbing team handled a full kitchen sink replacement: setting the sink to the countertop with silicone, installing the new faucet, connecting the garbage disposal, and rebuilding the drain with a new P-trap. Because of the way this type of sink bonds to the countertop, it required a 24-hour cure time and a planned second visit to finish the plumbing connections.
Below we’ll walk through what the homeowner was dealing with, how we approached the job, and what we did to leave them with a solid, leak-free sink setup that’s ready for daily use in their St. Petersburg, FL kitchen.
Case Recap
- Location: Single-family home in St. Petersburg, FL 33702
- Service: Level 2 kitchen sink replacement with new faucet, garbage disposal, and P-trap
- Approach: Two-visit process to allow sink adhesive to cure for 24 hours
- Scope: Set and secure sink to countertop, install faucet and disposal, connect drain assembly
- Coordination: Extra support technician scheduled to assist with safe handling and setup
- Result: Securely mounted sink, properly supported and fully tested for leaks and normal operation
Customer Problem
The homeowner in St. Petersburg was in the middle of a kitchen project and needed the new sink professionally installed. The old sink was out, the new countertop was in place, and they wanted to be sure the new sink wouldn’t shift, sag, or leak after everything was connected.
The main concerns we heard were:
- Making sure the sink was properly attached to the underside of the countertop
- Having the faucet and garbage disposal installed cleanly and correctly
- Getting a new P-trap and drain setup that would drain well and not leak
- Understanding how long the sink would be out of service and why
This particular install was an undermount-style attachment, where the sink is bonded directly to the underside of the countertop. That’s different from a typical drop-in sink that rests on top of the countertop cutout. With undermounts, the bond and support are critical; done wrong, the sink can pull away from the top over time.
Our office notes for this job also showed that we needed to send an additional technician out to help with the installation. That’s common for heavier sinks or tighter cabinet layouts, where having an extra set of hands helps keep everything aligned and supported while we secure it.
Inspection and Diagnosis
On arrival, we started by looking at the overall setup in the St. Petersburg, FL 33702 kitchen:
- Checked the new sink and compared its dimensions to the countertop cutout
- Inspected the cabinet interior to see what kind of support options were available
- Reviewed the existing drain, disposal wiring, and water supply shut-off valves
- Confirmed with the homeowner what faucet and disposal were being installed
With undermount sinks, there are a few ways they can be supported:
- Silicone or adhesive bonding between sink rim and countertop
- Mechanical supports such as 2×4 braces or support straps inside the cabinet
- Factory or aftermarket undermount clips installed by the countertop contractor
As plumbers, we can reliably attach the sink using silicone or appropriate adhesive and, where the cabinet design allows, add wood support or straps to help carry the weight. If the cabinet doesn’t allow for safe and effective bracing, or if special under-mount clips are required, that portion is best handled by the countertop contractor who installed the top.
After inspecting this cabinet, we identified how much support we could safely add and confirmed with the homeowner how the two-visit process would work: first visit to set and secure the sink and faucet assembly, then a return after the adhesive cured to complete the drain and disposal connections.
For homeowners who are planning a similar upgrade, our dedicated kitchen sink installation and repair services page is a good overview of how we typically handle these projects in the Tampa Bay area.
Repair and Service Process
Because this was a Level 2 kitchen sink replacement, we followed a structured, step-by-step process to protect the new finishes and ensure a solid final result.
Visit 1: Setting and Securing the Sink
On the first visit, our focus was on mounting the sink correctly to the countertop and preparing for the plumbing connections that would come later.
Key steps included:
- Dry fitting the sink: We first placed the sink into position without adhesive to make sure the cutout matched correctly, the sink sat level, and there was enough clearance for the faucet, disposal, and P-trap assembly inside the cabinet.
- Evaluating cabinet support options: We looked at the cabinet framing to see where 2×4 bracing or straps could be used without interfering with drawers, doors, or existing plumbing. If the cabinet design limited those options, we planned to rely primarily on the adhesive bond.
- Applying silicone/adhesive: Once everything was lined up, we applied silicone (or appropriate sink adhesive) along the rim where the sink meets the underside of the countertop. This is what seals the joint and helps hold the sink in place.
- Setting and strapping the sink: With two technicians on site, we were able to carefully lift and hold the sink in position from below while we pressed it evenly against the countertop and secured any temporary support straps or bracing to keep it from shifting while the adhesive cured.
It’s important to understand that during this curing period—typically 24 hours—the sink can’t be used at all. Any weight, water, or movement can weaken the bond or cause the sink to sag. Before leaving, we walked the homeowner through this, so they knew not to use the sink or faucet until we returned.
Visit 2: Faucet, Disposal, and Drain P-Trap Installation
After the adhesive had the full 24 hours to cure, we came back for the second visit to finish the plumbing connections.
On this visit, we:
- Verified the bond and alignment: We checked that the sink was still tight against the countertop, sitting level, and not shifting under light pressure.
- Installed the faucet: We set the faucet into the pre-drilled holes, secured it from underneath, and connected the hot and cold supply lines to the existing shut-off valves.
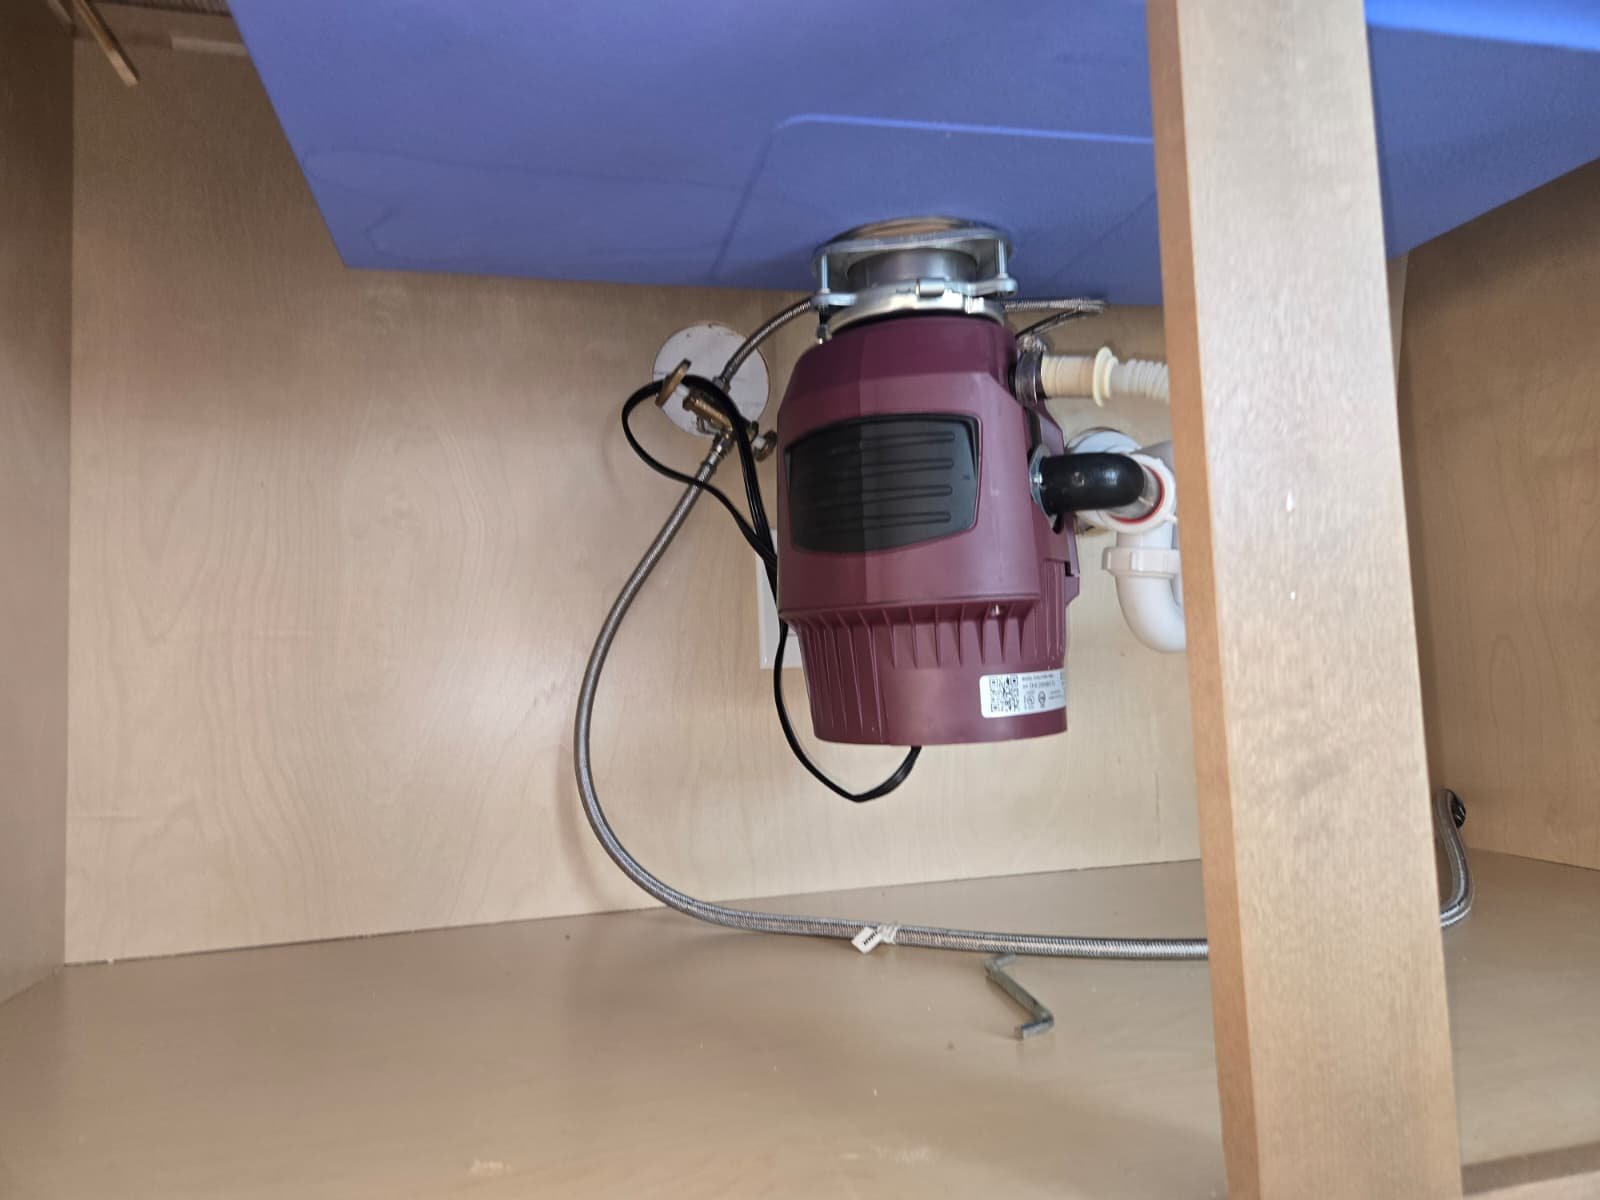
- Mounted the garbage disposal: We attached the disposal to the new sink’s drain flange, making sure the mounting ring was properly tightened and the unit was supported correctly.
- Assembled the drain and P-trap: We built a new P-trap assembly to connect the sink drain (and disposal outlet, where applicable) to the home’s existing drain line. We set the alignment to promote smooth flow and minimize the risk of clogs.
- Leak and function testing: Once everything was connected, we ran water, tested the disposal, and checked each joint for leaks or drips. We verified proper drainage and confirmed the sink was operating as expected.
For homeowners in St. Petersburg and greater Pinellas County who may have additional plumbing needs beyond the kitchen, we also offer a full range of plumbing repair services in St. Petersburg and nearby communities, so issues elsewhere in the home can be handled during the same project when appropriate.
Why This Fix Works
The long-term success of a kitchen sink replacement in a home in St. Petersburg, FL 33702 depends on three main factors: support, sealing, and proper drainage.
Support: An undermount sink is essentially hanging from the underside of the countertop. The adhesive bond and any added bracing or straps have to support not just the sink itself, but also water, dishes, pots, and daily use. By giving the adhesive a full 24 hours to cure and using additional support where the cabinet design allowed, we helped ensure the sink would not sag or separate over time.
Sealing: The silicone or adhesive along the sink rim prevents water from seeping between the sink and countertop. If that seal fails, water can get into the cabinet and potentially damage the wood, finishes, or even the subfloor. Proper surface prep and even pressure while the sealant cures make a big difference.
Drainage and venting: The P-trap under the sink holds a small amount of water that blocks sewer gases from coming back up into the home. It also directs water smoothly into the drain line. By rebuilding the P-trap and aligning everything correctly, we support good drainage and minimize the risk of future leaks or odors.
Combining these elements—secure attachment, good sealing, and a correctly built drain system—gave this St. Petersburg homeowner a solid, dependable sink setup that should serve their kitchen well for years when used normally and maintained as needed. If they ever need additional help elsewhere in the home, we can also assist with other plumbing services throughout Tampa Bay.
Pro Tips for Homeowners in St. Petersburg
Living in a coastal, high-humidity area like St. Petersburg, FL, your kitchen plumbing sees a lot of daily use and moisture. Here are a few simple tips to help keep a new sink and drain system in good shape:
- Protect the sink during the first 24 hours: If you’re having a new undermount sink installed, plan ahead for that curing time. Avoid setting anything in the sink, running water, or leaning on the countertop directly above the sink until your plumber tells you it’s ready.
- Use the garbage disposal gently: In Florida homes, disposals work hard year-round. Avoid putting fibrous foods (like celery), large bones, or grease down the disposal. Run cold water for several seconds before and after using it to help move debris through the system.
- Watch for early signs of leaks: Every few weeks, take a quick look inside the kitchen sink cabinet. Signs like dampness, swelling wood, or musty odors can point to a small leak before it becomes a bigger problem.
- Mind the humidity: Our local humidity in St. Petersburg can trap moisture in enclosed cabinets. Leaving the cabinet doors open occasionally, or using a small moisture absorber, can help keep the area around your plumbing drier.
- Test shut-off valves: Once or twice a year, gently turn your hot and cold shut-off valves under the sink off and back on. This helps keep them from seizing up, so they’ll work when you really need them.
- Know when to call for help: If you notice slow drainage, recurring clogs, or unusual disposal noises, it’s better to have a plumber take a look before anything backs up. Our team can help with routine issues or more urgent emergency plumbing services in the Tampa Bay area.
FAQ: Kitchen Sink Replacement in St. Petersburg, FL
Why did this kitchen sink replacement require two visits?
The sink needed to be bonded securely to the countertop with silicone or adhesive and then left undisturbed for about 24 hours so the bond could fully cure. If we connected the drain and started using the sink immediately, the added weight and movement could have weakened the attachment. Splitting the work into two visits allowed us to secure the sink first and then safely complete the faucet, garbage disposal, and P-trap installation afterwards.
Can you always add wood supports or straps under an undermount sink?
Not always. It depends on the cabinet design, clearances, and how the countertop was installed. Where the cabinet framing allows it, we can often add 2×4 braces or straps to help support the sink. In some cabinets, there simply isn’t a safe or practical way to do that. In those cases, the sink relies primarily on the adhesive bond and, when specified, any undermount clips installed by the countertop contractor.
Who is responsible for undermount sink clips—the plumber or the countertop contractor?
Undermount clips are typically provided and installed by the countertop contractor, since they’re part of the countertop system. As plumbers, we handle the silicone or adhesive bond and the plumbing connections. If a particular sink or countertop requires specific clips, it’s best to coordinate that with the company that installed the countertop so everything is supported according to the manufacturer’s recommendations.
Is it normal for the sink to be unusable for 24 hours during installation?
Yes, that’s normal for this type of installation. The 24-hour no-use period gives the adhesive time to cure and reach its proper strength. During that time, the sink shouldn’t be filled, leaned on, or used. We always explain this to homeowners in St. Petersburg, FL 33702 before we start, so they can plan around being without the kitchen sink for that short window.
What did you check after reconnecting the drain and garbage disposal?
Once everything was installed, we ran water through the sink and disposal, checked each connection for leaks, and listened for any unusual noises. We confirmed that the sink drained properly, the disposal operated as expected, and the cabinet interior stayed dry. We don’t leave the job until we’ve verified that the system is working normally.
Can you help with other plumbing projects in my St. Petersburg home?
Yes. In addition to sink replacements, we help homeowners with a wide range of plumbing repairs and improvements throughout St. Petersburg and the Tampa Bay area. From minor fixes to larger projects, you can learn more about our broader plumbing offerings on our St. Petersburg plumbing repair and other plumbing services pages.
Why Tampa Bay Homeowners Choose Home Therapist
When you invite a plumbing team into your kitchen, you’re trusting us with one of the most-used spaces in your home. At Home Therapist Cooling, Heating, and Plumbing, we take that seriously.
Here’s what homeowners across Tampa Bay, including St. Petersburg, can expect from us:
- Licensed, professional technicians: Our plumbers are trained, experienced, and familiar with the specific needs of Florida homes and local building standards.
- Clear, transparent communication: We explain the scope of work, why a two-visit process may be needed, what you can expect in terms of downtime, and how we’ll protect your home throughout the job.
- Clean and respectful work habits: We work carefully around new countertops, cabinets, and flooring, clean up our workspace, and treat your home as if it were our own.
- Focus on long-term reliability: We don’t just connect pipes and walk away. Our goal is to leave you with a system that works reliably and safely over time, whether it’s a kitchen sink replacement or another plumbing project.
- Commitment to Tampa Bay homeowners: We live and work in this community, and we’re proud to be a trusted local option for plumbing and HVAC services throughout the St. Petersburg area.
If you’d like to see more of what we do or hear from other homeowners, you can connect with us on social media and review platforms:
- Follow us on Facebook for updates, photos, and homeowner tips.
- See project highlights and behind-the-scenes work on our Instagram.
- Watch educational and service-related videos on our YouTube channel.
We’re also proud to be listed with trusted local and national organizations that help homeowners find reputable service providers:
- View our rating with the Better Business Bureau.
- See our profile with the Tampa Bay Chamber of Commerce.
- Find us and check reviews on Google Maps.
Need Kitchen Sink Help in St. Petersburg, FL 33702?
If you’re planning a kitchen update or dealing with a problem sink in St. Petersburg, FL 33702, our team is here to help. Whether you need a full sink replacement with faucet and garbage disposal, or you’re simply looking to address a leak or drainage issue, we can walk you through the options and handle the work with care.
From straightforward replacements to more involved plumbing projects, Home Therapist Cooling, Heating, and Plumbing is ready to support your home with reliable service, clear communication, and attention to detail. Reach out today to schedule your kitchen sink or plumbing service, and let our local Tampa Bay technicians get your kitchen back to working the way it should.


