

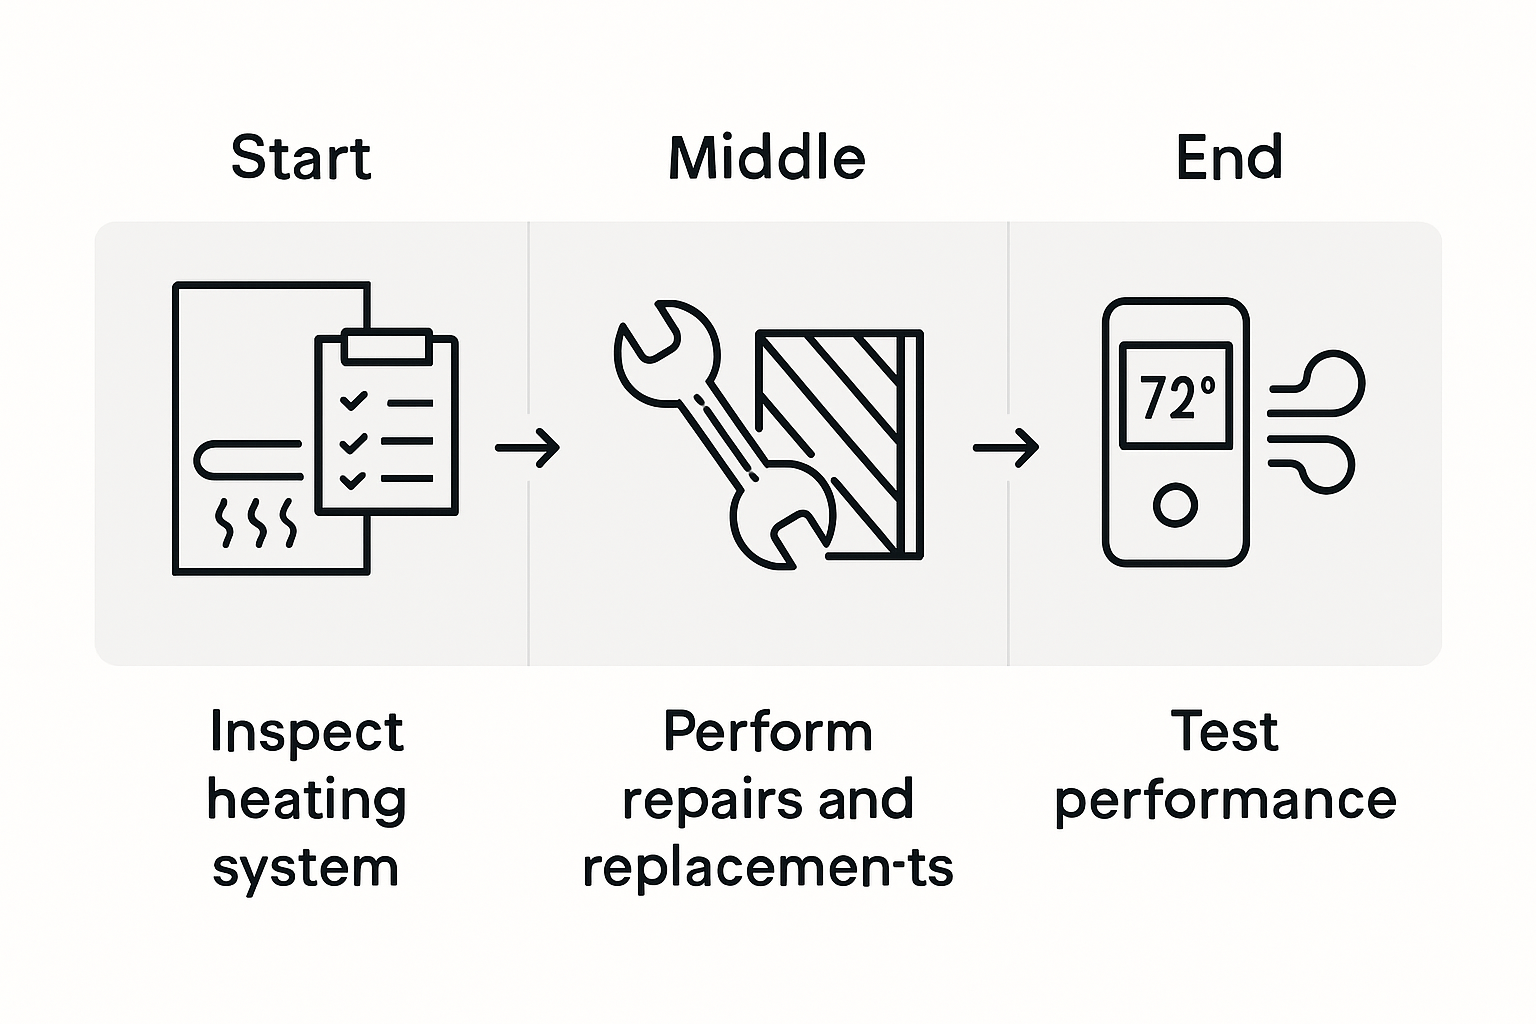
Heating System Repair Process: Step-by-step for Homeowners
Most American homeowners face unexpected heating problems just when temperatures drop the lowest. Safety concerns are real, as the U.S. Consumer Product Safety Commission reports thousands of heating system incidents each year. Taking a proactive approach to inspecting, repairing, and testing your heating system can help prevent emergencies, save on energy costs, and keep your home comfortable. This guide lays out expert-backed steps for reliable performance and peace of mind in every American household.
Table of Contents
- Step 1: Prepare for Safe Heating System Inspection
- Step 2: Identify Common Heating System Issues
- Step 3: Perform Essential Repairs and Replacement
- Step 4: Test Heating System Performance
- Step 5: Verify Safety and Restore Normal Operation
Quick Summary
| Key Insight | Explanation |
|---|---|
| 1. Inspect Heating Systems Annually | Regular inspections by qualified technicians reduce carbon monoxide risks and enhance performance, following consumer safety recommendations. |
| 2. Document System Issues Before Inspection | Noting unusual sounds, heating inconsistencies, and rising energy bills helps technicians diagnose problems accurately during evaluations. |
| 3. Understand When to Repair or Replace | Major issues may warrant replacement if repair costs exceed 50% of the system’s value or if the unit is older than 15 years. |
| 4. Conduct Thorough Performance Testing | Testing the system’s operation during a complete heating cycle identifies efficiency issues and ensures balanced heat distribution throughout the home. |
| 5. Ensure Safety Checks are Completed | Confirm all repair work is properly done and installations like carbon monoxide detectors are functional for enhanced safety. |
Step 1: Prepare for Safe Heating System Inspection
Preparing for your heating system inspection requires careful planning and attention to safety. By taking proactive steps, you can ensure a thorough and efficient evaluation of your home’s heating infrastructure.
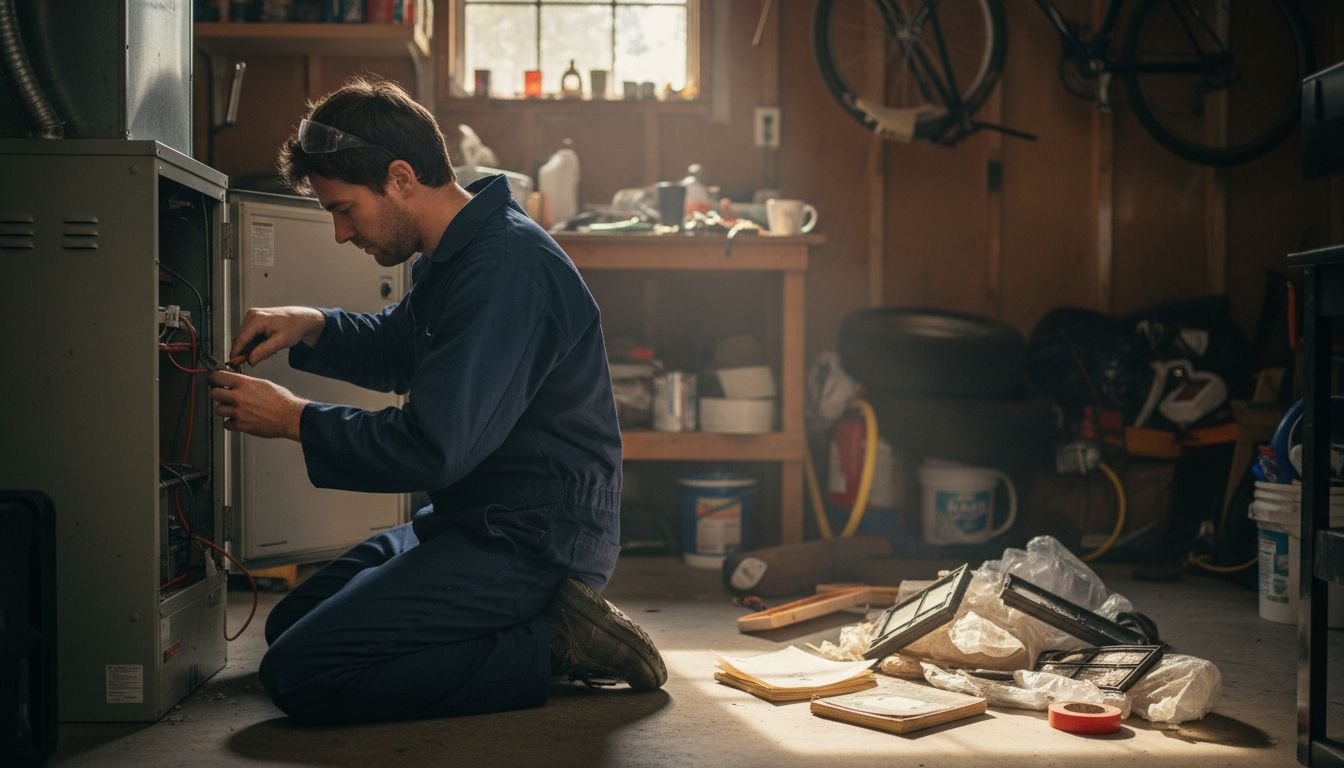
Start by reviewing your HVAC maintenance checklist and gathering all relevant documentation about your heating system. The U.S. Consumer Product Safety Commission recommends annual inspections by qualified technicians to prevent potential carbon monoxide risks and ensure optimal system performance. Clear the area around your heating unit, removing any stored items, boxes, or debris that might obstruct the technician’s access. Collect recent utility bills to help the inspector understand your system’s performance history and potential efficiency issues.
Before the technician arrives, make a list of any specific concerns or changes you’ve noticed with your heating system. Have you heard unusual noises? Experienced inconsistent heating? Observed higher energy bills? These details can help the technician diagnose potential problems more effectively. Keep your home at a comfortable temperature to allow for accurate system testing, and ensure you have easy access to your thermostat, furnace, and any related equipment. Prepare to be present during the inspection so you can ask questions and gain valuable insights about your heating system’s condition.
Step 2: Identify Common Heating System Issues
Identifying potential problems with your heating system early can save you from costly repairs and unexpected breakdowns. Understanding the warning signs will help you take proactive steps to maintain your home’s comfort and safety.
The International Association of Certified Home Inspectors highlights several critical heating system issues that homeowners should watch for carefully. ENERGY STAR recommends paying close attention to specific warning signs such as unusual noises, inconsistent heating, and unexpected increases in energy bills. Key indicators of potential heating system problems include strange sounds like banging, whistling, or grinding coming from your furnace, which could signal mechanical issues. Uneven heating throughout your home might suggest blocked vents, damaged ductwork, or a malfunctioning thermostat. Watch for signs of reduced airflow, unexpected temperature fluctuations, or rooms that feel significantly colder than others.
Additional red flags include visible rust or corrosion on your heating unit, frequent cycling on and off, pilot light discoloration, and unexplained increases in your energy costs. If you notice any of these symptoms, it’s crucial to document them carefully before your professional inspection. Take note of when these issues occur, their frequency, and any specific patterns you observe. These detailed observations will help your HVAC technician diagnose potential problems more accurately and develop the most effective solution for your heating system.
Step 3: Perform Essential Repairs and Replacement
Addressing heating system repairs requires careful assessment and strategic decision making to ensure your home remains comfortable and energy efficient. Understanding when to repair versus replace can save you significant time and money in the long run.
InterNACHI’s professional guidelines for HVAC system inspections highlight the importance of systematic evaluation before undertaking any repairs. The American Society of Home Inspectors recommends consulting qualified HVAC contractors to determine the most appropriate course of action. Some critical factors to consider include the age of your heating system, the extent of the damage, repair costs compared to replacement expenses, and overall system efficiency. Minor issues like faulty thermostats, worn belts, or electrical connection problems can often be repaired relatively inexpensively. However, significant problems such as cracked heat exchangers, persistent mechanical failures, or systems over 15 years old might necessitate complete replacement.
When making repair decisions, calculate the potential return on investment. A good rule of thumb is to replace your heating system if repair costs exceed 50% of the unit’s current value or if the system is more than a decade old. Pay attention to warning signs like rising energy bills, inconsistent heating, frequent repairs, and unusual noises. Modern heating systems offer improved energy efficiency, which can lead to substantial long term savings. Prioritize professional assessment to ensure you make the most cost effective and safe decision for your home’s heating infrastructure.
Step 4: Test Heating System Performance
Testing your heating system’s performance is a critical step in ensuring your home remains comfortable and energy efficient. This comprehensive evaluation helps you identify potential issues before they become expensive problems.
ENERGY STAR recommends carefully checking system controls to confirm proper and safe operation. InterNACHI’s professional HVAC inspection guidelines highlight the importance of methodical component testing, including evaluating burners, heat exchangers, and safety mechanisms. Start by running a complete heating cycle and observe how your system starts, operates, and shuts down. Listen for unusual sounds, check for consistent airflow from all vents, and monitor temperature stability across different rooms. Pay attention to the thermostat response time and verify that the system reaches and maintains your desired temperature without frequent cycling.
During your performance test, measure key indicators like energy consumption, temperature consistency, and system response time. Check for even heat distribution by using a digital thermometer in different areas of your home. Watch for warning signs such as uneven heating, cold spots, excessive noise, or unexpected temperature fluctuations. If you notice any irregularities, document them precisely for your professional HVAC technician. Remember that thorough performance testing can help prevent potential breakdowns and extend your heating system’s overall lifespan.
Step 5: Verify Safety and Restore Normal Operation
The final step in your heating system repair process focuses on ensuring complete safety and returning your system to optimal performance. This critical stage requires meticulous attention to detail and proactive safety measures.
Massachusetts safety guidelines recommend comprehensive professional checks to guarantee your heating system operates without potential risks. The U.S. Consumer Product Safety Commission emphasizes the importance of thorough safety inspections to prevent dangerous situations like carbon monoxide leaks. Begin by confirming all repair work has been completed correctly. Check that all electrical connections are secure, gas lines are properly sealed, and ventilation systems are unobstructed. Install or verify the functionality of carbon monoxide detectors near your heating system and in sleeping areas. Visually inspect the area around your heating unit for any signs of damage, corrosion, or unusual wear that might have been missed during earlier inspections.
Pay special attention to system controls, thermostat settings, and overall system responsiveness. Run a complete heating cycle to ensure smooth operation, listening carefully for any unusual sounds and monitoring temperature consistency. Keep flammable materials far from your heating unit and maintain a clear workspace. If you have any lingering doubts or notice anything unusual, do not hesitate to contact a professional HVAC technician for a final safety assessment. Your diligence in this final step will help protect your home, your family, and ensure your heating system continues to function safely and efficiently.
Ensure Your Heating System Runs Safely and Efficiently All Winter
Facing issues like inconsistent heating, unusual noises, or worries about carbon monoxide safety can disrupt your home’s comfort and cause stress. The article highlights crucial steps such as thorough inspections, identifying common problems, and assessing when repairs or replacements are necessary. These challenges require expertise to guarantee your heating system’s performance and safety, especially when outdated equipment or unclear signs make decisions difficult.
Trust Home Therapist Cooling, Heating, and Plumbing to provide expert guidance and service tailored to your specific heating system needs. Our certified technicians in Tampa Bay specialize in identifying and resolving heating issues with precision and care. Whether you need a detailed inspection, essential repairs, or a full system upgrade, we deliver reliable solutions that restore comfort and peace of mind.
Don’t wait for heating problems to worsen this winter. Take the proactive step now by visiting Home Therapist Cooling, Heating, and Plumbing to schedule your professional heating system service. Learn more about maintaining your home’s heating with our expert team ready to keep your environment safe and cozy. Experience the difference of a family-owned business dedicated to your satisfaction. Act today to protect your family and home comfort!
Frequently Asked Questions
- What causes the heat and AC to stop working?
The most common causes are a tripped breaker, dirty air filter, failed capacitor, or low refrigerant. In Tampa Bay, salt-air corrosion near the coast also accelerates component failure. Home Therapist offers FREE diagnosis on every visit to pinpoint the exact cause fast. Call (813) 343-2212.
- Can I fix my HVAC myself?
Minor tasks like replacing filters or resetting a tripped breaker are safe DIY fixes, but refrigerant handling, electrical repairs, and component replacements require a licensed technician. Home Therapist holds HVAC license CAC1819196 and offers FREE estimates so you know exactly what professional repair involves before committing.
- Can AC cause sinus issues?
Yes, a poorly maintained AC can worsen sinus issues by circulating mold spores, dust, and allergens through dirty filters or a contaminated evaporator coil. Tampa Bay's high humidity makes mold growth especially common. Regular tune-ups and filter changes keep indoor air quality healthy. Call Home Therapist at (813) 343-2212.
- How to repair heating and air conditioning
Start with a FREE diagnosis from a licensed technician who inspects filters, electrical components, refrigerant levels, and heat strips. Home Therapist follows a step-by-step repair process, offers same-day service, and holds license CAC1819196. With 1,300 plus five-star reviews in Tampa Bay, we restore comfort fast. Call (813) 343-2212.
- If the heater breaks down, how to repair it? Are there any good methods?
First check your thermostat settings, air filter, and breaker panel. If those are fine, call a licensed technician for a FREE diagnosis. Home Therapist provides same-day heating repair throughout Tampa Bay, identifying failed heat strips, capacitors, or control boards and restoring heat quickly. Call (813) 343-2212.
How do I prepare my heating system for an inspection?
Begin by reviewing your HVAC maintenance checklist and gathering relevant documentation about your heating system. Clear the area around the heating unit to allow easy access for the technician, and document any specific concerns or issues you’ve noticed before the appointment.
What are common signs that my heating system needs repairs?
Common signs include unusual noises like banging or grinding, inconsistent heating throughout your home, and unexpected increases in your energy bills. Observe these symptoms and document their frequency, as this information helps diagnose issues during the inspection.
When should I consider replacing my heating system instead of repairing it?
Consider replacing your heating system if repair costs exceed 50% of its value or if it is over 15 years old. Assess the extent of damage and frequency of repairs to determine if replacement is a more cost-effective choice for long-term efficiency.
How can I test the performance of my heating system?
Run a complete heating cycle to observe how the system operates, including listening for unusual sounds and checking airflow from all vents. Measure the temperature consistency in different rooms to identify any uneven heating, which may indicate underlying issues.
What safety measures should I take after completing repairs on my heating system?
Ensure all repairs have been completed correctly, including checking electrical connections and securing gas lines. Install functional carbon monoxide detectors nearby and visually inspect the area for any signs of damage or wear to maintain a safe environment.
How often should I schedule inspections for my heating system?
Schedule inspections at least once a year before the cold season to ensure optimal performance and safety. This proactive approach can help identify potential issues early and maintain the efficiency of your heating system.
About This Guide
Written and reviewed by the Home Therapist Cooling, Heating & Plumbing team, a family-owned Tampa Bay HVAC and plumbing company serving the area since 2011. Our licensed techs hold Florida HVAC license CAC1819196 and Plumbing license CFC1431159, with over 1,100 five-star reviews across Tampa, St. Petersburg, Clearwater, Wesley Chapel, Lutz, Riverview, Brandon, Valrico, Apollo Beach, Palm Harbor, Land O’ Lakes, Plant City, New Port Richey, and surrounding Tampa Bay zip codes.
Honest pricing: $279 labor minimum. Upfront quotes, no high-pressure sales, no surprise fees.
Questions about your home? Call (813) 343-2212 for a real tech, or request a callback. Available 7 days a week including evenings and weekends for emergencies.
Recommended
- HVAC Troubleshooting Steps for Homeowners: Easy Guide – Home Therapist Cooling, Heating, and Plumbing
- Role of Heating Systems – Comfort and Efficiency at Home
- Step-by-Step Guide to HVAC Maintenance for Homeowners – Home Therapist Cooling, Heating, and Plumbing
- 7 Steps to a Complete HVAC Replacement Checklist for Homeowners – Home Therapist Cooling, Heating, and Plumbing
- How to Minimize Downtime: Efficient Diesel Injection Repairs – My WordPress
More Related Articles
- Visit #7 and Still Flawless: Premium HVAC Tune-Up on Lesley Ln, Oldsmar FL 34677
- Callista Ave Condenser Fan Motor Replacement Under Warranty: Valrico, FL 33596 AC Repair
- Thermostat Not Working After HVAC Work New Port Richey FL: What Jandiel Found on Dewey Dr
- Dead Carrier Control Board on Post Oak Blvd: Electric Board Replacement in Wesley Chapel, FL 33544
- Air Conditioner Installation Repair Tampa FL Bay FL Services Review from Bonnie Wakefield


