
Shower Valve Replacement and Access Panel Installation in Clearwater, FL 33759


When your shower starts acting up, it can quickly turn daily routines into a frustrating experience. That was the case for a homeowner in Clearwater, FL 33759 who reached out to Home Therapist for help with a failing shower valve. Our plumbing technician, Adalberto, was assigned to the job and provided a careful, professional solution: a new Moen shower valve installation, along with a clean, spring-loaded plastic access panel to make future service easier.
In this walkthrough, we’ll explain what was going wrong, how we diagnosed the issue, and the step-by-step work we performed to restore safe, reliable shower use for this Clearwater home. If you’re dealing with similar problems, this gives a clear picture of what to expect from a professional shower valve replacement in the Tampa Bay area.
Understanding the Customer’s Shower Problem
The homeowner in Clearwater had a shower that was no longer performing the way it should. While every case is a bit different, common symptoms that lead to a shower valve replacement include:
- Difficulty controlling water temperature
- Sudden swings from hot to cold
- Low or inconsistent water pressure at the shower head
- Drips or leaks from the shower head, even when turned off
- A handle that feels loose, sticks, or turns too far
In this Clearwater, FL 33759 home, the existing shower valve had reached the point where repair was no longer the best long-term solution. The homeowner wanted reliability and peace of mind, not a temporary band-aid.
The specific scope of work for this visit included:
- Level 2 shower valve repair with full shower valve replacement
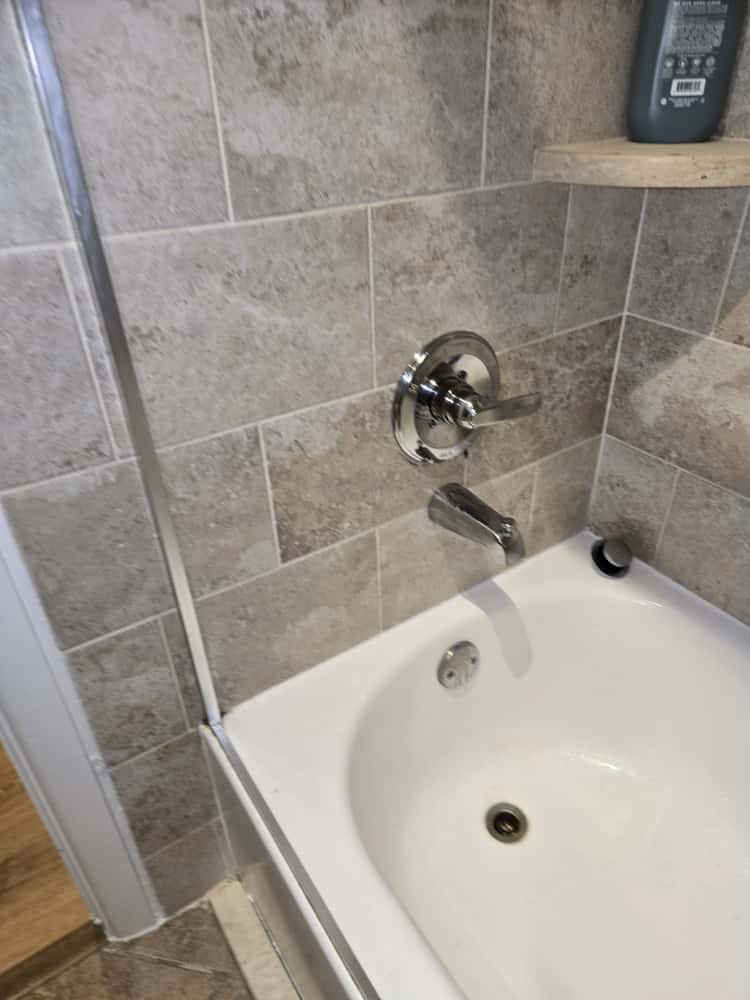
- Installation of a new Moen shower valve body
- Replacement or re-use of trim (shower head, plate, and handle) depending on the homeowner’s choice and supplied parts
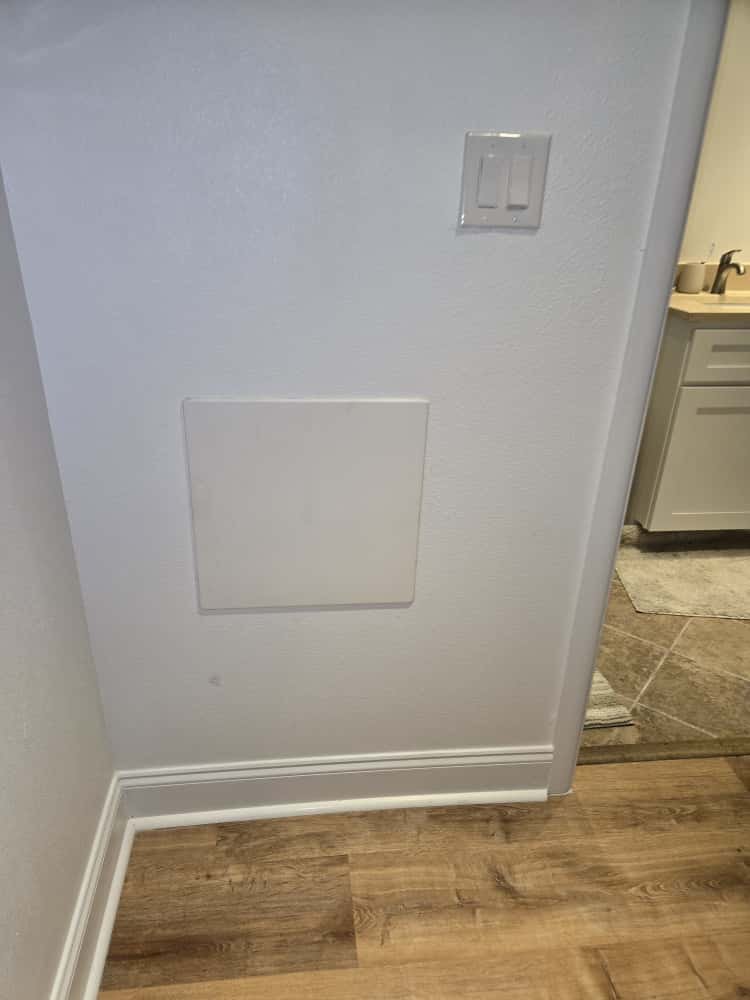
- Installation of an adjustable, spring-loaded plastic access panel to cover the new service opening behind the shower
- Application of a 15% discount on the labor cost
Because the valve body is inside the wall, this type of work can require cutting into drywall or tile to access the plumbing. As we’re always transparent with our customers, we clearly note that while we handle the plumbing and install a neat access panel, we are not responsible for patching finished sheetrock or tile beyond that panel area.
Inspection and Diagnosis in a Clearwater Bathroom
Before any parts are removed, our technician takes time to evaluate the plumbing system and confirm that a valve replacement is the right call. In this Clearwater home, Adalberto followed a step-by-step diagnostic process:
1. Initial conversation with the homeowner
Adalberto first spoke with the homeowner to understand the history of the problem:
- How long the temperature or pressure issues had been happening
- Whether the problem was getting worse over time
- Any recent work done on the bathroom or water lines
This helps rule out issues like temporary municipal water changes or other non-valve concerns.
2. Visual inspection of the shower area
Next, he carefully inspected the visible parts of the shower in this Clearwater, FL 33759 bathroom:
- Checked the current handle and trim for excessive wear, looseness, or damage
- Looked for signs of moisture or staining around the wall that could indicate hidden leaks
- Observed how the water responded when the handle was turned from cold to hot
3. Functional testing
Adalberto then ran the shower to see how the valve was performing:
- Measured how quickly the water reached a stable temperature
- Listened for unusual sounds that might point to partial obstructions or worn internal components
- Shut the water off to see if the shower head continued to drip
4. Confirming the need for a new valve
Based on the behavior of the shower valve and its age, along with the homeowner’s desire for a lasting fix, a full shower valve replacement was recommended. To ensure the right fit and quality, a compatible Moen shower valve was ordered from a local supplier, with an estimated availability time of Thursday evening to Friday morning.
With the diagnosis confirmed, the next step was planning a clean, safe installation that would protect the home and make future service simpler for this Clearwater homeowner.
Step-by-Step Shower Valve Replacement & Access Panel Installation
When the new Moen valve was ready, Adalberto returned to complete the installation. Here’s how that process typically looks for a bathroom in Clearwater or anywhere in the Tampa Bay area.
1. Protecting the work area
We start by protecting the bathroom surfaces:
- Placing drop cloths or mats to shield the floor
- Keeping tools organized to avoid unnecessary mess
- Ensuring any nearby fixtures or finishes are not scratched or damaged
Cleanliness and respect for the home are especially important in smaller bathrooms often found in Clearwater condos and single-family homes.
2. Shutting off the water safely
Before opening the wall or disconnecting any plumbing, Adalberto shut off the water supply to the shower (and, if needed, the main water supply to the home). This prevents accidental leaks and keeps the workspace safe and dry.
3. Gaining access to the existing valve
Because shower valves sit behind tile or fiberglass walls, we often need to create an access opening from the back side of the wall (typically in a closet or adjacent room). For this Clearwater, FL 33759 project:
- An opening was carefully measured and cut to reach the existing valve
- The cut was planned to match an adjustable plastic access panel size (commonly 8″ x 8″ or 14″ x 14″)
- Care was taken to avoid cutting into electrical lines or other hidden services
4. Removing the old shower valve
Once access was available, the old valve assembly was disconnected from the hot and cold water lines and the shower riser pipe. Depending on the original installation, this may involve copper, PEX, or CPVC connections. The old valve body was completely removed so the new Moen valve could be installed according to manufacturer specifications.
5. Installing the new Moen shower valve
With the wall open and the old parts removed, Adalberto installed the new Moen valve:
- Positioned the valve at the correct depth so the trim would sit flush once the shower wall plate was installed
- Secured the valve to framing for long-term stability
- Reconnected hot and cold water lines, along with the shower riser
- Verified that all joints were properly sealed and tightened
Moen valves are known for their reliability and consistent temperature control, which makes them an excellent choice for Clearwater homeowners who want fewer surprises in the shower.
6. Testing for leaks and proper operation
Before closing anything up, we always perform a thorough test:
- Slowly turned the water back on and inspected all connections for leaks
- Ran the shower to verify strong, even water flow
- Checked that the valve properly balanced hot and cold water to help prevent sudden temperature swings
7. Trim, handle, and shower head considerations
For this project in Clearwater, the labor covered the valve replacement and allowed for reusing existing trim or installing new trim if the homeowner provided it. In many cases:
- If the homeowner supplies a new Moen trim kit (head, plate, and handle), we install those components for a finished, updated look.
- If the existing trim is in good shape and compatible with the new valve, we can leave it in place to keep costs down.
This flexible approach lets Clearwater homeowners decide where to invest—full visual upgrade, or primarily functional improvement.
8. Installing the adjustable plastic access panel
One of the most valuable parts of this project was the addition of a spring-loaded plastic access panel. After confirming no leaks and proper operation:
- The cutout behind the shower was cleaned up for a neat fit
- An appropriately sized access panel (either 8″ x 8″ or 14″ x 14″) was chosen
- The panel was installed so it sits flush and can be easily opened in the future
This access panel provides a clean, finished look while protecting the opening. It also makes any future maintenance much simpler—no more cutting into drywall just to reach the shower valve.
9. Final clean-up and homeowner walkthrough
Adalberto wrapped up by cleaning the work area, removing debris, and walking the homeowner through the new setup:
- Explained how the new Moen valve works
- Reviewed what the access panel is for and how it opens
- Answered any questions about long-term care and what to watch for
A 15% labor discount was applied as quoted, and the homeowner in Clearwater, FL 33759 was left with a safer, more reliable shower system.
Why This Shower Valve Fix Works
A properly installed modern shower valve does more than just turn water on and off. It plays a big role in comfort and safety, especially in humid, warm climates like Clearwater and the greater Tampa Bay area.
1. Improved temperature control
Modern Moen valves are designed to balance hot and cold water pressure. When someone else in the home flushes a toilet or starts a faucet, the valve helps minimize sudden spikes of hot or cold water. This is especially important in busy households and multi-bathroom homes throughout Clearwater.
2. Reduced leak risk inside the wall
Old valves can develop internal leaks that you can’t see. Those slow drips inside the wall can lead to:
- Hidden water damage
- Mold or mildew growth
- Swollen drywall or soft spots around the shower
By replacing the aging valve and pressure-testing the new connections, we greatly reduce the risk of hidden leaks, which is crucial in Florida’s already humid environment.
3. Easier future maintenance with an access panel
Without an access panel, even a small future adjustment can require cutting into the wall again. The spring-loaded plastic access panel installed in this Clearwater bathroom makes it simple to:
- Inspect the valve and connections
- Service or replace internal cartridges
- Check for leaks during future remodels or plumbing upgrades
That means lower disruption and lower long-term costs for the homeowner.
Pro Tips for Clearwater, FL Homeowners with Showers
Whether you live near the heart of Clearwater or in nearby neighborhoods around the 33759 area, these tips can help extend the life of your shower plumbing:
- Watch for early signs of valve trouble. If your shower starts taking longer to warm up, the handle becomes hard to turn, or you notice occasional temperature swings, don’t ignore it. Early inspection can prevent water damage and bigger repairs.
- Check walls near the shower for soft spots or discoloration. Gently press on walls and baseboards around your tub or shower. Any softness, bubbling paint, or staining can indicate a slow leak behind the surface.
- Use your access panel periodically. If you already have an access panel like the Clearwater homeowner in this project, open it once or twice a year and take a quick look inside for moisture or corrosion.
- Maintain consistent water pressure. Sudden high-pressure spikes can stress valves and connections. If you notice unusually strong or weak pressure throughout your home, consider scheduling an evaluation with our team.
- Plan ahead for bathroom upgrades. If you’re thinking about updating your shower trim or tile, that can be a great time to also replace the valve behind the wall. This helps keep your bathroom in sync—both the visible and hidden parts.
- Schedule periodic plumbing checkups. Clearwater’s coastal environment can be tough on plumbing over time. A routine visit from our local Tampa Bay plumbers can help spot issues early. You can learn more about options on our ongoing plumbing maintenance plans page.
Why Clearwater Homeowners Choose Home Therapist
At Home Therapist Cooling, Heating, and Plumbing, we treat every bathroom, kitchen, and utility room as if it were in our own homes. For this shower valve replacement in Clearwater, FL 33759, that meant:
- Assigning a skilled, licensed plumber like Adalberto to diagnose and perform the work
- Communicating clearly about the need to cut drywall, and offering a clean, spring-loaded access panel solution
- Respecting the home with drop cloths, organization, and full clean-up
- Providing honest options around reusing existing trim versus installing homeowner-supplied parts
- Delivering the quoted work with a 15% labor discount as promised
If you’d like to see how similar projects look in other Tampa Bay homes, you can read about another shower valve and handle replacement project in Riverview. For more extensive shower work, such as relocations or larger remodels, our team also offers comprehensive shower installation and repair services in Tampa Bay and even professional shower installation and relocation support when layout changes are needed.
Throughout Clearwater, from neighborhoods close to the 33759 area to shopping hubs like the Countryside area of Clearwater, homeowners trust us to keep their plumbing systems safe, reliable, and easy to maintain.
Need Shower Valve or Bathroom Plumbing Help in Clearwater?
If your shower in Clearwater, FL isn’t working like it used to—whether it’s temperature swings, constant dripping, or a handle that feels worn out—our local Tampa Bay plumbing team is here to help.
We can:
- Diagnose valve and trim issues
- Replace aging shower valves with quality brands like Moen
- Install clean, adjustable access panels for smarter future maintenance
- Review your entire bathroom plumbing system for hidden concerns
To schedule professional shower valve replacement or other plumbing repair in Clearwater or anywhere in the Tampa Bay area, reach out to Home Therapist Cooling, Heating, and Plumbing today. We’ll walk you through your options, provide clear pricing, and deliver the steady, reliable service your home deserves.


