

Beginner HVAC Maintenance Guide for Homeowners Made Easy
Every year, millions of American homeowners tackle basic HVAC maintenance, yet nearly half admit they overlook simple steps that could extend their system’s lifespan. A well-maintained HVAC system not only saves money but also improves comfort and air quality throughout your home. This guide shares straightforward advice to help you gather essential tools, follow safe procedures, and keep your system running efficiently—making it easier to protect both your investment and your family’s well being.
Table of Contents
- Step 1: Gather Essential Tools And Safety Gear
- Step 2: Turn Off Power And Inspect HVAC Components
- Step 3: Clean Or Replace Air Filters Properly
- Step 4: Check And Clear Drain Lines For Blockages
- Step 5: Test System Performance After Maintenance
Quick Summary
| Important Insight | Explanation |
|---|---|
| 1. Gather Essential Safety Gear | Use gloves, safety glasses, and a respirator to protect yourself during HVAC maintenance tasks. |
| 2. Always Turn Off Power First | Disconnect electrical power before starting any maintenance to prevent accidents and ensure safety. |
| 3. Regularly Clean Air Filters | Maintain clean air filters to improve HVAC efficiency and air quality, changing them every three months. |
| 4. Check Drain Lines for Blockages | Inspect and clear condensate drain lines regularly to avoid water damage and maintain system performance. |
| 5. Test System Performance Post-Maintenance | After maintenance, ensure the system operates correctly and watch for any unusual sounds or issues. |
Step 1: Gather Essential Tools and Safety Gear
Before diving into HVAC maintenance, you need the right tools and protective equipment to keep yourself safe and work efficiently. Piedmont Technical College recommends gathering a comprehensive set of tools that will help you tackle home cooling and heating projects with confidence.
Start with personal safety equipment first. A good pair of leather work gloves will protect your hands from sharp metal edges and potential electrical hazards. Safety glasses with side shields are non negotiable they shield your eyes from debris and unexpected sparks. For respiratory protection especially when working in dusty areas or around potential allergens, consider wearing a respirator. The American Society of Home Inspectors emphasizes the importance of having respiratory protection during system inspections.
Your basic toolkit should include several key items: adjustable wrenches in different sizes, screwdrivers with insulated handles, a reliable flashlight for examining dark spaces, and a utility knife for cutting materials. Pro tip: Keep all your tools organized in a sturdy toolbox or bag so you can quickly access what you need without searching around. With the right gear ready you are now prepared to start your HVAC maintenance safely and professionally.
Step 2: Turn Off Power and Inspect HVAC Components
Before performing any maintenance on your home heating or cooling system, shutting off power is absolutely critical for your safety. ENERGY STAR recommends carefully disconnecting electrical power to prevent any potential accidents during your inspection and maintenance work.
Start by locating your home’s main electrical panel and switching off the circuit breaker that controls your HVAC system. This ensures zero electrical current running to your equipment while you work. Next, verify the power is truly off by attempting to turn on your thermostat or system controls. With power disconnected, you can now conduct a thorough visual inspection of your HVAC components. Look for signs of wear like frayed wires, rust, or corrosion on electrical connections. NC State Extension advises that homeowners should have heating and cooling systems professionally checked at least once annually, but performing your own initial visual inspection can help catch potential issues early.
Pro tip: Always use a non contact voltage tester to double check that no electrical current is present before touching any components. This extra step provides an additional layer of safety beyond simply switching off the circuit breaker. With power safely managed, you are now ready to move forward with a careful examination of your HVAC system’s critical parts.
Step 3: Clean or Replace Air Filters Properly
The U.S. Department of Energy emphasizes that maintaining clean air filters is crucial for your HVAC system’s efficiency and performance. Dirty filters can significantly reduce airflow and force your system to work harder which leads to increased energy consumption and potential equipment damage.
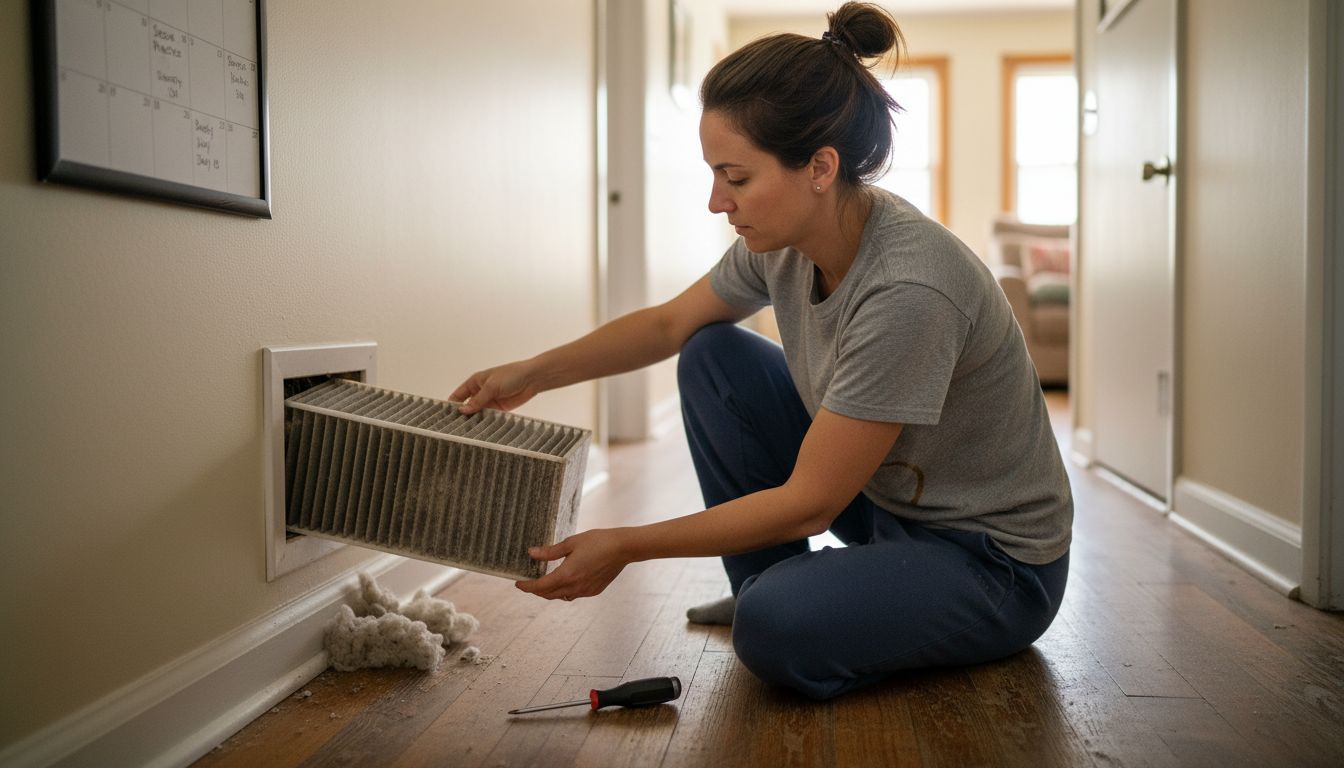
To clean or replace your air filter, start by locating the filter compartment typically found near the return air duct or inside the air handler. Carefully remove the existing filter and note its size and direction of airflow. If you are replacing the filter select a new one with the same dimensions and airflow specifications. ENERGY STAR recommends checking filters monthly and changing them at least every three months to maintain optimal system performance.
Pro tip: When inserting a new filter make sure the arrow indicating airflow direction points toward the furnace or air handler. This ensures proper air movement through your system. If you are cleaning a reusable filter use a vacuum cleaner with a soft brush attachment to gently remove dust and debris. Remember clean filters not only improve your HVAC system’s efficiency but also contribute to better indoor air quality and reduce strain on your equipment.
Step 4: Check and Clear Drain Lines for Blockages
ENERGY STAR recommends regularly checking and inspecting the condensate drain lines in your HVAC system to prevent potential water damage and maintain proper indoor humidity levels. These drain lines are critical for removing moisture created during the cooling process and can quickly become blocked with algae, mold, and debris.
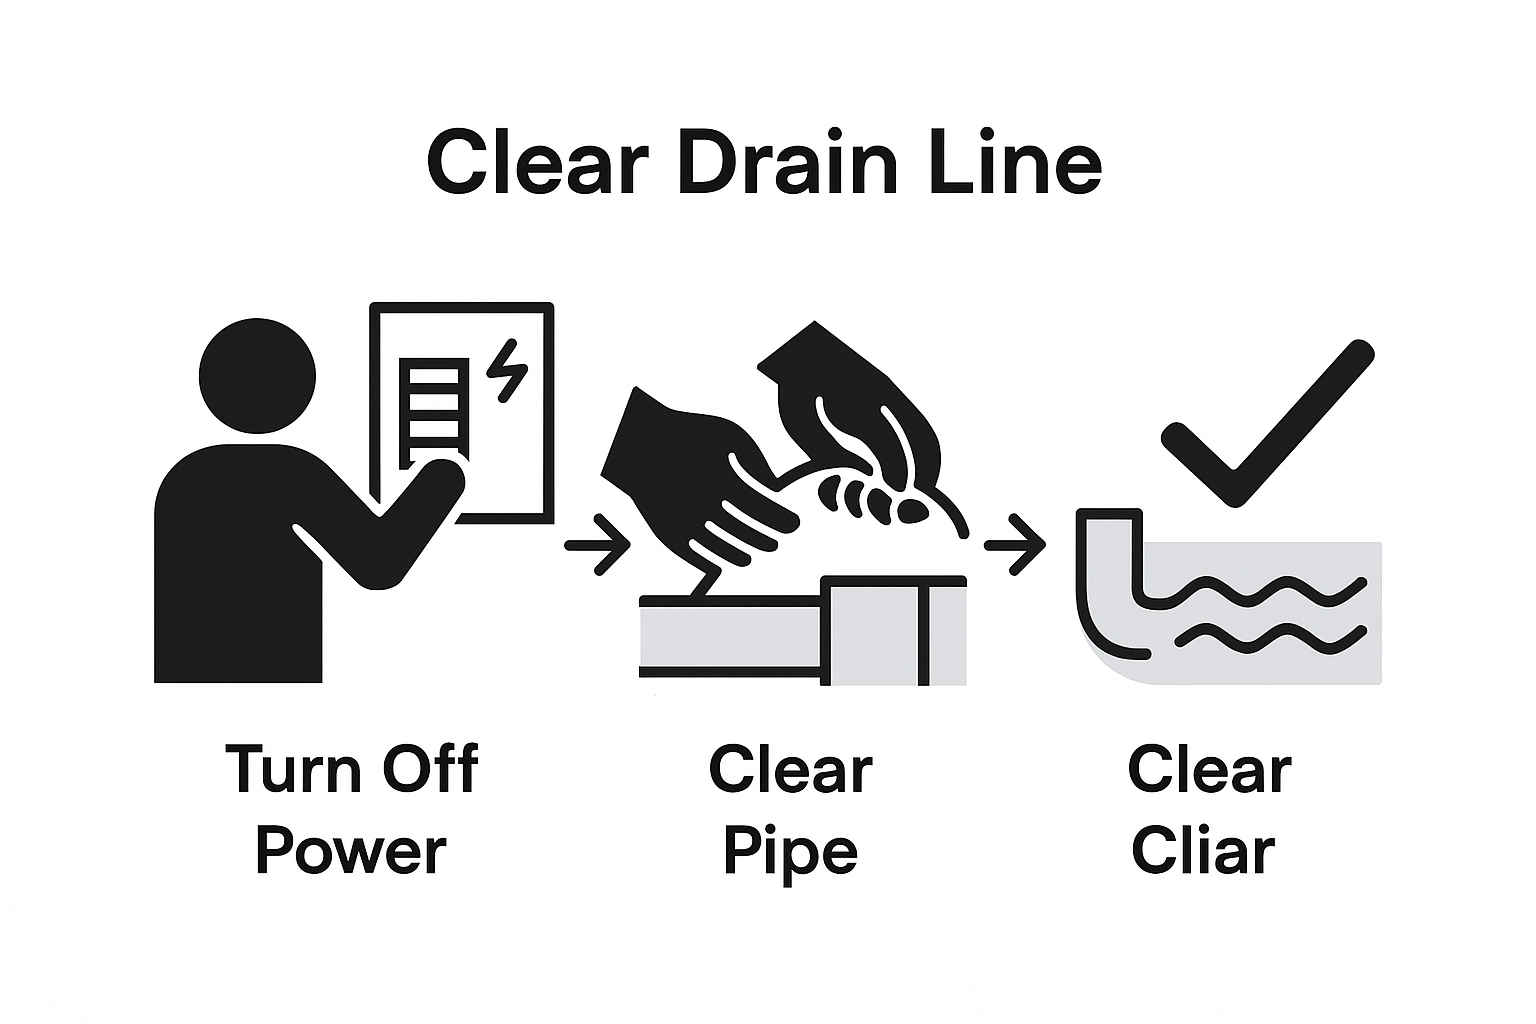
To clear your drain lines, start by locating the primary drain line typically found near your indoor air handler or furnace. The U.S. Department of Energy suggests using a stiff wire to gently clear any potential blockages. Begin by turning off your HVAC system at the circuit breaker for safety. Carefully insert the wire into the drain line opening to dislodge any accumulated debris. If you notice standing water or significant buildup, consider using a wet vacuum or specialized drain line cleaning solution to remove stubborn clogs.
Pro tip: Create a maintenance schedule to check your drain lines every few months. Signs of a clogged drain line include water pooling around your indoor unit, unexplained musty odors, or your system showing error codes. Catching and clearing these blockages early can prevent costly water damage and keep your HVAC system running smoothly.
Step 5: Test System Performance After Maintenance
ENERGY STAR suggests thoroughly checking your HVAC system controls to ensure proper and safe operation after completing maintenance. This final step is crucial for verifying that all your hard work has restored your system to optimal functioning and identifying any potential issues that might require professional attention.
Begin by turning the power back on and setting your thermostat to a comfortable temperature. Listen carefully for any unusual sounds during startup and observe the system’s performance. The ENERGY STAR Heating and Cooling Guide recommends checking that the system turns on and off at the programmed temperatures and maintains consistent airflow. Pay attention to details like how quickly the system reaches the desired temperature, whether airflow feels strong and consistent, and if there are any strange noises or vibrations.
Pro tip: If you notice anything unusual like short cycling sudden temperature fluctuations or weak airflow do not ignore these signs. While some minor adjustments are normal after maintenance persistent issues might indicate a need for professional inspection. Document any observations you have during this test run which can be helpful if you need to consult with an HVAC technician later.
Keep Your HVAC System Safe and Efficient with Expert Help
Maintaining your HVAC system can feel overwhelming especially when handling crucial tasks like turning off power safely or clearing drain line blockages as detailed in the Beginner HVAC Maintenance Guide for Homeowners Made Easy. Common challenges like identifying worn components and ensuring proper airflow direction can put your system at risk and create frustration.
You do not have to face these issues alone. Our certified technicians at Home Therapist Cooling Heating and Plumbing specialize in delivering reliable and professional HVAC services tailored to your home’s unique needs. Whether you want peace of mind from a thorough inspection or expert assistance replacing or cleaning air filters correctly, we are here to support you.
Take control of your home comfort today by contacting us for a routine maintenance check or emergency repair. Visit https://callhometherapist.com now to schedule your appointment and ensure your HVAC system operates safely and efficiently through every season.
Frequently Asked Questions
What tools do I need for basic HVAC maintenance?
You will need essential tools such as adjustable wrenches, insulated screwdrivers, a flashlight, and a utility knife. Begin by gathering these items along with safety gear like gloves and safety glasses before starting any maintenance work.
How do I safely turn off power to my HVAC system?
Locate your home’s main electrical panel and switch off the circuit breaker designated for your HVAC system. Confirm the power is off by attempting to turn on the thermostat or system controls before proceeding with any maintenance.
How often should I check and replace my air filters?
You should inspect your air filters monthly and replace them every three months at a minimum. Regularly maintaining clean filters improves HVAC efficiency and indoor air quality, so make this a part of your routine.
What should I do if I find a blockage in my HVAC drain lines?
If you discover a blockage, start by turning off your HVAC system and using a stiff wire to gently clear the drain line. If standing water is present, use a wet vacuum or appropriate cleaning solution to remove clogs and ensure proper drainage.
How can I test my HVAC system performance after maintenance?
Turn the power back on and set your thermostat to a comfortable setting. Observe the system for unusual sounds, measure airflow consistency, and check if it maintains the desired temperature to confirm everything is functioning correctly.
What are the signs that I need to call a professional for my HVAC system?
If you notice issues such as strange noises, short cycling, or temperature fluctuations that persist after maintenance, these could indicate underlying problems. Document any observations and consider consulting a professional for a thorough inspection.
Recommended
- HVAC Troubleshooting Steps for Homeowners: Easy Guide – Home Therapist Cooling, Heating, and Plumbing
- 7 Essential HVAC Maintenance Checklist Tips for Homeowners – Home Therapist Cooling, Heating, and Plumbing
- The Essential Guide to Regular HVAC Maintenance – Home Therapist Cooling, Heating, and Plumbing
- Step-by-Step Guide to HVAC Maintenance for Homeowners – Home Therapist Cooling, Heating, and Plumbing
- Preventive Maintenance Checklist for Diesel Injection Pros – My WordPress


