

How to Troubleshoot AC: A Step-by-Step Guide for Homeowners
Sweltering days are all too common in Tampa Bay, and when your air conditioning starts acting up, every minute feels longer. Before you schedule a service call, a few simple troubleshooting steps can help you pinpoint issues and restore comfort. By tackling fundamentals like proper thermostat operation and filter maintenance, you may save time, money, and avoid unnecessary disruptions to your daily routine.
Table of Contents
- Step 1: Prepare Your AC Unit For Inspection
- Step 2: Check Power And Thermostat Settings
- Step 3: Inspect Air Filters And Vents
- Step 4: Examine Outdoor Unit And Components
- Step 5: Test AC Performance And Cooling Output
Quick Summary
| Key Point | Explanation |
|---|---|
| 1. Clear Access for Inspection | Maintain a 2-3 foot clearance around the AC unit to facilitate a thorough inspection by technicians. |
| 2. Check Thermostat Settings | Ensure the thermostat is powered and set to cooling mode; unrealistic temperature settings waste energy. |
| 3. Inspect Air Filters Regularly | Regularly check and replace air filters every 30-90 days to ensure efficient airflow and indoor air quality. |
| 4. Examine Outdoor Unit | Visually inspect the outdoor unit for debris, damage, and proper airflow clearance to maintain performance. |
| 5. Test Cooling Performance | Measure temperature differences and airflow to verify system efficiency and identify potential issues early. |
Step 1: Prepare Your AC Unit for Inspection
Preparing your AC unit for a professional inspection involves creating optimal accessibility and ensuring key components are ready for evaluation. A well-prepared system helps technicians conduct a thorough and efficient assessment of your cooling equipment.
Start by clearing a minimum 2-3 foot perimeter around your outdoor AC unit and indoor air handler. Remove any debris, vegetation, or stored items that might obstruct access. This allows inspectors to examine the entire system without physical barriers.
Your preparation checklist should include:
- Clear outdoor unit of leaves, branches, and grass clippings
- Trim surrounding vegetation at least 24 inches away
- Remove any stored boxes or equipment near the system
- Ensure all access panels can be easily opened
- Check that electrical outlets near the unit are functional
Next, focus on your home’s internal duct system. Inspect ducts for visible damage such as loose connections, visible tears, or areas with inadequate insulation. Look for signs of wear around vents and registers, which can indicate potential system inefficiencies.
Professional inspectors appreciate homeowners who take time to prepare their systems, making the evaluation process smoother and more comprehensive.
Pro tip: Keep maintenance records and recent filter replacement documentation available for the technician to review during the inspection.
Step 2: Check Power and Thermostat Settings
Before diving into complex AC troubleshooting, start with the most fundamental diagnostic step: verifying your system’s power and thermostat configuration. Understanding these basic settings can save you time and potentially avoid unnecessary service calls.
Begin by examining your thermostat. Verify the thermostat’s power supply and ensure it’s functioning correctly. Check for these critical elements:
- Confirm the display is illuminated
- Replace batteries if the screen is blank
- Check that circuit breakers haven’t tripped
- Verify the unit is switched to cooling mode
- Ensure temperature settings are appropriate
When setting your thermostat, remember that programmable thermostats can optimize energy efficiency. Avoid setting temperatures unrealistically low, as this doesn’t cool your home faster and only wastes energy. Instead, set a reasonable target temperature that balances comfort and efficiency.
Proper thermostat settings are the gateway to effective cooling and energy management.
Pro tip: Keep a small screwdriver nearby to check thermostat connections and battery compartments during your initial inspection.
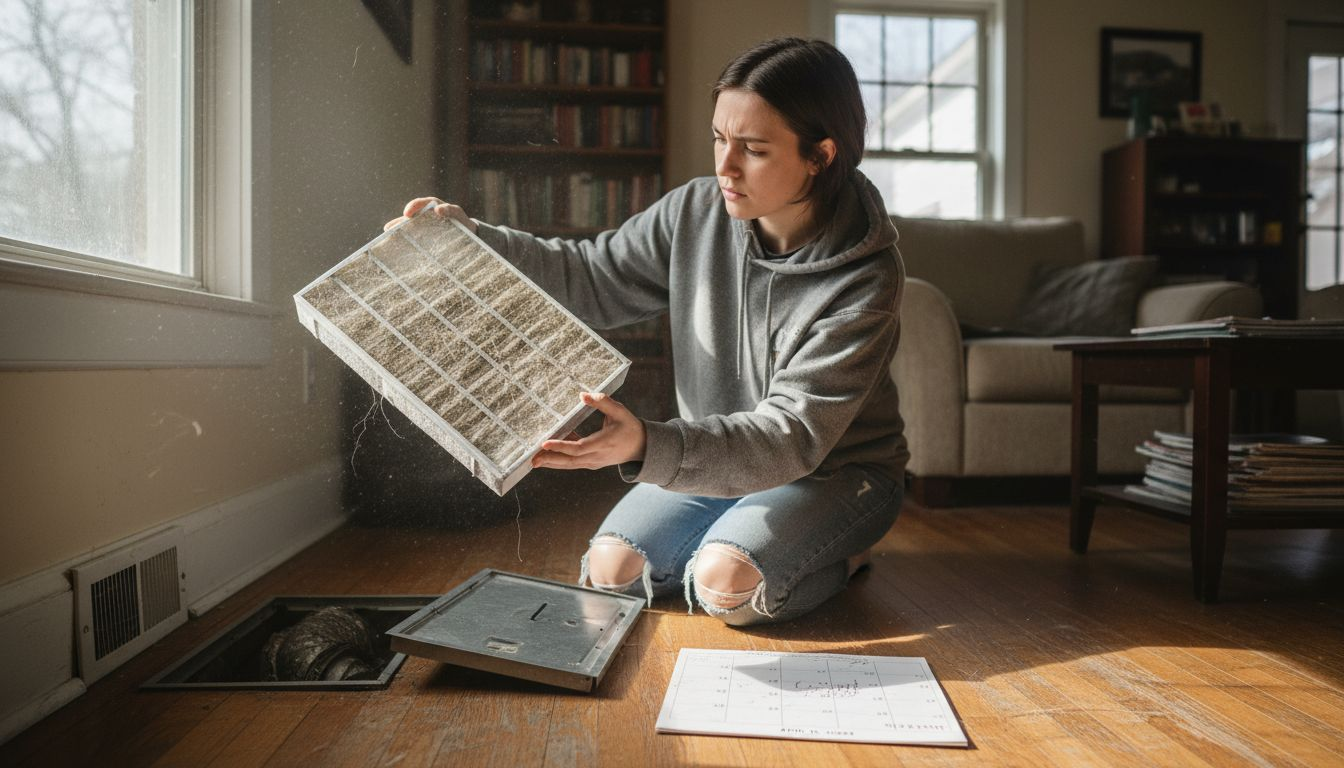
Step 3: Inspect Air Filters and Vents
Ensuring your AC system runs efficiently starts with a thorough inspection of air filters and vents. These components play a critical role in maintaining optimal cooling performance and indoor air quality.
Clogged air filters can significantly impact system performance, so begin by locating your system’s air filter. Check for these key indicators of filter condition:
- Visible dust and debris accumulation
- Discoloration or dark spots
- Reduced airflow through vents
- Filter age (typically replace every 30-90 days)
- Signs of moisture or mold growth
Carefully remove the filter and hold it up to a light source. If light cannot pass through, it’s time for a replacement. When examining vents, ensure they are completely unobstructed. Move furniture, curtains, or other items that might block airflow and prevent proper circulation.
A clean filter is your first line of defense against inefficient cooling and potential system damage.
Pro tip: Mark your calendar with filter replacement dates to maintain a consistent maintenance schedule.
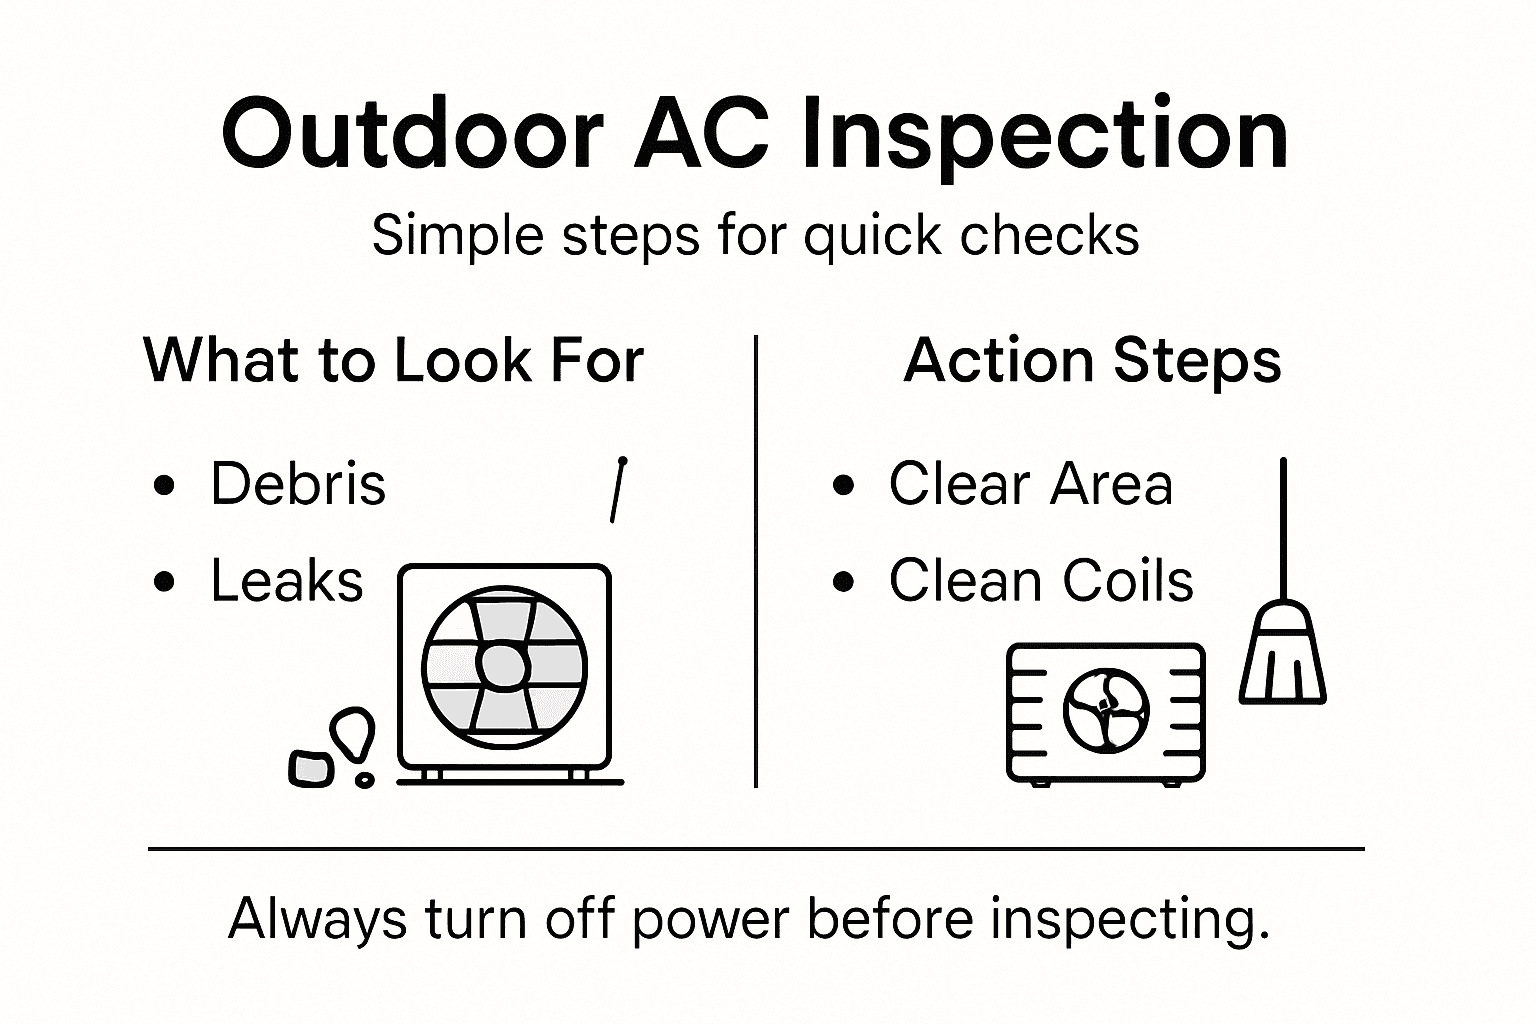
Step 4: Examine Outdoor Unit and Components
Your AC’s outdoor unit is the critical heart of the cooling system, and a thorough visual inspection can reveal potential performance issues before they become costly problems. Understanding what to look for can save you time and money on repairs.
Outdoor AC units require careful examination for optimal performance. Check these key components and conditions:
- Clear surrounding area of vegetation and debris
- Inspect condenser coils for dirt or damage
- Check fan blades for signs of wear or imbalance
- Look for any visible refrigerant leaks
- Examine electrical connections for corrosion
Pay special attention to the minimum clearance requirements. Ensure at least 12-24 inches of space around the unit to allow proper airflow. Remove any plants, leaves, or objects blocking the unit’s ventilation. Listen for unusual sounds like grinding or squealing, which could indicate mechanical issues with the fan motor or compressor.
A well-maintained outdoor unit is essential for efficient cooling and long-term system performance.
Pro tip: Keep a garden sprayer filled with gentle cleaning solution nearby to quickly clean condenser coils during your routine inspections.
Step 5: Test AC Performance and Cooling Output
Evaluating your air conditioning system’s performance goes beyond simply feeling cool air. A comprehensive assessment helps you understand whether your AC is functioning at its optimal capacity and identify potential issues before they become major problems.
Performance testing requires systematic evaluation of several key indicators. Follow these steps to gauge your AC’s cooling efficiency:
- Measure temperature difference between supply and return air
- Check airflow volume at various vents
- Monitor cooling time for specific room temperatures
- Compare current performance with system’s rated capacity
- Listen for unusual sounds during operation
Use a digital thermometer to measure the temperature differential between the air entering and leaving your AC vents. A properly functioning system should typically show a 15-20 degree temperature drop. Pay attention to how quickly rooms cool down and whether some areas feel significantly warmer or cooler than others.
Consistent and reliable cooling is the hallmark of a well-maintained air conditioning system.
Pro tip: Keep a log of your performance tests to track your AC’s efficiency over time and identify gradual performance changes.
Use this table to compare signs of AC efficiency and potential underlying issues:
| Indicator | Signs of Efficiency | Potential Issues |
|---|---|---|
| Temperature Drop (Supply/Return) | 15-20°F difference maintained | Low refrigerant, dirty coils |
| Airflow Through Vents | Strong, steady airflow | Blocked ducts, dirty filter |
| Cooling Time per Room | Rapid, uniform cooling | Insulation gaps, undersized AC |
| Outdoor Unit Noise | Quiet operation | Motor wear, loose components |
Here’s a quick reference table outlining common AC inspection steps and what they reveal:
| Inspection Step | What It Reveals | Consequences if Overlooked |
|---|---|---|
| Clear Unit Perimeter | Accessibility, safety | Limited inspection, fire risk |
| Check Thermostat | System responsiveness | False AC failures, wasted service |
| Inspect Air Filter | Airflow, air quality | Reduced efficiency, system strain |
| Examine Outdoor Unit | Component wear, blockage | Overheating, repair needs |
| Test Cooling Performance | Operation efficiency | High energy bills, uneven cooling |
Keep Your AC Running Smoothly with Expert Help from Home Therapist
Troubleshooting your air conditioner can be challenging when you face issues like clogged filters, thermostat errors, or outdoor unit problems as covered in our step-by-step guide. These common pain points can lead to inefficient cooling, increased energy bills, and discomfort in your home. If you want to avoid guesswork and protect your investment, turning to trusted professionals is the best solution. Our certified technicians understand key concepts like airflow, temperature differential, and outdoor unit clearance to restore your system’s peak performance.
Don’t wait until minor troubles turn into costly repairs. Explore our HVAC Archives – Home Therapist Cooling, Heating, and Plumbing for proven solutions and real customer stories on how we solve cooling challenges. Visit our Case Studies Archives – Home Therapist Cooling, Heating, and Plumbing to learn how we deliver lasting comfort. Ready for expert service that brings peace of mind and keeps your AC efficient year-round Visit us today at Home Therapist Cooling, Heating, and Plumbing to schedule your reliable HVAC inspection or repair.
Frequently Asked Questions
How do I prepare my AC unit for inspection?
To prepare your AC unit for inspection, clear a minimum 2-3 foot perimeter around both the outdoor unit and indoor air handler. Remove debris, vegetation, and items that obstruct access to allow technicians to examine the entire system efficiently.
What should I check before testing my AC system?
Before testing your AC system, verify that the thermostat is functioning properly and set to cooling mode. Confirm that the display is illuminated, check for tripped circuit breakers, and ensure the temperature settings are appropriate for your cooling needs.
How can I tell if my air filter needs to be replaced?
You can determine if your air filter needs replacement by inspecting it for visible dust and debris buildup. If light cannot pass through the filter when held up to a light source, replace it immediately to maintain efficiency; typically, filters should be changed every 30-90 days.
What are the signs of a problem with my outdoor AC unit?
Signs of a problem with your outdoor AC unit include visible dirt or damage on the condenser coils, unusual noises such as grinding or squealing, and evidence of refrigerant leaks. Regularly inspect for these issues and maintain a clear area around the unit to ensure optimal performance.
How do I test the cooling performance of my AC?
To test the cooling performance of your AC, measure the temperature difference between the air entering and leaving the vents using a digital thermometer. A properly functioning system should exhibit a temperature drop of 15-20 degrees Fahrenheit, indicating good performance and efficiency.
What steps should I take if my AC is not cooling properly?
If your AC is not cooling properly, start by checking the thermostat settings, ensuring it is switched to cooling mode and that the temperature is set correctly. Inspect the air filter, outdoor unit, and vents for obstructions, and consider making necessary adjustments or seeking professional assistance to address any identified issues.
Recommended
- HVAC Troubleshooting Steps for Homeowners: Easy Guide – Home Therapist Cooling, Heating, and Plumbing
- Air Conditioning Maintenance Guide for Tampa Bay Homes – Home Therapist Cooling, Heating, and Plumbing
- Heating System Repair Process: Step-by-Step for Homeowners
- 7 Essential HVAC Maintenance Checklist Tips for Homeowners – Home Therapist Cooling, Heating, and Plumbing
- Broan repair In Irvine Orange CA


