

How to prepare your AC for summer: Tampa Bay guide
Tampa Bay summers are no joke. When temperatures climb past 95°F and humidity hangs above 70%, your air conditioner becomes the most important appliance in your home. Without proper preparation, that system works harder, costs more, and breaks down at the worst possible time. HVAC accounts for over 40% of Florida home energy use, but a little maintenance now can cut your summer bills by up to 30%. This guide walks you through every practical step, from swapping filters to cleaning your condenser, so you stay cool and comfortable all season long without surprise repair bills.
Table of Contents
- Checklist: Tools and materials for AC summer prep
- Step 1: Replace or clean your AC filter
- Step 2: Clean and inspect the outdoor condenser unit
- Step 3: Optimize your thermostat and system settings
- Step 4: Seal ducts and check for leaks
- Step 5: When to schedule professional AC service
- The hidden costs (and savings) of skipping AC prep in Tampa Bay
- Professional help for stress-free AC summers
- Frequently asked questions
Key Takeaways
| Point | Details |
|---|---|
| Monthly filter changes | Swapping out AC filters regularly keeps the system efficient and air clean in Tampa Bay. |
| Outdoor unit care | Clearing debris and rinsing your condenser prevents damage and boosts cooling performance. |
| Smart thermostat settings | Setting your thermostat to 78°F and using smart controls can cut summer cooling costs by up to 8% per degree. |
| Check and seal ducts | Leaky ducts waste energy—sealing them can save you up to 30% on your power bill. |
| Schedule pro service | Annual professional tune-ups catch hidden issues and keep your AC working at its best all summer. |
Checklist: Tools and materials for AC summer prep
Before you start, gather everything you need. Stopping mid-task to run to the hardware store wastes time and breaks your focus. Here’s what most Tampa Bay homeowners will need:
| Tool or material | Purpose |
|---|---|
| Replacement air filter (correct size) | Restore airflow and air quality |
| Garden hose | Rinse outdoor condenser fins |
| Flathead and Phillips screwdriver | Open panels and access components |
| Fin comb | Straighten bent condenser fins |
| Work gloves | Protect hands from sharp metal edges |
| Mild household cleaner | Wipe down accessible surfaces |
| Flashlight | Inspect dark corners of the unit |
| Duct tape or foil tape | Seal small duct gaps temporarily |
For homeowners who want to go a step further, a few optional items add real value:
- Coil cleaner spray for deep condenser cleaning
- Corrosion-resistant protective coating spray (especially useful near Tampa Bay’s coast)
- Fresh batteries or a backup power source for your thermostat
- Incense sticks for duct leak detection (more on that in Step 4)
Pro Tip: Replace filters every 1 to 3 months in Tampa Bay homes, and even monthly if you have pets or allergies. Buying a multi-pack saves money and ensures you always have one ready. Most local hardware stores carry standard sizes, and your HVAC summer checklist can help you confirm which filter rating fits your system best.
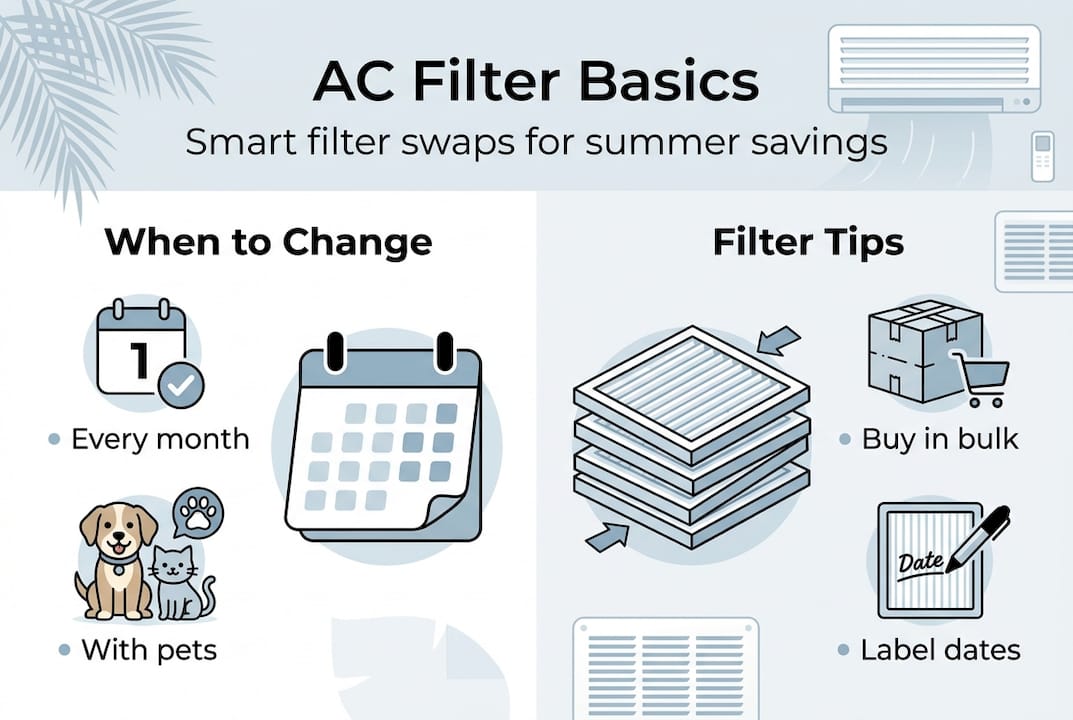
Step 1: Replace or clean your AC filter
With supplies in hand, the first and most important step is a fresh AC filter. This single task affects airflow, energy use, system lifespan, and even allergy symptoms. A clogged filter forces your system to work harder to pull air through, which strains the motor and drives up your electric bill.

Dirty filters reduce efficiency and add unnecessary wear to your system. In Tampa Bay, where your AC runs almost year-round, that strain adds up fast. Filters need replacing every 1 to 3 months, and monthly if you have pets, dusty conditions, or anyone with allergies at home.
Here’s how to do it:
- Turn off your AC at the thermostat before you begin.
- Locate the filter slot, usually in the return air vent or inside the air handler unit.
- Slide out the old filter and hold it up to the light. If you can’t see light through it, it’s overdue.
- Check the size printed on the frame and match it to your replacement.
- Slide in the new filter with the airflow arrow pointing toward the unit.
- Write the installation date on the filter frame with a marker.
- Turn your system back on and confirm airflow feels stronger.
Pro Tip: Keep two or three spare filters in a closet near your air handler. A quick swap takes under five minutes and knowing how to change HVAC filters correctly means you’ll never skip this step again. Check the right air filter frequency for your specific home setup.
A clogged filter can spike your energy bill by up to 30% during peak summer months. That’s a significant cost for a fix that takes five minutes and costs under ten dollars.
Step 2: Clean and inspect the outdoor condenser unit
With indoor airflow maximized, it’s time to turn attention outside to your home’s condenser. This is the large metal unit sitting outside your house, and it takes a beating from Tampa Bay’s heat, humidity, and salt air.
Spring is the best time to clean it, before the first serious heatwave hits. Here’s how:
- Shut off power to the unit at the disconnect box near the condenser.
- Remove any leaves, sticks, or debris from around and inside the unit.
- Use a garden hose on a gentle setting to rinse the fins from the inside out.
- Inspect the fins for bending or corrosion. Use a fin comb to straighten any bent sections.
- Check electrical connections and wiring for visible rust or fraying.
- Restore power only after everything is dry and reassembled.
| Task | DIY | Professional |
|---|---|---|
| Debris removal | Easy, 15 minutes | Included in tune-up |
| Fin rinsing | Easy with a hose | Deeper cleaning with tools |
| Corrosion check | Visual only | Includes coating application |
| Electrical inspection | Not recommended | Full safety check |
| Refrigerant level check | Not possible | Certified technician only |
Maintaining 2 to 3 feet of clearance around your condenser prevents airflow blockage and extends system life. Trim back any shrubs or fencing that crowd the unit.
In Tampa Bay’s coastal environment, salt air accelerates corrosion on coils and electrical components. A protective coating spray applied annually can add years to your system’s life. Never use a power washer on the fins since the pressure bends them and reduces airflow. Review our full condenser cleaning guide and AC maintenance guide for more detail.
Step 3: Optimize your thermostat and system settings
Once your AC hardware is clean, make sure it’s running with optimal settings for both savings and summer comfort. Before the first heatwave, switch your system to cooling mode and run it for 15 minutes. Listen for rattling, grinding, or hissing sounds. Any of those are warning signs worth addressing early.
Here are the best thermostat practices for Tampa Bay summers:
- Set your thermostat to 78°F or higher when you’re home
- Use auto fan mode rather than the constant-on setting
- Schedule setbacks for times when the house is empty
- Enable humidity control if your system or thermostat supports it
- Avoid dropping the temperature more than 2 to 3 degrees at once
Each degree below 78°F increases cooling costs by up to 8%. That adds up quickly during a Tampa summer. A smart or programmable thermostat pays for itself within one season by automatically adjusting temperatures based on your schedule.
Humidity is the factor most homeowners overlook. When indoor humidity climbs above 70%, the air feels hotter than the thermostat reads. Prioritize dehumidification alongside cooling to stay genuinely comfortable, not just technically cool. Explore more seasonal AC tips and review your maintenance guide to find the right settings for your home.
Setting your thermostat just 2 degrees higher saves roughly 16% on your cooling bill over a full summer.
Step 4: Seal ducts and check for leaks
Fine-tuning settings is powerful, but lost cool air equals wasted money unless your ducts are ready. Leaky ductwork is one of the most common and most expensive problems in Florida homes, and most homeowners have no idea it’s happening.
Here’s how to inspect your ducts:
- Turn your AC on and walk through your home, feeling for weak airflow at vents.
- Access any visible ductwork in your attic, garage, or utility closet.
- Look for disconnected joints, holes, or sections where insulation has fallen away.
- Check where ducts connect to vents and the air handler for gaps.
- Use foil tape (not standard duct tape, which fails in heat) to seal small gaps temporarily.
| Duct leakage level | Estimated energy loss | Monthly bill impact |
|---|---|---|
| 10% leakage | 10% efficiency loss | +$15 to $25 |
| 20% leakage | 20% efficiency loss | +$30 to $50 |
| 30% leakage | 30% efficiency loss | +$50 to $80 |
Leaky ducts waste up to 30% of cooling efficiency, and upgrading to a 15+ SEER system can cut costs by 40% compared to older low-efficiency units.
Pro Tip: Light an incense stick and hold it near duct joints while your AC runs. If the smoke drifts or swirls, air is escaping through a gap. It’s a simple, inexpensive way to find leaks before calling anyone. If DIY fixes don’t solve the problem, review these AC troubleshooting steps or check the full spring HVAC checklist for next steps.
Step 5: When to schedule professional AC service
For the best protection from Tampa’s brutal summer, pairing these DIY steps with a pro checkup is smart insurance. Some problems simply can’t be caught with a flashlight and a garden hose.
Watch for these warning signs that mean it’s time to call a technician:
- Weak or uneven cooling even after filter replacement
- Unusual sounds like grinding, banging, or squealing
- Visible rust or corrosion on the unit or refrigerant lines
- Higher energy bills even after completing all DIY maintenance
- Ice forming on the indoor coil or refrigerant lines
A professional tune-up typically includes refrigerant level checks, deep coil cleaning, system calibration, electrical safety tests, and a full inspection of all moving parts.
Pro tune-ups detect refrigerant and electrical issues that DIY checks simply can’t reach. Catching a refrigerant leak or failing capacitor in spring costs far less than an emergency repair in August.
AC systems in Tampa Bay tend to age faster than in cooler climates because they run so much longer each year. If your system is 8 to 12 years old, it’s worth asking a technician whether repair or replacement makes more financial sense. Check the recommended professional AC service schedule for Florida homes to stay ahead of problems.
The hidden costs (and savings) of skipping AC prep in Tampa Bay
Most homeowners wait for a breakdown before they think about their AC. That reactive approach is almost always the most expensive one. A system that limps through summer on a dirty filter and leaky ducts doesn’t just cost more to run. It wears out faster, breaks down during the hottest weeks, and creates the kind of repair bills that ruin a budget.
Summer electric bills can spike 30% without proper AC prep, and that’s before factoring in humidity. Even a 5% drop in efficiency at Tampa Bay’s average electric rate of around $0.15 per kilowatt-hour adds up to real money over a four-month summer. Humidity is the part most people ignore entirely. A home that’s technically 78°F but at 75% humidity feels miserable and creates conditions where mold can grow behind walls.
Proper prep addresses both problems at once. It’s not just about temperature. It’s about controlling moisture, protecting your equipment, and avoiding the emergency service call that always seems to happen on a Friday evening in July. Explore home cooling methods that work alongside your AC to reduce the load on your system.
Pro Tip: Set a recurring calendar reminder every March to run through this checklist. Future you will genuinely appreciate it.
Professional help for stress-free AC summers
DIY maintenance handles the basics well, but Tampa Bay’s salt air, high humidity, and long cooling seasons create challenges that go beyond what a homeowner can address alone.
At Home Therapist Cooling, Heating, and Plumbing, our certified technicians know exactly what Tampa Bay systems face every summer. We offer HVAC maintenance plans designed for local conditions, covering everything from refrigerant checks to coil cleaning and duct inspections. If your system needs more than a tune-up, our team also handles full duct replacement services for homes where aging ductwork is costing you comfort and money. Contact us today to book your summer AC service and head into the season with real confidence.
Frequently asked questions
How often should I clean or replace my AC filter in Tampa Bay?
Change or clean your filter every month in homes with pets or heavy use, and every 2 to 3 months in lower-traffic homes. Tampa Bay’s year-round AC use makes regular filter changes more important here than in most other states.
What temperature should I set my thermostat for summer savings?
Set your thermostat to 78°F or higher when home for the best balance of comfort and savings. Every degree lower increases your cooling costs by up to 8%, which adds up fast over a Tampa summer.
How can I tell if my AC needs professional service?
Weak cooling, unusual noises, visible rust, or higher bills after completing DIY maintenance are all signs you need a technician. Pro tune-ups catch refrigerant and electrical issues that no homeowner inspection can find.
Do I need to clean my outdoor AC unit in Tampa’s salt air?
Yes. Rinse your condenser monthly with a garden hose to remove salt buildup and keep fins clear. Maintain at least 2 to 3 feet of clearance around the unit to prevent airflow restrictions and premature corrosion.
Recommended
- Prepping HVAC for Summer: Homeowner’s Full Checklist
- Air Conditioning Maintenance Guide for Tampa Bay Homes Home Therapist Cooling, Heating, and Plumbing
- How to clean AC condenser for efficient cooling Tampa Bay
- How Often Should You Service Your AC in Florida? The Ultimate Guide for Tampa Bay Homeowners | Home Therapist


