

How To Install A Water Heater: Electric & Gas Steps
Replacing a water heater ranks among the most impactful, and most intimidating, DIY plumbing projects a homeowner can take on. Whether your current tank is leaking, rusting out, or just not keeping up with demand, knowing how to install a water heater yourself can save you hundreds of dollars in labor costs. But it also comes with real risks if you skip steps or cut corners, especially when gas lines, electrical wiring, and pressurized water are all part of the equation.
At Home Therapist, we’ve installed and replaced water heaters across the Greater Tampa Bay Area since 2011. Our licensed technicians handle these jobs daily, so we know exactly where DIYers run into trouble. We built this guide to give you honest, practical instructions for both electric and gas water heater installations, along with the safety precautions that actually matter.
Below, you’ll find a full breakdown of tools, materials, and step-by-step procedures for each type of unit. We’ll also cover permit requirements, common mistakes, and how to recognize when a job is better left to a professional. If at any point the project feels beyond your comfort zone, same-day service is just a call away.
Safety, codes, and tools before you start
Before you learn how to install a water heater, you need to understand what you’re getting into legally and physically. Water heater replacement involves pressurized plumbing, either high-voltage electrical connections or gas lines, along with scalding hot water still sitting in the tank. Skipping the preparation phase is where most DIY installations go wrong, and the consequences range from a failed inspection to a gas leak or electrical fire.
Permits and local code requirements
Most municipalities require a permit for water heater replacement, even when you’re swapping one unit for a similar model. In Tampa and surrounding Hillsborough County, you’ll need to pull a permit through the local building department before any work begins. The permit process typically involves a post-installation inspection, where an official checks your water connections, temperature and pressure (T&P) relief valve setup, and venting configuration if you have a gas unit.
Skipping a permit can cause serious problems when you sell your home. Unpermitted work can void your homeowner’s insurance coverage and force you to redo the installation before closing.
Check your local building department’s website to confirm the requirements in your specific city or county before buying any parts. Some jurisdictions enforce minimum energy efficiency ratings, specific venting configurations for gas units, or mandated seismic strapping in areas prone to ground movement.
Safety rules that apply to every installation
Never begin any installation work without completely shutting off the energy source, whether that’s the dedicated circuit breaker for an electric unit or the gas shutoff valve for a gas unit. Treat every connection as live until you’ve physically confirmed otherwise. Keep a fire extinguisher rated for electrical and gas fires within reach for the entire job.
Carbon monoxide is odorless and can incapacitate you quickly, and gas water heaters produce it when combustion is incomplete or venting is blocked. Install a carbon monoxide detector near the water heater if you don’t already have one. For electric units, the primary risk shifts to shock and arc flash, so confirm the breaker is off and use a voltage tester before touching any wiring.
Tools and materials checklist
Gather everything before you start. Stopping mid-installation to track down a missing fitting wastes time and increases the chance of an error when you reconnect the job.
For both electric and gas installations, you’ll need:
- Pipe wrench and adjustable wrench
- Channel-lock pliers
- Flathead and Phillips screwdrivers
- Teflon tape (plumber’s tape)
- Flexible water supply connectors
- T&P relief valve with a rated discharge pipe
- Pipe cutter or hacksaw
- Bucket and garden hose for draining the old tank
- Utility knife
For gas water heater installations, add:
- Gas leak detection solution or an electronic leak detector
- Flexible gas connector approved for your local code
- Pipe joint compound rated for gas lines
For electric water heater installations, add:
- Voltage tester or multimeter
- Wire nuts and electrical tape
- Conduit fittings if required by local code
Having a second person on-site is strongly recommended, particularly when moving the old tank and positioning the new one. Water heaters weigh between 100 and 150 pounds when empty, and the utility closet or garage corner where they live is almost always tight.
Step 1. Plan the replacement and shut off utilities
Before you touch a single pipe, planning your replacement carefully saves you from wasted trips to the hardware store and avoids the most common installation mistakes. Start by measuring your current unit (height, diameter, and first-hour recovery rating) and confirming that the new model fits your space and matches your household’s hot water demand. A unit that’s too tall for your closet or undersized for your family turns a straightforward job into a full-day headache.
Choose the right replacement unit
Selecting the correct water heater matters more than most homeowners expect. Match the fuel type to your home’s existing infrastructure: if you have a gas line running to the current unit, replace it with another gas model unless you’re prepared to run a new 240V electrical circuit or cap the gas line entirely. Tank capacity is typically sized at 10 to 15 gallons per person, so a family of four usually needs a 40- to 50-gallon tank to avoid running cold mid-shower.
Check the unit’s Uniform Energy Factor (UEF) rating before purchasing. Many local jurisdictions, including parts of the Greater Tampa Bay Area, require minimum efficiency ratings, and your permit inspection will catch a non-compliant unit. Also confirm the new unit’s dimensions fit your installation space, since modern tanks sometimes run taller than the model they’re replacing, which creates clearance problems with venting or overhead pipes.
Shut off utilities before any work begins
Once your new unit is on-site and confirmed to fit, shut down all utilities completely before disconnecting anything. Knowing how to install a water heater safely starts at this step, because working near a live gas line or an energized 240V circuit is where serious injuries occur.
Never assume the utility is off because you turned a valve or flipped a switch. Always verify with a voltage tester for electric units and a gas detector or soapy water solution for gas lines.
Follow this shutdown sequence in order:
- Electric unit: Switch off the dedicated 240V breaker in your electrical panel, then confirm the circuit is dead with a voltage tester at the junction box before touching any wiring.
- Gas unit: Turn the gas shutoff valve to the closed position (perpendicular to the pipe), wait a few minutes, and use a leak detector to confirm gas flow has stopped.
- Water supply (both types): Close the cold water inlet valve directly above the tank. If that valve doesn’t seat fully, shut off the main water supply to the house.
- Drain the tank (both types): Attach a garden hose to the drain valve at the tank’s base, route it to a floor drain or outside, and open the valve to start emptying the tank before removal.
Step 2. Remove and dispose of the old water heater
With the tank drained and utilities shut off, you’re ready to disconnect and pull out the old unit. Rushing through this step is a common mistake, particularly with gas units where a loose fitting can leave residual gas trapped in the line. Work methodically and confirm each connection is fully separated before you move the tank.
Disconnect water, energy, and vent connections
Start with the cold water inlet and hot water outlet lines at the top of the tank. If your home has copper pipes, you’ll likely need to cut them with a pipe cutter, leaving enough length on the house-side pipes to attach flexible connectors for the new unit. If you already have braided stainless or flexible connectors, simply unscrew them with an adjustable wrench. Wrap a rag around each connection before loosening to catch residual water still sitting in the lines.
For gas units, disconnect the gas supply line at the union fitting closest to the tank. Use two wrenches simultaneously: one to hold the pipe steady and one to turn the fitting. Once the gas connector is off, cap the open gas line immediately with a threaded cap to block any residual flow. Next, disconnect the flue vent pipe at the draft diverter on top of the tank. The vent sections typically pull apart after removing sheet metal screws. Set the vent pieces aside carefully if they’re in good condition, since you may be able to reuse them.
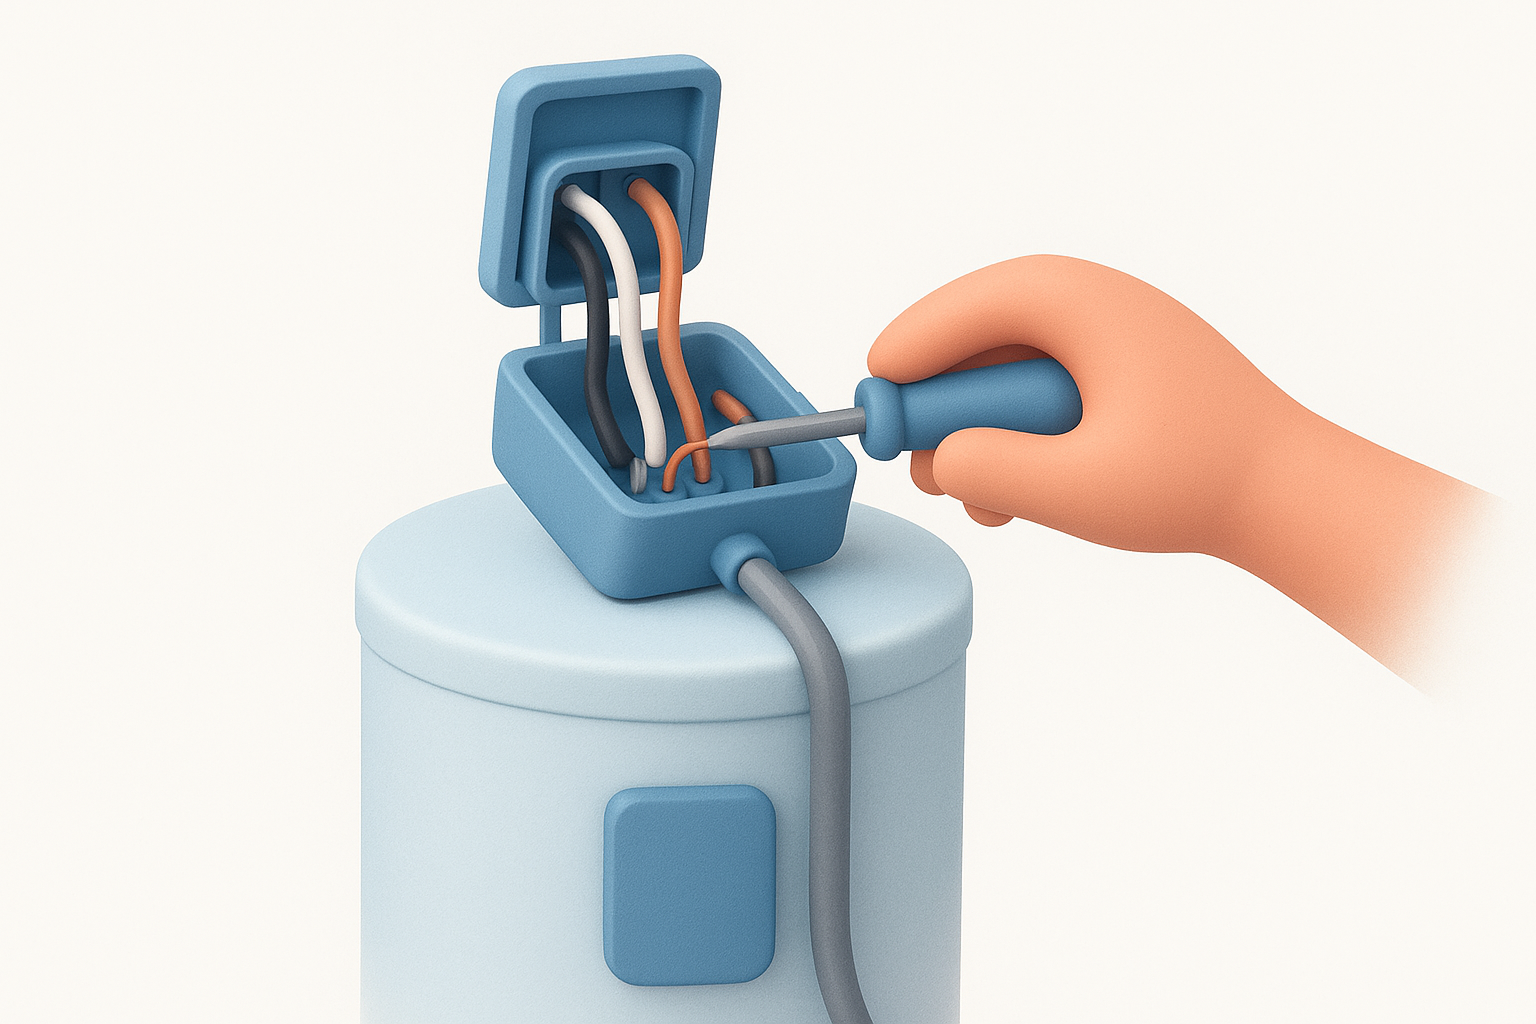
For electric units, open the junction box cover on the top or side of the tank and confirm with your voltage tester that the circuit is dead. Then loosen the wire nuts connecting the unit’s leads to your household wiring and separate all wires completely before moving the tank.
Never drag an old water heater across finished flooring. Place a moving dolly or furniture sliders under the unit before shifting it to avoid floor damage and back strain.
Move the tank and arrange disposal
Once all connections are clear, tip the tank onto an appliance dolly with a second person steadying it from the opposite side. Old tanks weigh 100 to 150 pounds empty and are awkward to maneuver through doorways, so take your time positioning the dolly before moving. For disposal, contact your local municipality’s bulk waste pickup program or check with a scrap metal yard, since most accept water heaters at no charge. Many areas, including Hillsborough County, prohibit leaving large appliances at the curb without scheduling a pickup first. Confirm the rules in your city before dragging the old unit outside. Understanding how to install a water heater also means leaving the job site clean and code-compliant before the new unit goes in.
Step 3. Install an electric water heater and start it
With the old tank gone and the space clear, you can position the new unit and begin making connections. Slide the new electric water heater into place and confirm it sits level on the floor before touching any plumbing. Use a bubble level on the side of the tank and shim the base if needed, since a slightly tilted unit puts uneven stress on the inlet and outlet connections over time. This step in learning how to install a water heater rewards patience, because a properly seated tank makes every subsequent connection easier and more secure.
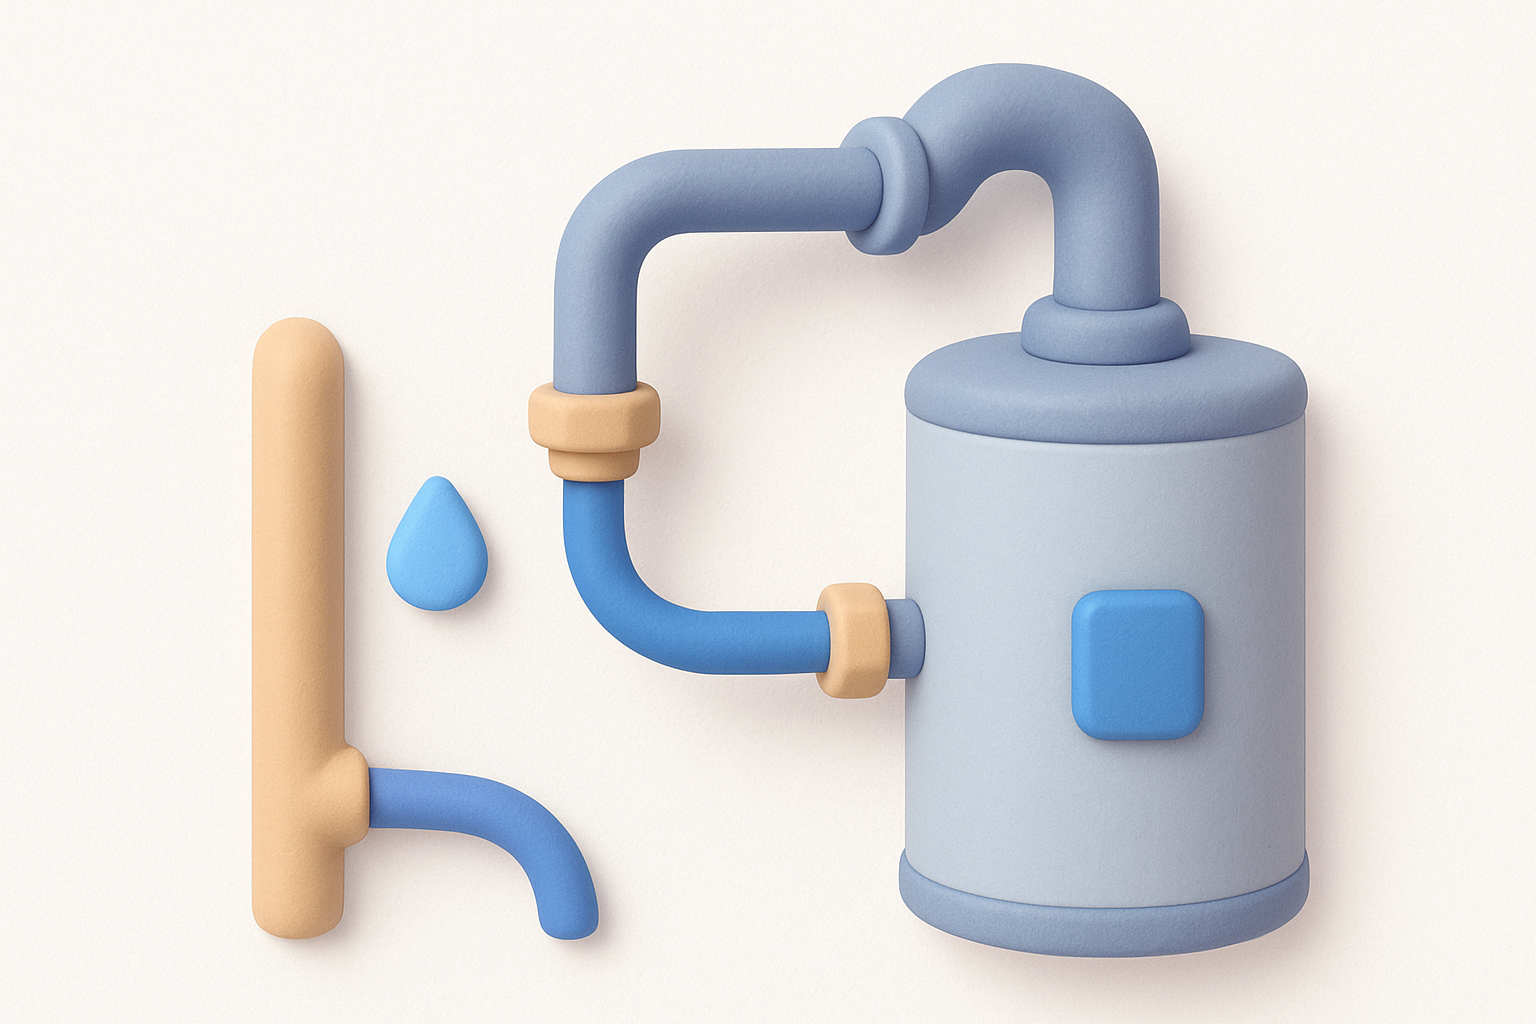
Connect the water supply lines
Wrap the threaded nipples at the cold water inlet and hot water outlet with two to three layers of Teflon tape before attaching your flexible supply connectors. The cold inlet is typically marked with a blue label or plastic dip tube collar, and the hot outlet carries a red label. Hand-tighten each connector first, then use an adjustable wrench to snug it an additional quarter to half turn. Avoid over-tightening, since brass fittings strip easily and a cracked fitting means starting over with new connectors.
Install a new T&P relief valve if the replacement unit did not come with one pre-installed, and run a discharge pipe from the valve to within six inches of the floor or to a proper drain per local code.
Wire the electric connections
Open the junction box cover on the top of the unit and pull your household wiring through the conduit fitting. Most residential electric water heaters run on a 240V, 30-amp dedicated circuit with two hot wires and a ground. Connect black wire to black, white wire to white (or red, depending on your unit’s labeling), and attach the bare copper ground wire to the unit’s ground screw. Fold the wires neatly into the box and replace the cover completely before moving to the next step.
Fill the tank and turn on the power
Turn the cold water inlet valve to the open position, but first crack open a hot water faucet anywhere in the house. This bleeds air from the system as the tank fills and prevents an airlock from stopping water flow. Once water runs steadily from that faucet without sputtering, the tank is full. Close the faucet, then flip the dedicated circuit breaker to the on position. Allow 60 to 90 minutes for the heating elements to bring water up to temperature before testing at any fixture.
Step 4. Install a gas water heater and start it
Gas installation follows the same positioning rules as electric: slide the new unit into place and verify it sits level before connecting anything. Because gas water heaters rely on proper venting to exhaust combustion gases, the physical location matters more than it does with an electric model. Confirm you have at least 18 inches of clearance from flammable materials on all sides and that the flue vent path is fully unobstructed before making any connections.
Connect the water supply lines and T&P valve
Wrap the cold inlet and hot outlet threaded nipples with two to three layers of Teflon tape, then attach your flexible supply connectors. Hand-tighten each connector first, then snug it an additional quarter turn with an adjustable wrench. Install a new T&P relief valve and run a discharge pipe to within six inches of the floor.
Follow this sequence for the water connections:
- Tape the cold inlet nipple and attach the cold supply connector
- Tape the hot outlet nipple and attach the hot supply connector
- Install the T&P relief valve and attach the discharge pipe
- Leave both the inlet and outlet valves closed until the tank is fully connected
Connect the gas line and flue vent
Attach the flexible gas connector to the gas supply line using pipe joint compound rated for gas on the threaded fittings, not Teflon tape alone. Hand-tighten first, then wrench-tighten firmly without over-torquing. Once the gas connector is secure, reassemble the flue vent sections starting at the draft diverter on top of the tank and working upward, securing each joint with at least three sheet metal screws. Confirm the vent slopes upward continuously toward the exterior termination with no dips that could trap combustion gases.
After connecting the gas line but before lighting the pilot, apply gas leak detection solution to every fitting and watch for bubbles. Bubbles mean you have a leak, so tighten the fitting and retest before moving forward.
Fill the tank and light the pilot
Open the cold water inlet valve and crack a hot water faucet elsewhere in the house to purge air from the system. Wait until water flows steadily from that faucet without sputtering, then close it. Every guide on how to install a gas water heater correctly stresses one point: never light the pilot on an empty tank, since running the burner dry damages the unit immediately.
Turn the gas valve to the pilot position and follow the manufacturer’s lighting sequence printed on the label attached to the tank. Hold the pilot button down for 30 to 60 seconds after the flame ignites so the thermocouple heats up and holds the valve open. Once the pilot stays lit, rotate the gas valve to your desired temperature setting, typically 120°F, and allow 30 to 45 minutes for the burner to heat the tank before testing at any fixture.
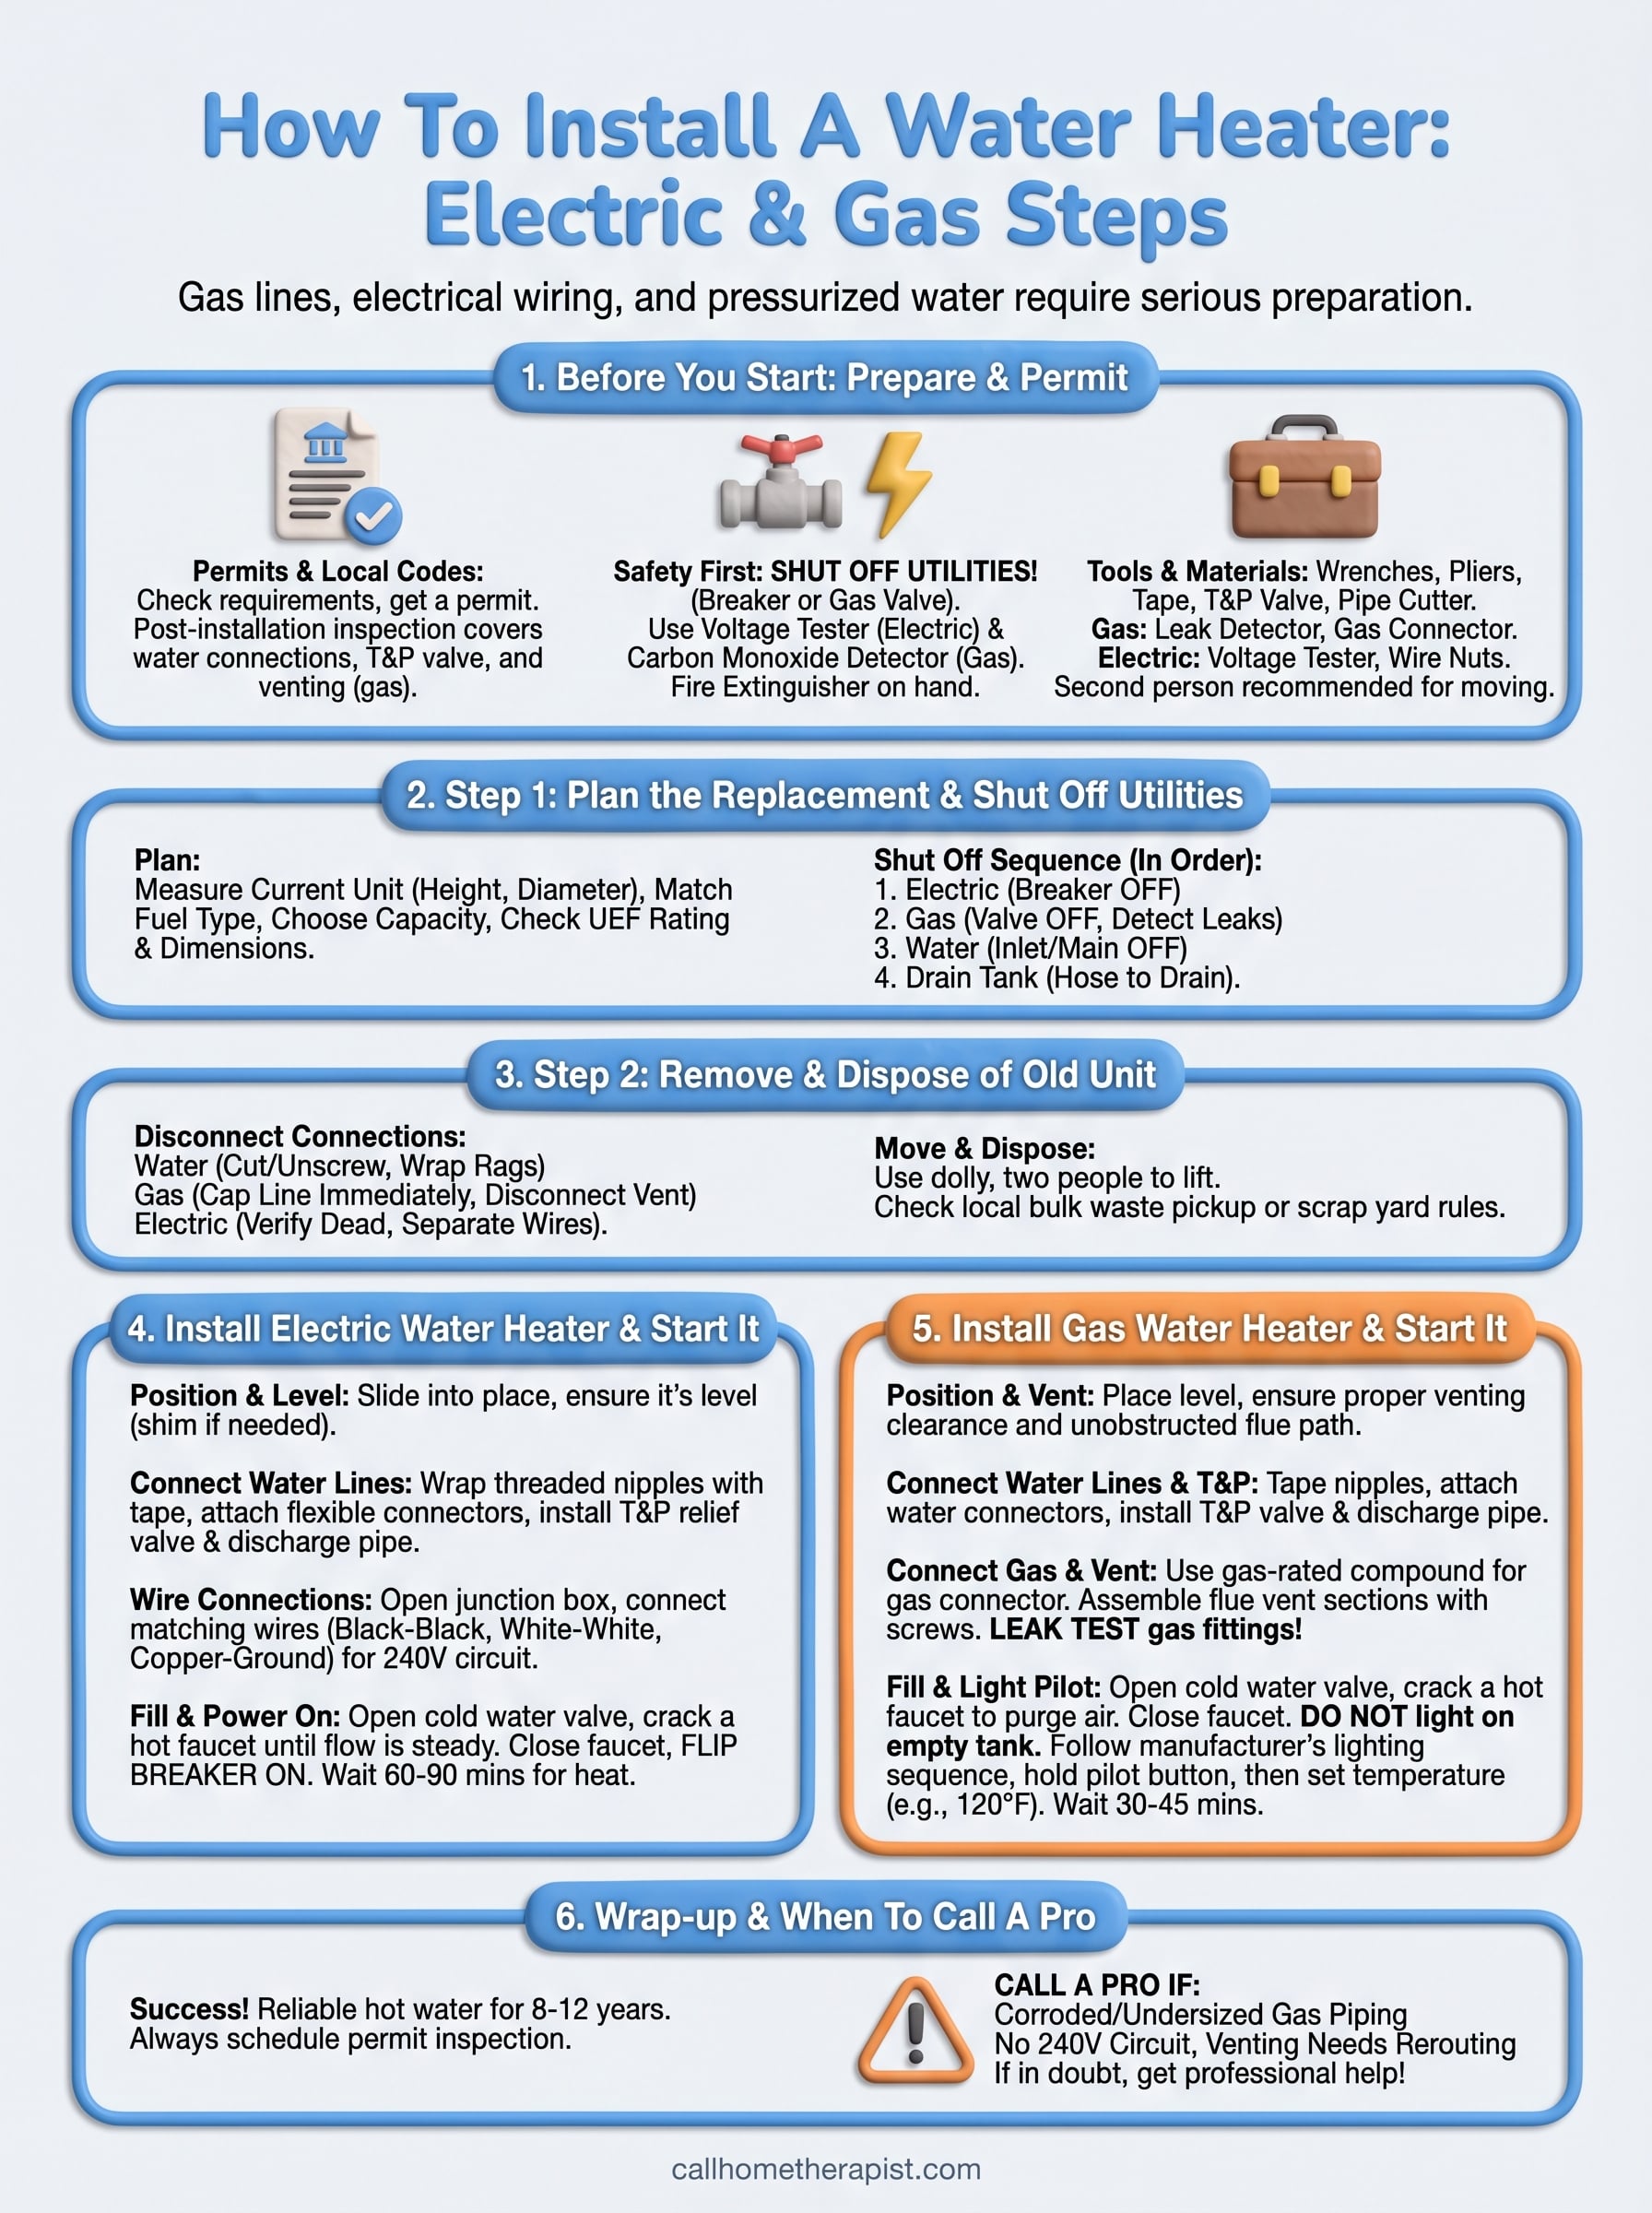
Wrap-up and when to call a pro
Learning how to install a water heater is genuinely achievable for a prepared homeowner, but the job demands respect for gas lines, high-voltage wiring, and local permit requirements. If you followed each step above carefully, your new unit should deliver reliable hot water for the next 8 to 12 years. Always schedule your permit inspection before considering the job complete.
That said, some situations call for a licensed technician rather than a DIY attempt. Call a pro if you discover corroded or undersized gas piping, if your electrical panel lacks a dedicated 240V circuit for a new electric unit, or if the venting path for a gas model requires rerouting. These are not beginner-level fixes.
If your installation feels beyond your comfort zone, or if something looks wrong after startup, the team at Home Therapist offers same-day water heater service across the Greater Tampa Bay Area with upfront pricing and no hidden fees.
More Water Heater (Tank) Articles
- Active Leak Found During an $89 Water Heater Flush on Turning Leaf Cir, Land O’ Lakes, FL 34638
- Missing Isolation Valves Stopped the Descale: Tankless Water Heater Inspection on S Renellie Ct, Tampa FL 33616
- Customer-Supplied Water Heater Installed Right on Lofty Bee Ln: Water Heater Installation in Wimauma, FL 33598
- Skip the Flush? Why Adalberto H. Made the Right Call on This E New Orleans Ave Water Heater Inspection in Tampa, FL 33610
- Water Heater Installation New Port Richey FL: When the Tank and Shower Both Fail on Shallow Creek Court, FL 34653


