

Whole Home Water Filter Replacement: Sizes, Types & Tips
Your whole home water filtration system is only as good as the filter inside it. Over time, sediment, minerals, and contaminants clog the media, and water quality drops, sometimes without you noticing until the taste or pressure changes. When that happens, a whole home water filter replacement is the fix, but picking the right one isn’t always straightforward. Filter sizes, media types, and micron ratings vary across brands and systems, and installing the wrong cartridge can restrict flow or leave contaminants in your water.
This guide breaks down the sizes, types, and compatibility factors you need to know before ordering a replacement filter. We’ll cover standard cartridge dimensions, the different filter media available, and how to match a replacement to your specific system. You’ll also learn how often filters should be swapped and what signs tell you it’s time.
At Home Therapist, we install and service whole home water filtration systems across the Greater Tampa Bay Area. Tampa’s water supply carries its own set of challenges, hard water, chlorine, and sediment are common, so we deal with filter replacements regularly. Whether you’re handling this yourself or want a professional to take care of it, the information here will point you in the right direction.
Why whole home filter replacements matter
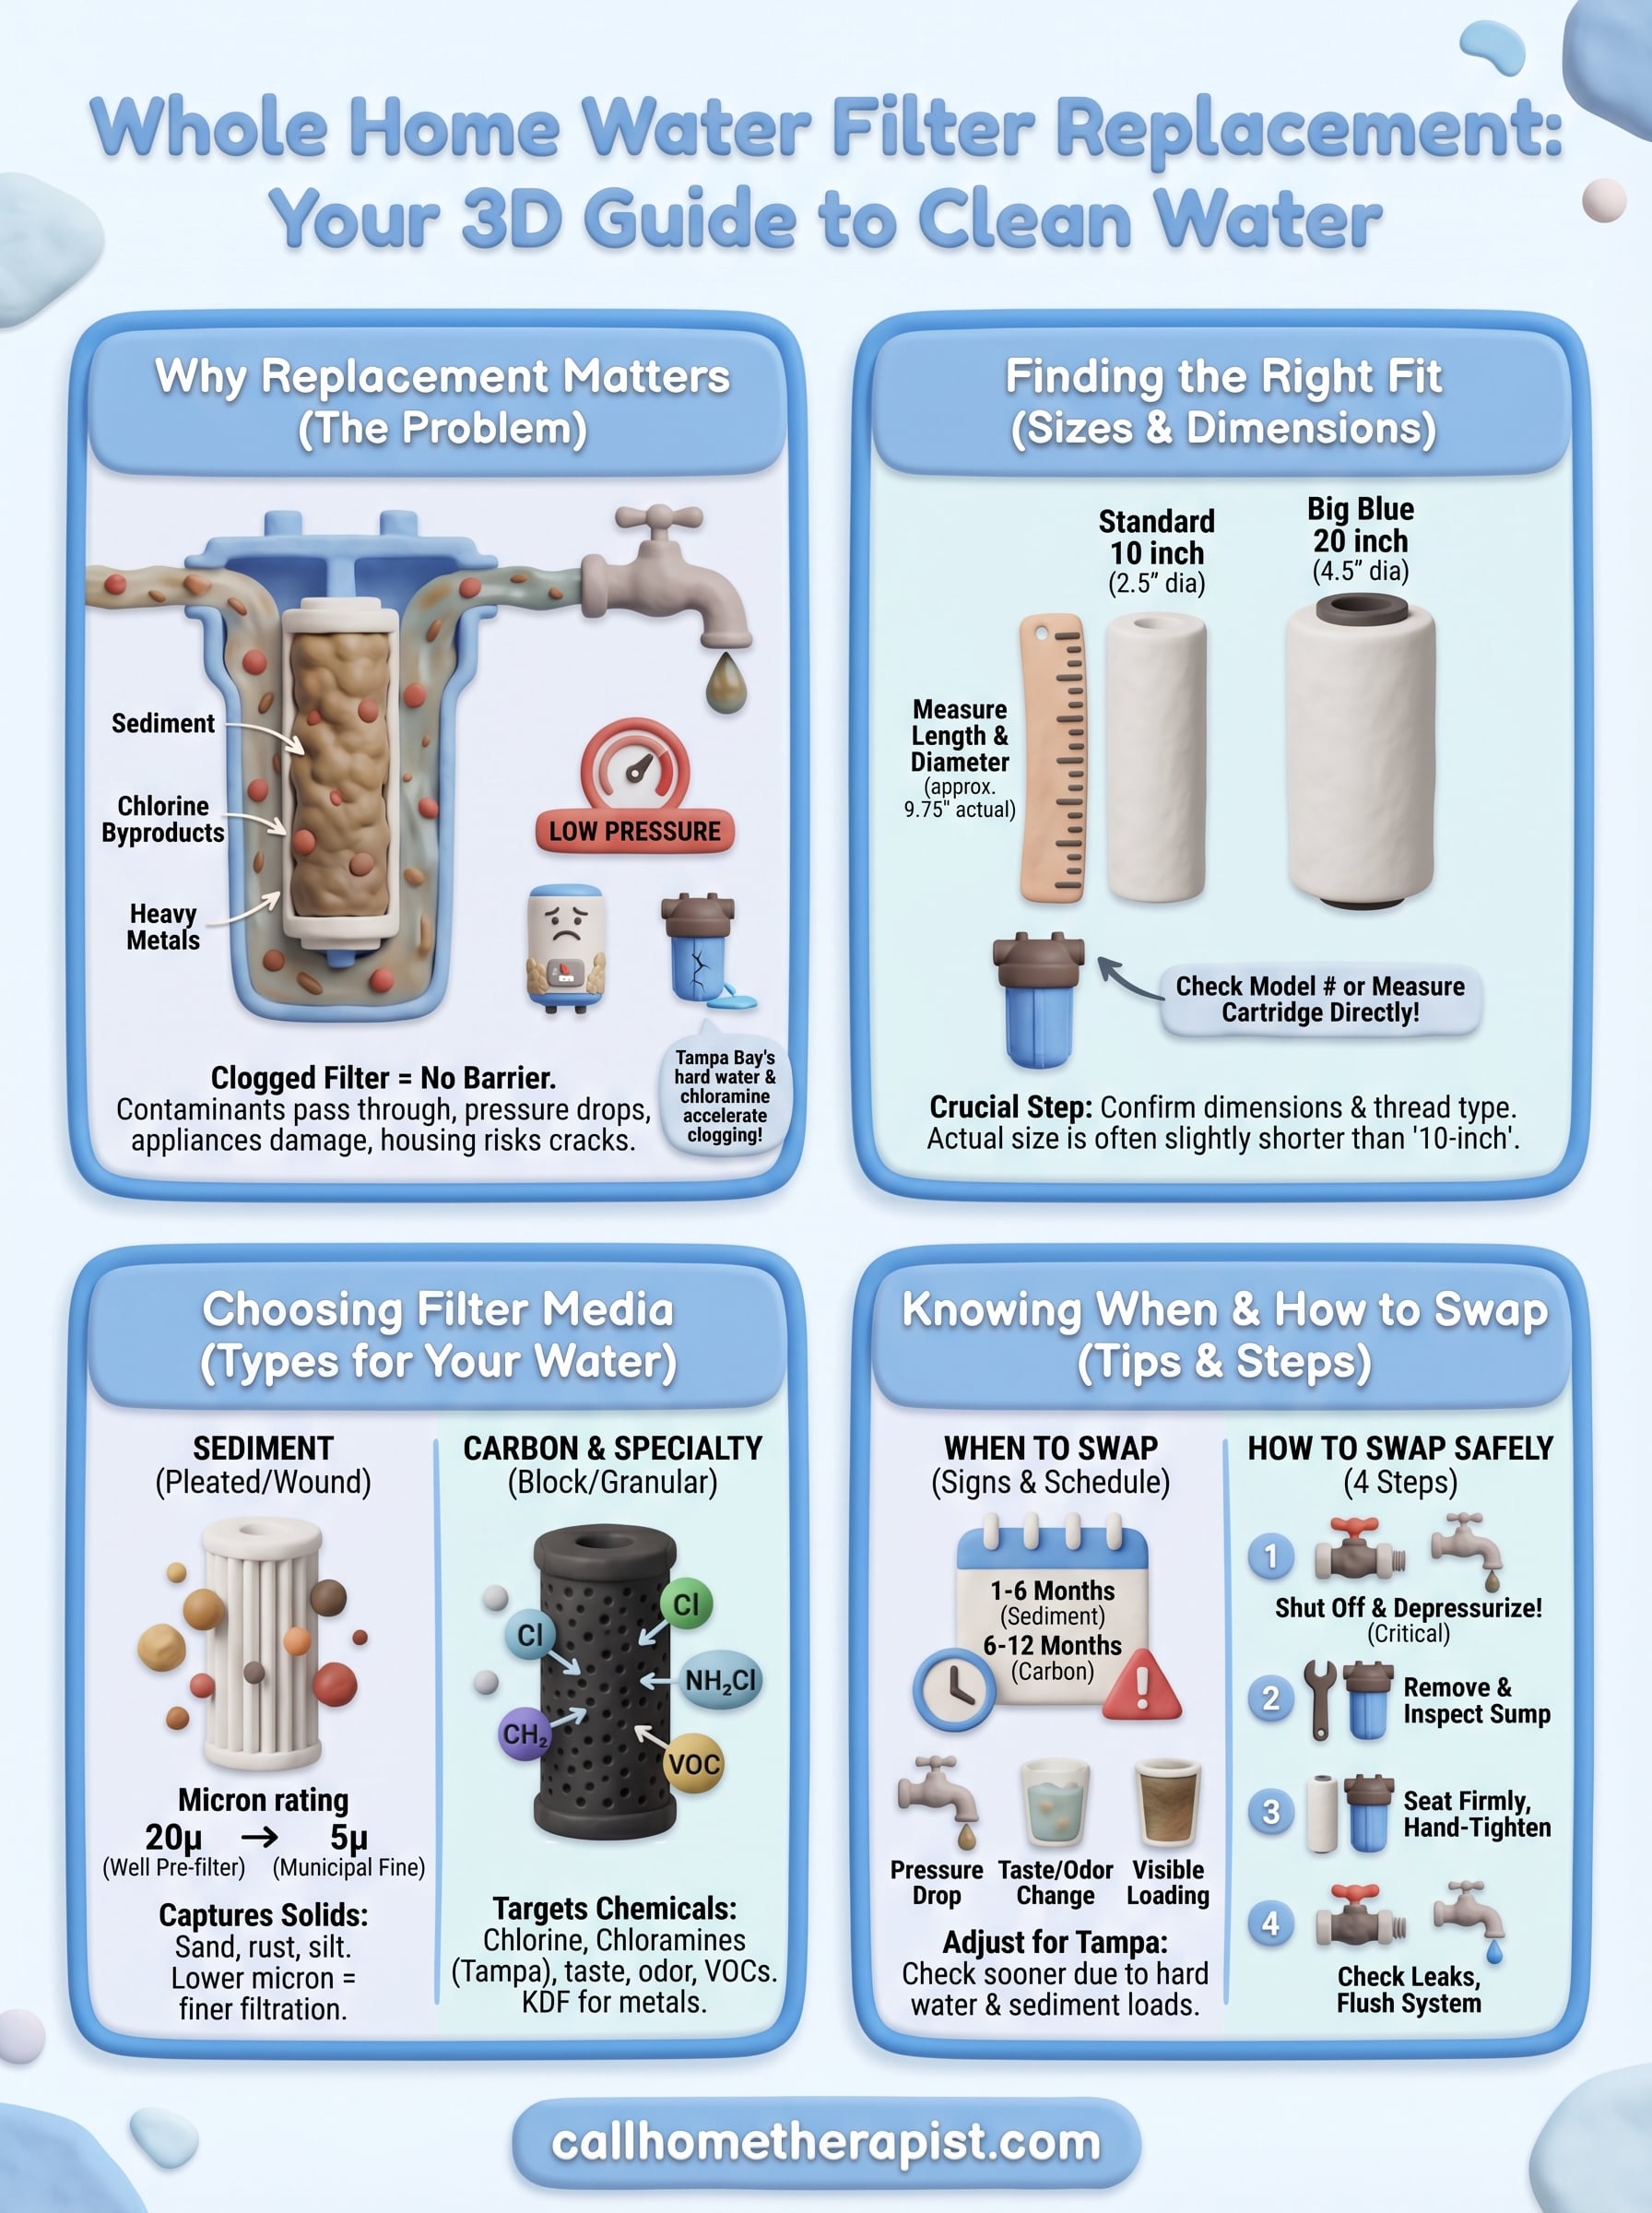
A whole home water filter replacement isn’t just routine maintenance, it’s what keeps your filtration system doing its job. When a filter cartridge reaches the end of its useful life, it stops removing the contaminants it was designed to catch. Sediment, chlorine byproducts, and heavy metals that should be trapped in the filter media pass straight through to your faucets, showers, and appliances instead. Most homeowners don’t notice this shift until water taste changes or pressure drops enough to become obvious, by which point the filter has been compromised for a while.
What a clogged filter does to your water
As a filter loads up with particulates, water pressure through the housing drops noticeably. You might see it first at a shower head or a kitchen faucet before it spreads to the rest of the house. Beyond pressure loss, a fully saturated filter can release trapped contaminants back into the water flow through a process called channeling, where water finds a path around the clogged media rather than through it. The filter stops acting as a barrier and starts working against you.
Once a filter begins channeling, contaminants it collected over weeks or months can re-enter your water supply in a concentrated burst.
How Tampa Bay’s water affects filter life
Tampa Bay’s municipal water supply is treated with chloramine rather than free chlorine in some service areas, which requires specific filter media to remove it effectively. Florida’s groundwater is also naturally high in calcium and magnesium, contributing to hard water mineral deposits that accelerate sediment filter loading faster than you’d see in areas with softer water. A cartridge that might last six months elsewhere can be saturated in three months here, depending on your household’s daily usage and the size of your filter housing. Knowing this helps you set a realistic replacement schedule rather than relying solely on a generic manufacturer timeline.
The cost of waiting too long
Skipping a scheduled replacement doesn’t just affect water quality. Appliances like water heaters, dishwashers, and ice makers that connect to your home’s water supply accumulate scale and sediment faster when the filter isn’t capturing particulates. Repair and replacement costs for these appliances add up quickly, and the damage is often invisible until something fails. Running water through a spent filter also puts more stress on the housing itself, because clogged media raises inlet pressure, which can lead to housing cracks or fitting leaks if left unaddressed for long enough.
Keeping your filter cartridge current protects everything downstream, including your plumbing fixtures, your appliances, and the water quality your household depends on every day.
How to identify your cartridge size and fit
Before ordering a replacement, you need to confirm the exact cartridge dimensions and thread configuration your housing accepts. Buying the wrong size is the most common mistake homeowners make, and it results in either a cartridge that won’t seat properly or one that lets unfiltered water bypass the media entirely. Check your system’s housing or owner’s manual before anything else.
Standard cartridge dimensions
Most residential whole home filter housings accept one of a few standardized sizes. The two most common are the 10-inch and 20-inch lengths, each available in standard 2.5-inch diameter or the wider "Big Blue" 4.5-inch diameter. The table below covers what you’re likely to find:
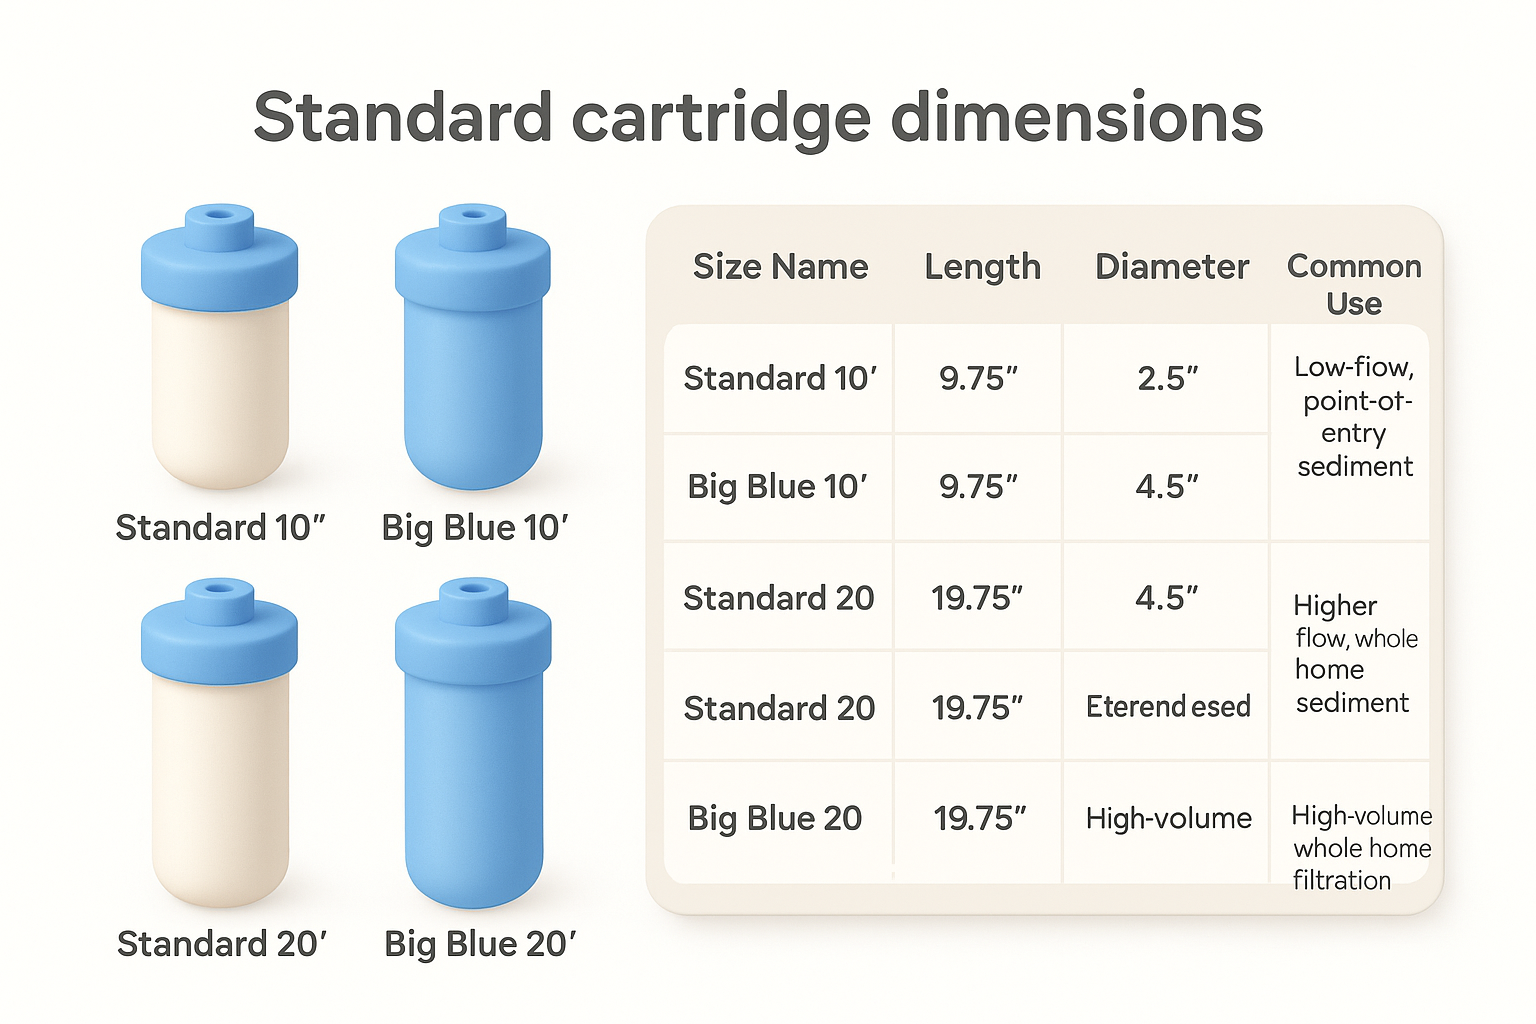
| Size Name | Length | Diameter | Common Use |
|---|---|---|---|
| Standard 10" | 9.75" | 2.5" | Low-flow, point-of-entry sediment |
| Big Blue 10" | 9.75" | 4.5" | Higher flow, whole home sediment |
| Standard 20" | 19.75" | 2.5" | Extended capacity, sediment or carbon |
| Big Blue 20" | 19.75" | 4.5" | High-volume whole home filtration |
Actual cartridge dimensions run slightly shorter than the housing label suggests, so a "10-inch" cartridge typically measures closer to 9.75 inches. That’s normal and expected, not a sizing error.
Always measure your current cartridge before ordering, since housing labels don’t always match what was originally installed.
Where to find your system’s specs
Your filter housing often has a model number stamped or printed on the sump, which is the lower section you unscrew to access the cartridge. Search that model number to pull up the manufacturer’s spec sheet, which will confirm the correct cartridge length, diameter, and inlet/outlet thread size. If the label has worn off, measure the cartridge you remove directly: length from end cap to end cap, and outer diameter at the widest point. For a whole home water filter replacement to work correctly, the cartridge must seat flush with no gaps around the o-ring seal.
How to choose the right filter type for your water
Once you know your cartridge size, the next step is selecting the right filter media for your specific water issues. Not all filter types remove the same contaminants, and using a sediment filter when your main problem is chlorine taste won’t solve anything. Your water source and the contaminants it carries should drive this decision before anything else.
Sediment filters
Sediment filters capture solid particles like sand, rust, and silt using a pleated or wound polypropylene material rated by micron level. A lower micron rating means finer filtration. For most Tampa Bay homes on municipal supply, a 5-micron or 10-micron sediment filter works as a solid first stage, catching larger particles before water reaches appliances. If your water comes from a well, start with a 20-micron pre-filter to extend the life of a finer downstream stage.
| Micron Rating | What It Catches | Best For |
|---|---|---|
| 20 micron | Large sediment, debris | Well water pre-filtration |
| 10 micron | Sand, rust, general sediment | Municipal water supply |
| 5 micron | Fine silt, dirt particles | Higher clarity municipal water |
| 1 micron | Very fine particles, some cysts | Targeted fine filtration |
Carbon and specialty filters
Carbon block and activated carbon filters are the right choice when your concern is chlorine, chloramines, or taste and odor issues. Tampa Bay’s treated water supply can carry a distinct chemical taste, and a carbon-based whole home water filter replacement addresses that at the point of entry rather than just at the tap. Standard carbon filters also reduce volatile organic compounds (VOCs) and some disinfection byproducts.
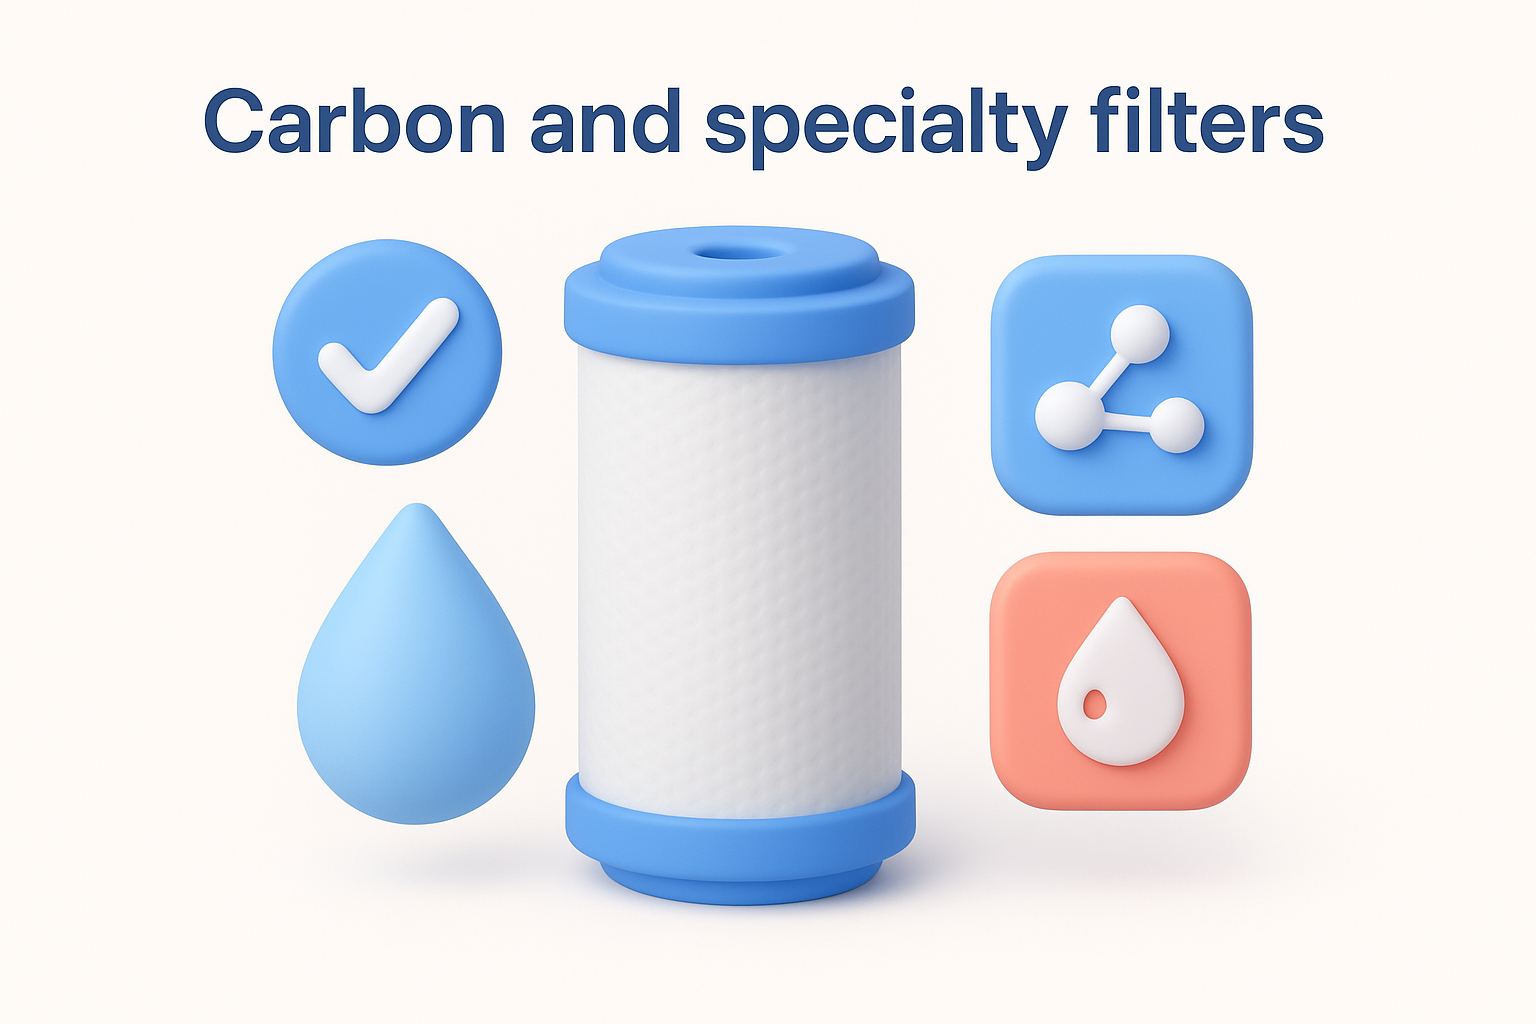
If your municipal report shows chloramine treatment in your area, confirm your carbon filter is rated for chloramine removal, since standard carbon handles free chlorine but not all formulations remove chloramine effectively.
Specialty media like KDF (kinetic degradation fluxion) targets heavy metals including lead and copper, while iron reduction filters handle elevated iron levels common in Florida well water. Match the media to your water test results, not a general recommendation.
When to replace filters and what to watch for
Most filter manufacturers print a recommended replacement interval on the cartridge packaging, but those timelines assume average water quality and average household usage. In Tampa Bay, where hard water and higher sediment loads are common, your actual replacement schedule will often be shorter than the label suggests. Treating the manufacturer’s timeline as a ceiling rather than a target keeps your system performing consistently.
Replacement intervals by filter type
The type of filter media you’re running has a direct impact on how long a cartridge lasts. Sediment filters load up faster than carbon filters because they’re physically trapping particles rather than adsorbing chemicals, which means they reach capacity sooner in areas with high turbidity or iron content.
| Filter Type | Typical Interval | Adjust for Tampa Bay |
|---|---|---|
| Sediment (10-20 micron) | 3 to 6 months | Check at 2 to 3 months |
| Sediment (1-5 micron) | 1 to 3 months | Check monthly |
| Carbon block | 6 to 12 months | Check at 6 months |
| KDF or specialty media | 12 months | Follow pressure drop |
Setting a calendar reminder when you install each cartridge removes the guesswork and prevents a lapsed whole home water filter replacement from going unnoticed.
Physical signs a filter is due
Pressure drop at fixtures is the most reliable early warning. If your shower or kitchen faucet delivers noticeably less flow than normal, check your filter housing before assuming the issue is elsewhere in the plumbing. A loaded cartridge creates backpressure that affects your entire supply.
Changes in taste, odor, or water clarity are also clear indicators. Cloudy water or a return of the chlorine smell you stopped noticing after installation both signal that the filter media is spent. Discoloration at fixtures, particularly a yellow or brown tint, suggests the sediment filter has exceeded its capacity and is releasing trapped particles back into the line.
How to replace whole home filters safely
Replacing a filter cartridge is a straightforward job, but skipping a few basic steps can turn it into a leak or a mess. Shutting off water flow and releasing system pressure before you open the housing protects both you and the plumbing around the filter. Most homeowners can handle a whole home water filter replacement without tools beyond the housing wrench that came with the system.
Shut off water and release pressure
Locate your filter housing, which sits on the main water supply line before it branches out through your home. Turn the inlet valve to the closed position, then open a nearby faucet to bleed residual pressure from the line. Skipping the pressure release step causes water to spray when you unscrew the sump. Once the line is depressurized, place a towel or shallow pan beneath the housing to catch the water that drains out when you open it.
Releasing pressure before opening the sump is the single step most homeowners skip, and it’s the one that causes most of the mess.
Remove, inspect, and seat the new cartridge
Use the housing wrench to turn the sump counterclockwise until it separates from the head. Pull the spent cartridge straight out and inspect the inside of the sump for sediment buildup. Rinse the sump with clean water before inserting the new cartridge. Seat the replacement cartridge firmly so both end caps align with the housing, then hand-tighten the sump back into the head until snug. Avoid over-torquing, which can crack the sump or damage the o-ring.
Check for leaks before restoring full flow
Slowly reopen the inlet valve and watch the housing fittings for drips or seepage around the sump connection. If water appears, close the valve, check that the o-ring is seated flat in its groove, and retighten. Once the housing holds pressure without leaking, open the inlet valve fully and flush the system by running a cold tap for two to three minutes to clear any loose media or air pockets.
A simple next step
A whole home water filter replacement comes down to three things: knowing your cartridge size, matching the filter media to your water quality, and staying ahead of the replacement schedule. Get those three right, and your system keeps doing its job without surprising you with pressure drops or a return of the water issues you installed it to solve. Tampa Bay’s hard water and chloramine treatment make regular filter swaps more important here than in many other parts of the country, so a consistent schedule matters more than waiting for a problem to appear.
If you’re not sure which cartridge your system uses, your water has changed noticeably, or you’d rather have a professional handle the swap and inspect the housing at the same time, Home Therapist is ready to help. We serve the Greater Tampa Bay Area with same-day availability and upfront pricing. Schedule a water filtration service today and we’ll take it from there.
About This Guide
Written and reviewed by the Home Therapist Cooling, Heating & Plumbing team, a family-owned Tampa Bay HVAC and plumbing company serving the area since 2011. Our licensed techs hold Florida HVAC license CAC1819196 and Plumbing license CFC1431159, with over 1,100 five-star reviews across Tampa, St. Petersburg, Clearwater, Wesley Chapel, Lutz, Riverview, Brandon, Valrico, Apollo Beach, Palm Harbor, Land O’ Lakes, Plant City, New Port Richey, and surrounding Tampa Bay zip codes.
Honest pricing: $279 labor minimum. Upfront quotes, no high-pressure sales, no surprise fees.
Questions about your home? Call (813) 343-2212 for a real tech, or request a callback. Available 7 days a week including evenings and weekends for emergencies.


