

How to Check Ductwork for Better Home Efficiency
Your home’s ductwork plays a critical role in maintaining comfort and controlling energy costs, yet many homeowners overlook this hidden HVAC component until problems arise. Leaky or damaged ducts can waste up to 30% of your conditioned air, driving up utility bills and creating uneven temperatures throughout your home. By learning to inspect your ductwork regularly, you can catch issues early, improve indoor air quality, and maximize your HVAC system’s performance. This guide walks you through the essential steps to check your ductwork safely and effectively, helping you identify common problems and determine when professional help is needed.
Table of Contents
- Key takeaways
- Preparing to check your ductwork
- Step-by-step how to inspect your ductwork
- Troubleshooting common ductwork issues
- Verifying ductwork performance after inspection
- Enhance your Tampa home comfort with expert HVAC help
- How to check ductwork frequently asked questions
Key Takeaways
| Point | Details |
|---|---|
| Regular duct checks | Regular inspections help prevent energy loss and improve home comfort by catching issues early. |
| Visual and airflow tests | Visual inspections and airflow tests help identify leaks, blockages, and damaged joints. |
| Common duct problems | Look for disconnected joints, holes, moisture, and mold during inspection. |
| Tools and safety | Gather a bright flashlight, screwdriver, sealant or foil tape, smoke pencil, and wear protective gear before inspecting. |
Preparing to check your ductwork
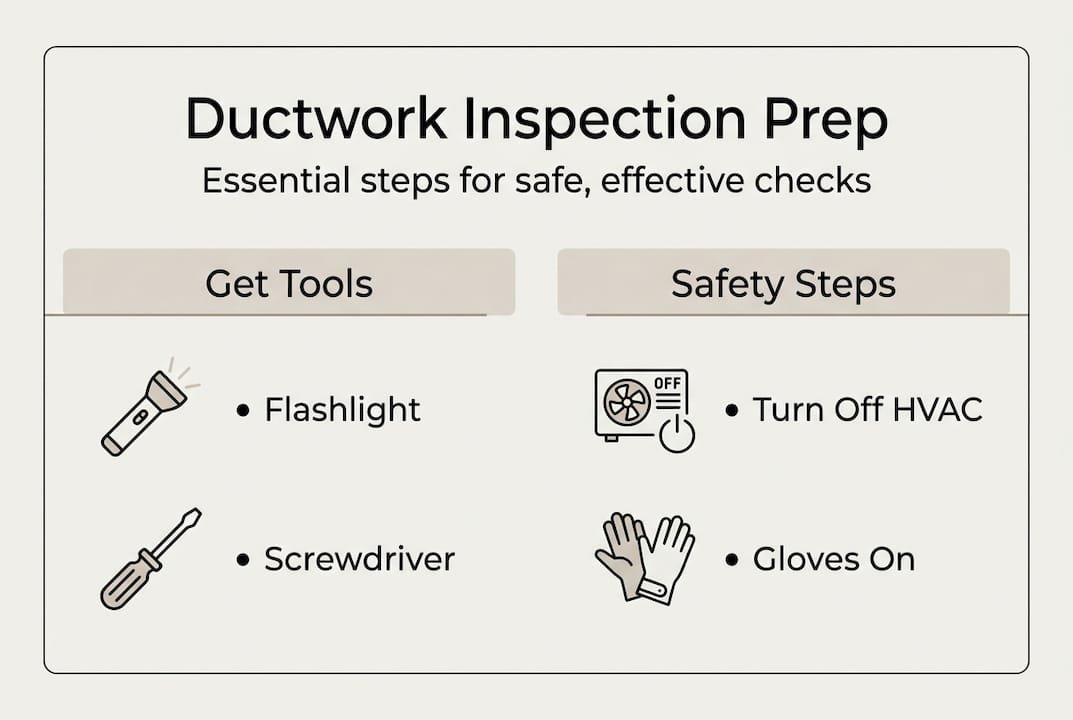
Before you start inspecting your ducts, gathering the right tools and understanding basic safety measures sets you up for success. You’ll need a bright flashlight or headlamp to illuminate dark crawl spaces and attics, a screwdriver to remove vent covers, mastic sealant or foil tape for temporary leak repairs, and a smoke pencil or incense stick to detect air leaks. These simple items let you conduct a thorough inspection without specialized equipment.
Safety should be your top priority when working around ductwork. Always turn off power to your HVAC system at the breaker before beginning any inspection to prevent the system from cycling on unexpectedly. Wear protective gear including gloves, safety glasses, and a dust mask, especially if you’re entering attic spaces or crawl areas where insulation and debris accumulate. If your home has older ductwork, be cautious of sharp metal edges and potential asbestos insulation in homes built before 1980.
Understanding ductwork basics is essential for safe inspection and maintenance. Your HVAC system uses two main types of ducts: supply ducts that deliver conditioned air from your heating or cooling unit to living spaces, and return ducts that pull air back to the system for reconditioning. The plenum is the large box that connects to your HVAC unit and distributes air into the supply duct branches. Recognizing these components helps you focus your inspection on the most critical areas.
Use this preparation checklist to ensure you’re ready:
| Preparation step | Purpose |
|---|---|
| Gather inspection tools | Ensures you have everything needed before starting |
| Turn off HVAC power | Prevents system activation during inspection |
| Wear protective equipment | Protects against dust, sharp edges, and insulation |
| Identify duct locations | Maps inspection route through attic, basement, or crawl space |
| Review ductwork diagram | Helps you understand your system layout |
Pro Tip: Take photos of your ductwork layout during your first inspection. These reference images help you track changes over time and communicate specific issues to HVAC professionals if repairs become necessary.
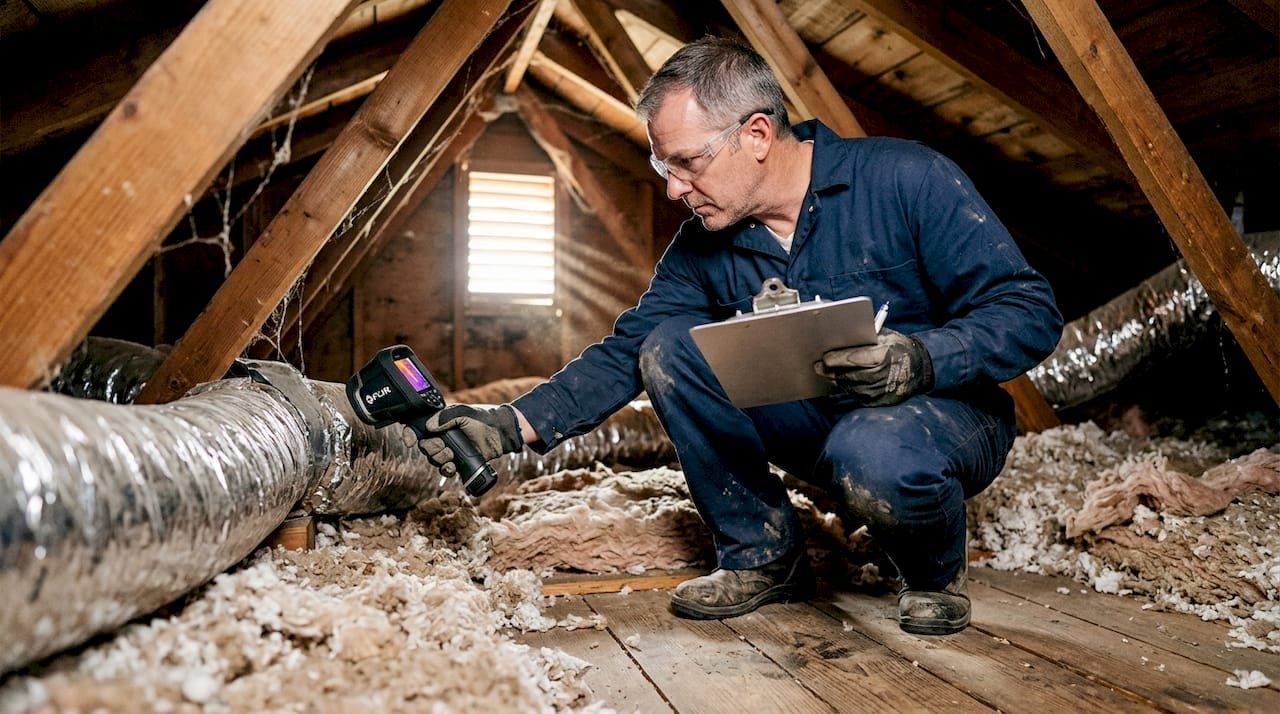
Step-by-step how to inspect your ductwork
Start your inspection by turning off your HVAC system at the thermostat and circuit breaker to ensure safe working conditions. Remove vent covers and registers throughout your home using your screwdriver, setting aside the screws in a container so they don’t get lost. This gives you access points to peer into the duct system and check for obvious problems like debris buildup or disconnected sections.
Follow these inspection steps systematically:
- Examine visible ductwork in your attic, basement, or crawl space for physical damage such as dents, holes, or crushed sections
- Check all duct connections and joints for gaps or separation where sections meet
- Inspect duct insulation for tears, compression, or missing sections that reduce efficiency
- Look for signs of moisture, rust, or mold growth indicating condensation problems
- Test for air leaks using a smoke pencil or lit incense stick held near joints and seams
Visual and airflow inspections reveal leaks, disconnections, and blockages that compromise system performance. When conducting airflow tests, turn your HVAC system back on briefly and observe how smoke moves near duct joints. If smoke is drawn toward or blown away from a connection point, you’ve found a leak. You can also use the tissue paper method by holding a thin piece of tissue near suspected leak areas and watching for movement.
Common duct problems you’ll encounter during inspection include:
- Disconnected or loose joints where duct sections have separated
- Visible holes or tears in duct material from age or damage
- Crushed or kinked flexible ducts restricting airflow
- Missing or deteriorated insulation reducing thermal efficiency
- Excessive dust accumulation indicating poor filtration or leaks
- Improperly sealed connections allowing conditioned air to escape
This table helps you identify what you’re seeing:
| Problem sign | Likely cause | Impact on system |
|---|---|---|
| Whistling sounds near ducts | Air leaks at joints or holes | Energy waste, reduced airflow |
| Visible gaps at connections | Poor installation or age | Conditioned air loss |
| Sagging flexible ducts | Inadequate support straps | Restricted airflow, inefficiency |
| Rust or moisture stains | Condensation or roof leaks | Potential mold growth, duct damage |
| Heavy dust coating | Air leaks drawing in attic air | Poor indoor air quality |
Pro Tip: Inspect ductwork during extreme weather when your HVAC runs frequently. Temperature differences make leaks easier to detect, and you can feel hot or cold spots around problem areas more readily than during mild weather.
Pay special attention to areas where ducts pass through unconditioned spaces like attics or crawl areas. These sections are most vulnerable to damage and energy loss. Check that duct cleaning hasn’t been neglected, as excessive buildup restricts airflow and reduces system efficiency significantly.
Troubleshooting common ductwork issues
Recognizing the symptoms of ductwork problems helps you address issues before they escalate into expensive repairs or system failures. Inconsistent room temperatures often indicate duct leaks or blockages preventing proper air distribution. If some rooms feel stuffy while others are too cold or hot, your ductwork likely needs attention. Excessive dust accumulation on surfaces despite regular cleaning suggests leaky ducts are pulling in contaminated air from attics or crawl spaces. Unexpectedly high energy bills without increased usage point to your HVAC system working harder to compensate for duct inefficiency.
When you identify minor duct leaks during inspection, you can apply temporary fixes while planning for professional repairs. Clean the area around small holes or gaps thoroughly, removing dust and debris. Apply mastic sealant for permanent repairs or aluminum foil tape as a temporary solution, avoiding standard duct tape which deteriorates quickly. Press the sealant or tape firmly to ensure good adhesion, extending coverage at least two inches beyond the damaged area on all sides.
For clogged ducts showing visible dust buildup, you can safely clean accessible sections yourself. Use a vacuum with a long hose attachment to remove loose debris from registers and the first few feet of ductwork. Wipe down vent covers with a damp cloth before reinstalling them. However, deep duct cleaning requiring specialized equipment should be left to professionals who can access the entire system without causing damage.
Leaky ducts increase energy bills and reduce comfort, making timely repairs essential for Tampa homeowners dealing with hot, humid conditions most of the year. Know when to call professionals rather than attempting DIY fixes:
- Extensive duct damage requiring section replacement
- Mold growth inside ductwork needing remediation
- Asbestos insulation on older ducts requiring special handling
- Ductwork redesign to improve system balance and efficiency
- Inaccessible ducts in walls or between floors
Ignoring ductwork problems doesn’t just waste energy. It forces your HVAC system to run longer cycles, accelerating wear on expensive components like compressors and blowers. The money you think you’re saving by delaying repairs often gets spent multiple times over on premature equipment replacement and inflated utility bills.
Document all issues you find during inspection with photos and notes. This record helps HVAC professionals diagnose problems quickly and provides a baseline for tracking whether issues worsen over time. Some duct problems develop gradually, and comparing inspection results year over year reveals deterioration that might otherwise go unnoticed.
Verifying ductwork performance after inspection
After completing your inspection and addressing any issues, confirming that your ductwork performs properly ensures your efforts achieved the desired results. Measuring airflow improvements provides concrete evidence of enhanced system performance. Use an inexpensive thermometer to check temperature differences between supply vents and return grilles. The temperature split should typically range between 14 and 20 degrees for cooling and 30 to 40 degrees for heating, depending on outdoor conditions and system type.
For more precise measurements, consider purchasing a basic airflow meter or anemometer from a hardware store. These devices measure air velocity at vents, helping you identify rooms receiving inadequate airflow even after repairs. Compare readings between different rooms to ensure balanced distribution throughout your home.
Tracking energy consumption before and after ductwork maintenance reveals the financial impact of your efforts. Note your utility bills for at least two months before inspection, then monitor bills for several months afterward, accounting for weather variations. Regular verification ensures maintained HVAC airflow and energy savings over time. Many homeowners see 15 to 25 percent reductions in heating and cooling costs after addressing significant duct problems.
Comfort level improvements often appear immediately after ductwork repairs. Pay attention to whether previously uncomfortable rooms now maintain consistent temperatures. Listen for reduced HVAC runtime, indicating your system reaches set temperatures more efficiently. Notice whether air feels cleaner and dust accumulation decreases, suggesting better filtration and sealed ducts.
This comparison table shows different verification methods:
| Verification method | What it measures | Best for |
|---|---|---|
| Visual inspection | Visible seal quality, no new damage | Confirming repair integrity |
| Temperature readings | Supply/return temperature difference | Assessing system efficiency |
| Airflow measurements | Air velocity at vents | Identifying distribution problems |
| Energy bill tracking | Month-to-month cost changes | Quantifying financial savings |
| Comfort assessment | Room temperature consistency | Evaluating overall improvement |
Maintain your ductwork’s improved condition with ongoing care:
- Inspect accessible ductwork every six months for new damage
- Change HVAC filters monthly during heavy use seasons
- Keep attic and crawl space areas clear of stored items that might damage ducts
- Monitor energy bills for unexpected increases signaling new problems
- Schedule professional duct inspections every three to five years
- Address minor issues immediately before they worsen
Create a simple maintenance log noting inspection dates, findings, and actions taken. This documentation helps you spot patterns and provides valuable information if you ever sell your home or file insurance claims for HVAC-related issues.
Enhance your Tampa home comfort with expert HVAC help
While DIY ductwork inspection empowers you to catch many common issues, some situations benefit from professional expertise. Understanding HVAC systems helps you recognize when specialist knowledge makes the difference between temporary fixes and lasting solutions. Professional duct inspection uses specialized cameras and pressure testing equipment to identify hidden problems you might miss during visual checks.
Our certified technicians provide comprehensive ductwork evaluation and repair services designed for Tampa Bay’s unique climate challenges. We help homeowners optimize their HVAC systems through proper duct sealing, insulation upgrades, and system balancing. Whether you need guidance on troubleshooting HVAC issues or want to establish a preventive maintenance schedule, our family-owned business delivers personalized service that keeps your home comfortable year-round while controlling energy costs.
How to check ductwork frequently asked questions
How often should I check my ductwork?
Inspect accessible ductwork every six months, ideally before peak cooling and heating seasons begin. This schedule helps you catch developing problems before they impact comfort or efficiency. Schedule professional duct inspections every three to five years for comprehensive assessment of hidden sections.
Can I fix duct leaks myself or should I hire a pro?
Small leaks at accessible joints can be sealed with mastic or foil tape as a DIY project. However, extensive damage, inaccessible ducts, or systems requiring rebalancing need professional attention. Improper repairs sometimes worsen problems or create new issues.
What are the signs of severely damaged ducts?
Severe duct damage shows through rooms that never reach comfortable temperatures, dramatic increases in energy bills, visible mold growth around vents, or musty odors when the system runs. Whistling or rattling sounds during operation also indicate significant structural problems requiring immediate professional evaluation.
How does duct cleaning improve my home’s air quality?
Professional duct cleaning removes accumulated dust, allergens, and contaminants that circulate through your home every time your HVAC runs. Clean ducts reduce airborne particles, minimize allergy symptoms, and prevent musty odors. Cleaning is especially beneficial for homes with pets, smokers, or recent renovations.
What tools do I need for a basic duct inspection?
Essential tools include a bright flashlight or headlamp, screwdriver for removing vent covers, smoke pencil or incense stick for leak detection, and mastic sealant or foil tape for minor repairs. A camera phone documents findings, while a thermometer helps measure temperature splits. These basic items enable thorough DIY inspection without expensive equipment.
About This Guide
Written and reviewed by the Home Therapist Cooling, Heating & Plumbing team, a family-owned Tampa Bay HVAC and plumbing company serving the area since 2011. Our licensed techs hold Florida HVAC license CAC1819196 and Plumbing license CFC1431159, with over 1,100 five-star reviews across Tampa, St. Petersburg, Clearwater, Wesley Chapel, Lutz, Riverview, Brandon, Valrico, Apollo Beach, Palm Harbor, Land O’ Lakes, Plant City, New Port Richey, and surrounding Tampa Bay zip codes.
Honest pricing: labor minimum. Upfront quotes, no high-pressure sales, no surprise fees.
Questions about your home? Call (813) 343-2212 for a real tech, or request a callback. Available 7 days a week including evenings and weekends for emergencies.
Recommended
- What is ductwork? Guide to HVAC efficiency & air quality
- How to Detect HVAC Leaks for Lower Energy Bills
- DIY Air Duct Cleaning Guide for Cleaner Indoor Air
- 7 Key Signs of HVAC Inefficiency Every Homeowner Should Know
More Ductwork & Airflow Articles
- Customer-Supplied Toilet Installation Checklist: What Adalberto Checks on Imperial Key, Tampa FL 33615
- Kitchen Sink Replacement on Gandy Blvd N, St. Petersburg, FL 33702: Full Install With Faucet, Disposal & Drain
- Air Duct Cleaning Cost in Tampa Bay
- Indoor Air Quality and Ductwork FAQ for Tampa Bay Homeowners
- AC Tune-Up and Ductwork Inspection on Blossom Ave: What Barbaro Found in Tampa, FL 33614
Tampa Bay averages 246 sunny days and over 51 inches of rain per year, placing more demand on HVAC and plumbing systems than most U.S. markets.
AC Service in Tampa Bay: What Local Conditions Actually Require
Home Therapist technicians work in Tampa Bay homes year-round. Tampa Bay's 9-month cooling season, high humidity, and salt air create specific failure patterns that define what good AC maintenance looks like here.
- Home Therapist installs Goodman (Value and Premium) and Daikin (Elite) systems engineered for Florida's climate. We service and repair all major brands.
- Capacitor and contactor inspections identify the components most likely to fail under Tampa Bay's continuous summer load before they cause a breakdown.
- UV light air purifiers at the air handler prevent biological growth on the evaporator coil surface, reducing both odor complaints and coil cleaning frequency.


