

Plumbing Inspection Checklist: Tampa Homeowners’ Guide
TL;DR:
- Proper preparation and organization help ensure passing Tampa plumbing inspections.
- Inspections cover specific stages like underground, rough-in, and final, depending on the project scope.
- Follow detailed checklists and fix common issues to avoid re-inspections and delays.
A failed plumbing inspection can cost you more than just time. Rescheduling fees, required rework, and project delays add up fast, and many Tampa Bay homeowners don’t realize how preventable most failures are. Whether you’re replacing a water heater, completing a repipe, or building new construction, the City of Tampa has specific inspection stages that must pass before work is approved. This guide gives you a clear, checklist-driven approach to every stage of the process, from understanding what inspectors look for to submitting documentation correctly, so you walk into inspection day with confidence instead of guesswork.
Table of Contents
- What Tampa plumbing inspections cover and why they matter
- Essential tools, documents, and prep steps for your inspection
- The complete homeowner’s plumbing inspection checklist
- Common issues, troubleshooting, and what to expect after your inspection
- The overlooked value of proper plumbing preparation
- Expert help for stress-free plumbing inspections in Tampa
- Frequently asked questions
Key Takeaways
| Point | Details |
|---|---|
| Know your inspection type | Understanding the exact inspection required helps you gather the right paperwork and prep your plumbing properly. |
| Prepare tools and documents | Have the necessary tools, permits, and access ready whether your inspection is in-person or virtual. |
| Use a detailed checklist | Following a systematic checklist prevents missed steps that can cause inspection failures. |
| Address common trouble spots | Double-check for leaks, code labels, accessible shutoffs, and correct documentation to avoid re-inspections. |
| Call pros for complex work | Licensed local plumbers can ensure fast code compliance and reduce the risk of costly errors or delays. |
What Tampa plumbing inspections cover and why they matter
Not every plumbing job triggers the same inspection. Tampa has a structured set of required checkpoints depending on the scope of your project, and knowing which ones apply to your situation is the first step toward passing without a hitch.
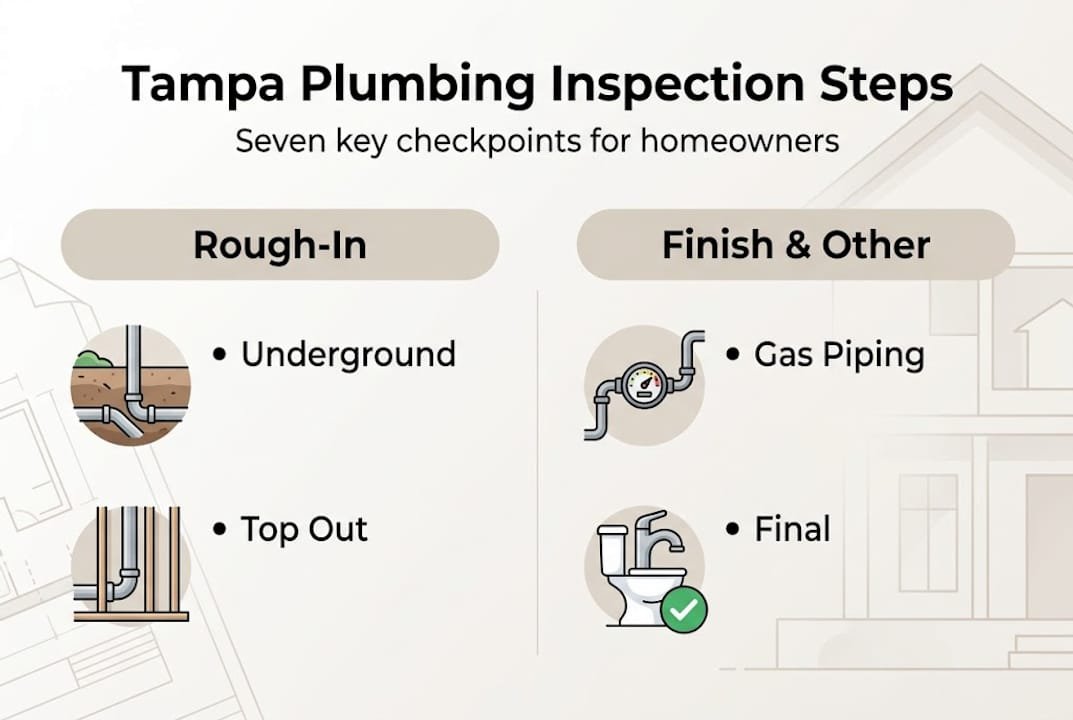
According to the City of Tampa, residential new construction plumbing inspections include seven distinct stages: PLB-Underground Rough-In, PLB-Gas Rough-In, PLB-Rough-In, PLB-Tub Set, PLB-Sewer, PLB-Water Service, and PLB-Final. Each stage must be approved before work continues.
Here’s a quick overview of common inspection types and what triggers them:
| Inspection type | When it’s required |
|---|---|
| PLB-Underground Rough-In | Before concrete pour in new construction |
| PLB-Gas Rough-In | Before gas line concealment |
| PLB-Rough-In | Before walls are closed in |
| PLB-Tub Set | After tub/shower installation, before surround |
| PLB-Sewer | Sewer line replacement or new installation |
| PLB-Water Service | New or replaced water service line |
| PLB-Final | After all plumbing work is complete |
| Water Heater Replacement | Any permitted water heater swap |
These inspections exist for good reason. Faulty plumbing doesn’t just fail code, it creates real hazards: water damage, gas leaks, contaminated water supply, and structural problems. Passing each stage protects your family, your investment, and your ability to legally occupy or sell the property.
Many homeowners confuse preparing a personal checklist with meeting code requirements. A DIY checklist is a valuable prep tool, but it doesn’t replace a licensed inspection. You can learn what to expect from Tampa plumbing inspections to understand exactly what inspectors assess at each stage.
Only work complying with code will pass inspection. DIY repairs may require rework by licensed professionals before a permit can be closed.
Tampa also offers official virtual inspection resources that walk you through digital submission options, which is increasingly relevant for common permit types like water heater replacements and fixture swaps.
Essential tools, documents, and prep steps for your inspection
Once you know which inspections apply, your next job is showing up prepared. Inspectors notice when a homeowner or contractor has done the groundwork, and that preparation often makes the review go faster and smoother.
Tampa Bay uses virtual inspection tools like VuSpex for several permit types. Virtual inspections cover PLB-Final, Plumbing Fixture Replacement, Water Heater Replacement, Water Distribution Re-Pipe, Gas Piping, and Sewer and Water Service Replacement. Homeowners and contractors submit photos and notes following specific checklists for each permit type. For Hillsborough County properties, check the Hillsborough County virtual inspection info for jurisdiction-specific guidance.
Here’s how in-person and virtual prep requirements compare:
| Prep item | In-person inspection | Virtual inspection |
|---|---|---|
| Permit paperwork on-site | Required | Required (digital copy) |
| Fixture accessibility | Physically clear | Photographed clearly |
| Water shut-off tested | Inspector verifies | Photo or video proof |
| Access panels open | Must be open | Must be visible in photos |
| Gas shutoff accessible | Must be labeled and clear | Photo with label visible |
Follow these steps before any inspection:
- Pull and review your permit paperwork. Confirm all approved scopes match completed work.
- Test every water shut-off valve to confirm it operates without sticking.
- Open all access panels to pipes, valves, and the water heater.
- Check drain flow at every fixture. Slow drains signal blockages that could flag during inspection.
- Verify gas shutoffs are clearly labeled and accessible.
- For virtual submissions, photograph each system in good lighting before submitting.
- Review the Tampa plumbing maintenance checklist to catch anything you may have overlooked.
- Confirm your inspection is scheduled with the correct permit type selected.
Pro Tip: For virtual inspections, use a phone with a quality camera and take photos in natural light or with a flashlight. Blurry or dark photos are a common reason for delayed approvals. Capture labels, connections, and full pipe runs clearly.
Commonly forgotten items include exposed pipe access panels behind walls, anti-siphon devices on outdoor hose bibs, and pipe insulation on hot water lines. These small details catch inspectors’ attention quickly.
The complete homeowner’s plumbing inspection checklist
This checklist is organized by system so you can work through your home methodically. Use it the day before inspection to confirm everything is ready.
Visible piping
- No visible leaks, corrosion, or staining on supply or drain lines
- Pipes are properly supported with straps at required intervals
- All pipe materials are labeled with type and size where required
- No cross-connections between potable and non-potable lines
Fixtures and drains
- All faucets, toilets, and showers operate correctly
- Drain flow is clear at every sink, tub, and floor drain
- P-traps are installed and not dry or missing
- Overflow drains on tubs are secure and sealed
Water heater
- Temperature and pressure relief valve is installed and properly discharged
- Water heater is strapped or secured per current code
- Expansion tank is installed if your system has a backflow preventer
- Permit label is visible on the unit
Sewer and water service
- Clean-outs are accessible and capped
- No visible root intrusion or pipe damage at exterior access points
- Water meter area is clear and accessible
Valves and shutoffs
- Main water shutoff is clearly labeled and operational
- Individual fixture shutoffs work without sticking
- Backflow prevention devices are installed where required
Venting
- Vent pipes extend through the roof without obstruction
- No missing vent caps or open vent terminations
Gas lines (if applicable)
- All gas lines are properly supported and labeled
- Shutoff valves are accessible and marked
- No odor of gas near connections
Pro Tip: Double-check for cross-connections and anti-siphon devices. These are among the most common reasons for failed inspections and are easy to miss during a quick walkthrough.
Remember, this checklist prepares you for inspection but does not replace the licensed sign-off required to close a permit. Applying this checklist in a real inspection scenario shows exactly how these steps play out in practice. Homeowners and contractors must still submit photos and notes per the specific permit checklist when using virtual inspection platforms.
Common issues, troubleshooting, and what to expect after your inspection
Even well-prepared homeowners sometimes face a failed item. Knowing the most common failure points in advance lets you fix them before the inspector ever arrives.
| Common failure reason | How to avoid it |
|---|---|
| Leaking connections | Test all joints under pressure before inspection |
| Missing pipe straps | Add supports every 4 feet on horizontal runs |
| Unlabeled shutoffs | Use adhesive labels on all valves before inspection |
| Inaccessible access panels | Clear all panels and leave them open |
| Missing expansion tank | Install one if your system has a check valve or PRV |
| Improper vent termination | Confirm vent caps are secure and unobstructed |
| No anti-siphon on hose bibs | Replace standard bibs with vacuum-breaker models |
If an item doesn’t pass, here’s how to respond quickly:
- Read the inspection report carefully. Inspectors note the specific code section violated.
- Fix the flagged item only. Don’t disturb passing areas.
- Document the correction with photos if using virtual inspection.
- Schedule a re-inspection through the same permit portal.
- Confirm the re-inspection covers only the failed items, not the full scope.
Code compliance is non-negotiable. Failed DIY repairs can lead to increased costs and delays that compound the longer they go unaddressed.
Once your inspection passes, you’ll receive written confirmation through the permit portal. The permit status updates to reflect approval, and you’ll get a final inspection record to keep with your home documents. For more detail on inspection outcomes in Tampa, including what reports look like, review what the process covers from start to finish. If your water heater was part of the inspection, water heater inspection details explain what inspectors specifically check on those units.
Only work that complies with code will pass inspection. DIY repairs that don’t meet current standards may need correction by a licensed plumber before the permit can close.
The overlooked value of proper plumbing preparation
After years of working with Tampa Bay homeowners, we’ve noticed a pattern. Most failed inspections aren’t caused by major technical errors. They happen because of small, easily fixable details that got overlooked in the rush to finish a project.
Homeowners spend hours on the visible work, the new fixtures, the repipe, the water heater install, and then forget to label a shutoff valve or leave an access panel blocked by stored items. Inspectors notice the overall condition of a work zone. A clean, organized, well-labeled space signals that the work was done carefully. That impression matters.
Our honest advice: over-prepare on the documentation side. Keep your permit paperwork in a folder at the job site. Print the checklist. Walk through it the morning of inspection. These steps take 20 minutes and dramatically reduce your re-inspection risk.
Partnering with a licensed plumber for complex work and using a detailed checklist side by side gives you the best shot at a clean pass. Maintenance beyond inspection day is equally important, because a home that stays well-maintained rarely surprises you at inspection time.
Expert help for stress-free plumbing inspections in Tampa
Sometimes the checklist reveals something that needs professional attention before inspection day. That’s exactly where our team at Home Therapist Cooling, Heating, and Plumbing steps in.
We offer plumbing leak inspection and diagnosis to catch hidden problems before they become inspection failures. If your home needs a repipe or you’re unclear on what the work involves, our repiping and service explanation breaks down exactly what to expect. We also stand behind our work with clear warranty coverage for plumbing services so you know what’s protected after the job is done. As a family-owned Tampa Bay business, we’re here to make sure your inspection goes smoothly from start to finish.
Frequently asked questions
- What does a home plumbing inspection consist of?
A home plumbing inspection covers water heater condition, pipe integrity, fixture connections, shut-off valves, drain flow, water pressure, and leak checks under sinks and at toilets. In Tampa, inspectors also watch for hard-water buildup and salt-air corrosion on exposed fittings. Home Therapist provides FREE diagnosis on every visit.
- What are the most common plumbing code violations?
Common violations include missing pipe supports, improper venting, lack of backflow prevention, water heaters without pressure-relief valve discharge tubes, and unsupported drain slopes. Tampa's humidity accelerates corrosion on exposed connections, making these issues appear faster. Home Therapist is fully licensed (CFC1431159) and corrects code issues on the spot.
- What are the 7 steps of the inspection process?
A thorough plumbing inspection covers: (1) water pressure test, (2) water heater evaluation, (3) supply line check, (4) drain and waste flow test, (5) fixture and shut-off valve inspection, (6) leak detection at joints and under slabs, and (7) venting system review. Call Home Therapist at (813) 343-2212 for a FREE estimate.
What are the main types of plumbing inspections required in Tampa?
Tampa requires inspections for each phase of plumbing work, including seven distinct stages such as PLB-Underground Rough-In, PLB-Rough-In, PLB-Final, PLB-Sewer, PLB-Water Service, PLB-Gas Rough-In, and PLB-Tub Set, each tied to a specific permit and work type.
How do I prepare for a Tampa virtual plumbing inspection?
Tampa uses platforms like VuSpex for virtual inspections covering water heater replacements, repiping, gas piping, and more. Gather clear photos of all systems per the permit checklist and submit them with notes through the platform.
Can I pass inspection if I do my own plumbing work?
DIY work must still meet all current code requirements. Work that doesn’t comply will fail inspection and may need correction by a licensed plumber before the permit can close.
What happens if my Tampa plumbing inspection fails?
You’ll receive a report identifying each failed item and the code section it violates. Fix the issues, document corrections, and schedule a re-inspection through the same permit portal.
Are checklists provided by the city available for download?
Yes. Tampa and Hillsborough County both offer downloadable inspection checklists as PDFs for each permit type, including virtual inspection submissions.
About This Guide
Written and reviewed by the Home Therapist Cooling, Heating & Plumbing team, a family-owned Tampa Bay HVAC and plumbing company serving the area since 2011. Our licensed techs hold Florida HVAC license CAC1819196 and Plumbing license CFC1431159, with over 1,100 five-star reviews across Tampa, St. Petersburg, Clearwater, Wesley Chapel, Lutz, Riverview, Brandon, Valrico, Apollo Beach, Palm Harbor, Land O’ Lakes, Plant City, New Port Richey, and surrounding Tampa Bay zip codes.
Honest pricing: $279 labor minimum. Upfront quotes, no high-pressure sales, no surprise fees.
Questions about your home? Call (813) 343-2212 for a real tech, or request a callback. Available 7 days a week including evenings and weekends for emergencies.
Recommended
- Essential plumbing maintenance checklist for Tampa Bay
- Why Inspect Plumbing Pipes – Tampa Bay Homeowners
- Preventative plumbing tips for Tampa Bay homeowners 2026
- Plumbing Inspections in Tampa, FL: Ensuring Your Pipes are in Top Condition Home Therapist Cooling, Heating, and Plumbing
More Related Articles
- Recurring Drain Clogs Wesley Chapel: Why the Same Drain Keeps Backing Up
- Toilet Flange Replacement Oldsmar FL 34677: Repair Ring vs Full Glue-In on Huntleigh Ct (86 Min, $398)
- Garbage Disposal Repair Near Me in Tampa Bay, FL: What to Check and When to Call
- A O Smith Water Heater Warranty: Tampa Bay Homeowner Guide
- Garbage Disposal Humming Not Spinning: Grant Park Tampa FL 33619 Job


