

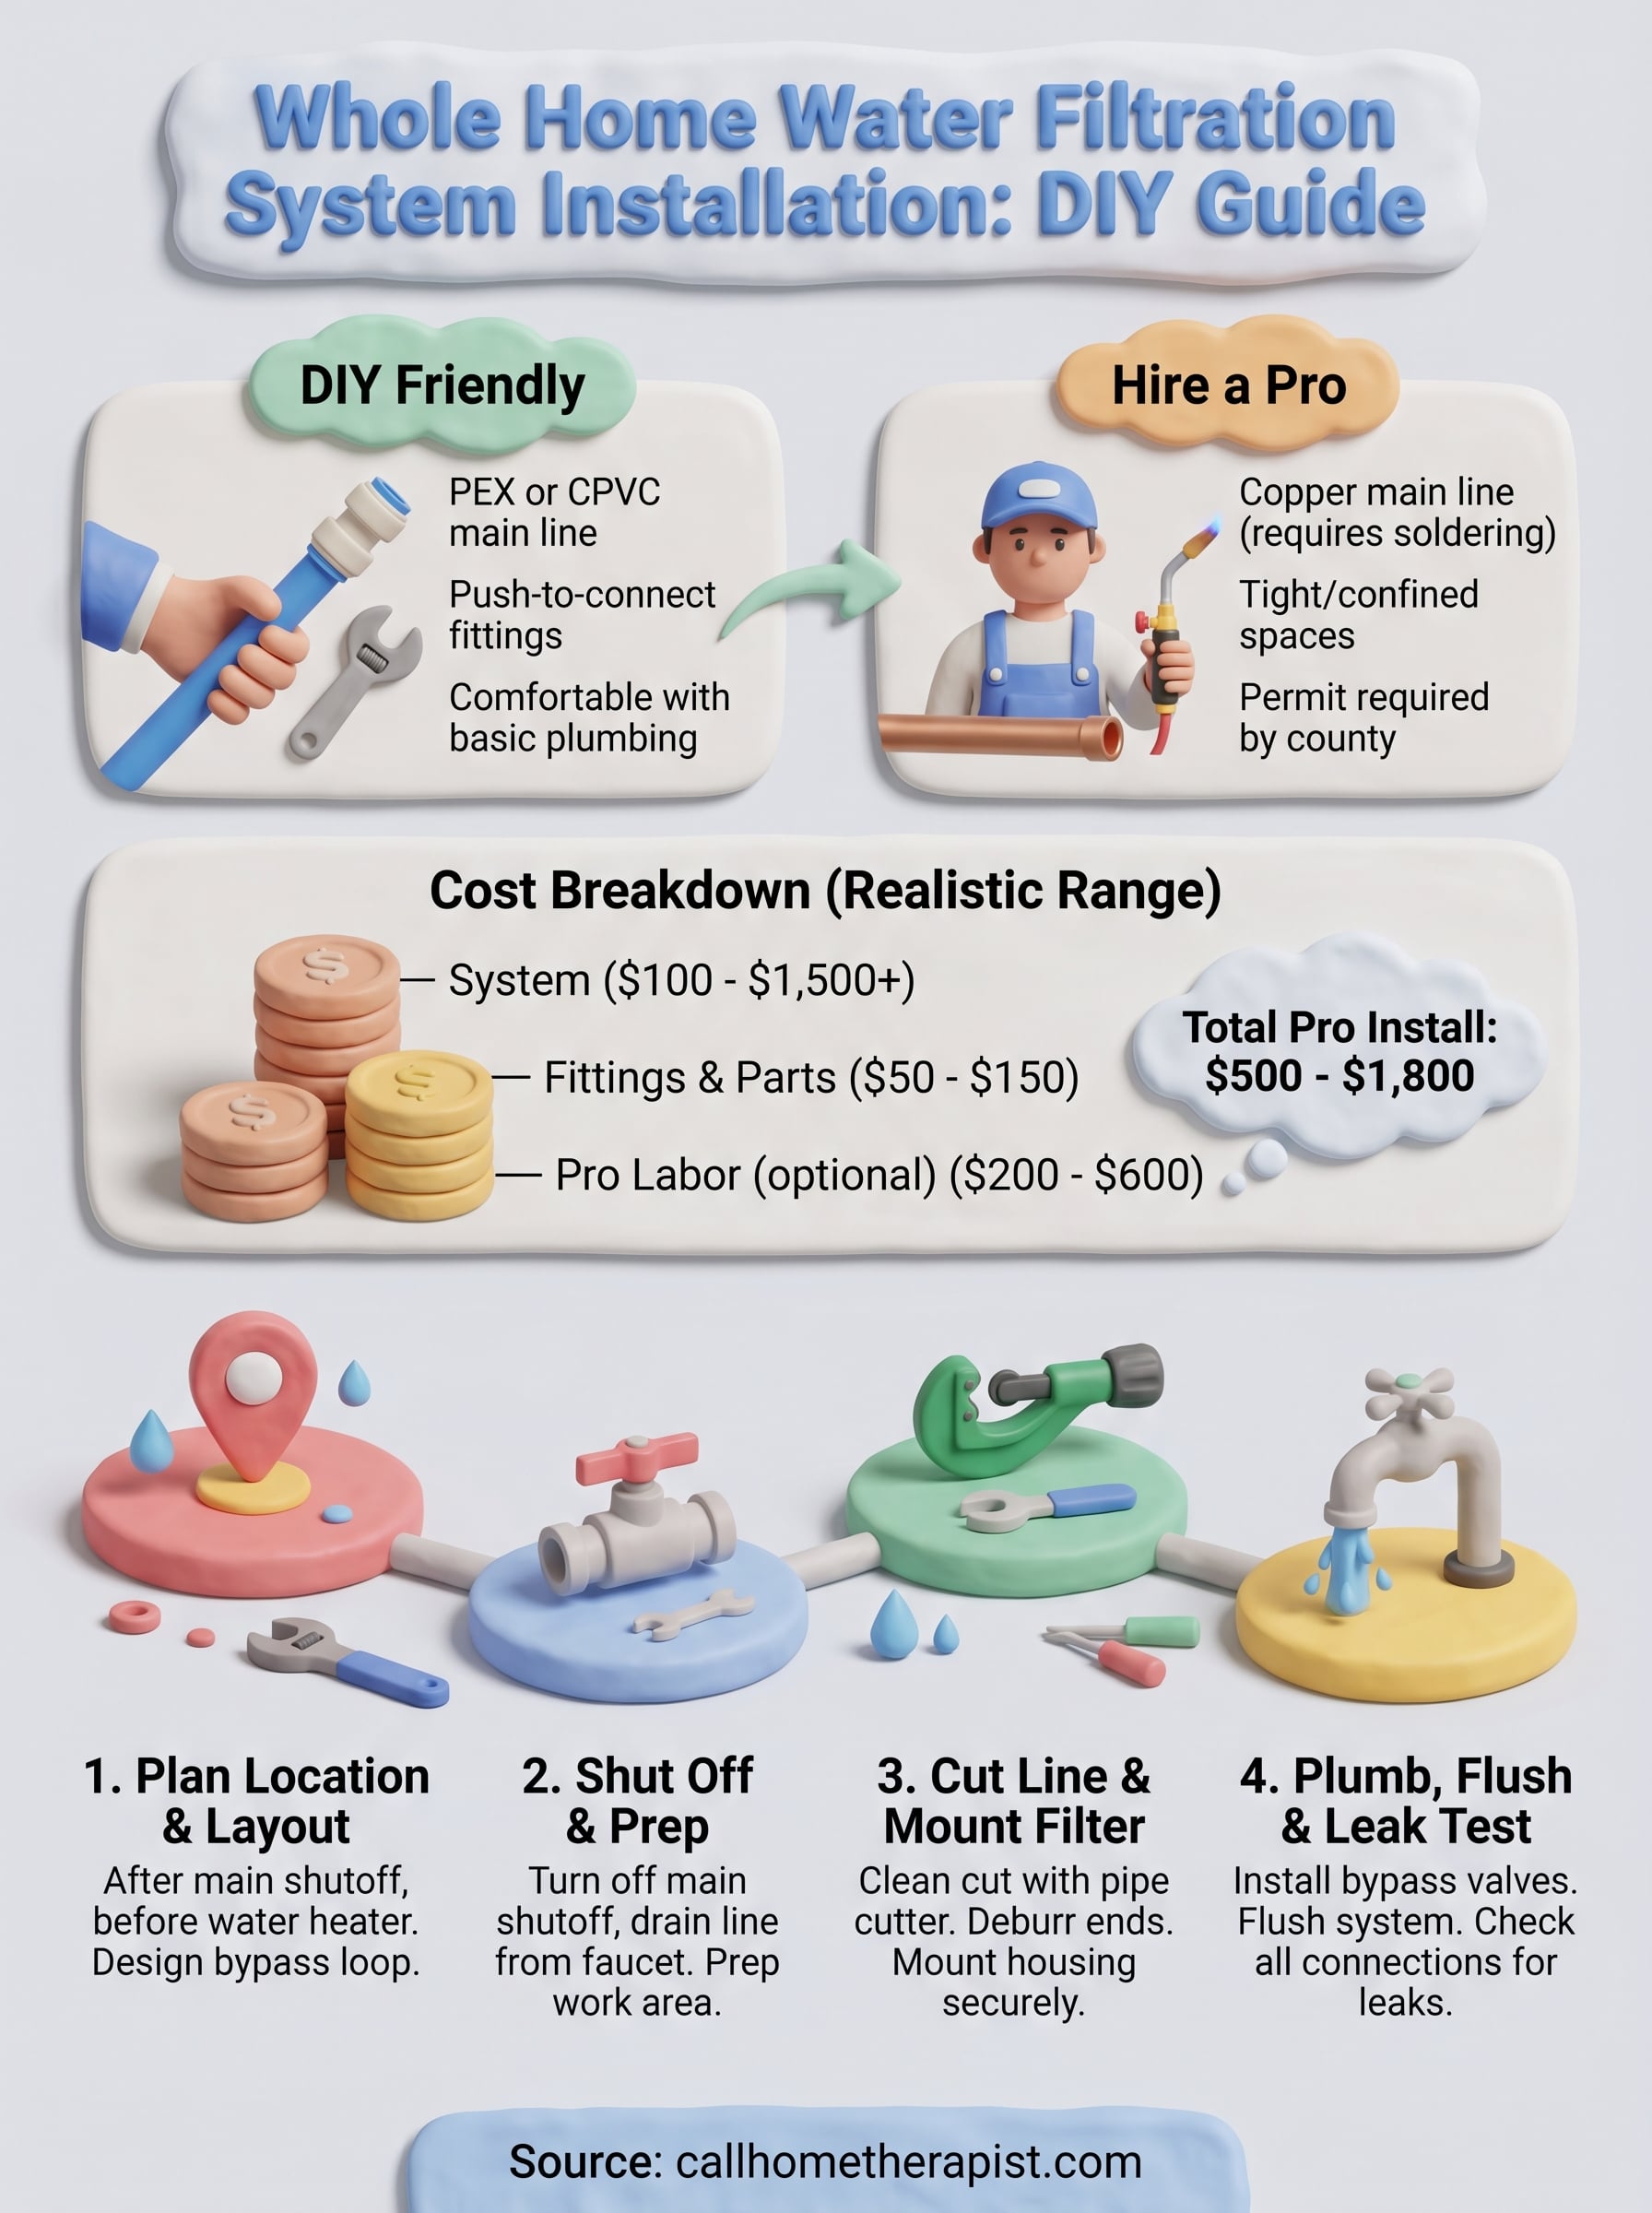
Whole Home Water Filtration System Installation: DIY Guide
Tampa Bay’s tap water isn’t exactly known for tasting great. Between chlorine, sediment, and hard minerals, what comes out of your faucet can affect everything from your morning coffee to the lifespan of your plumbing fixtures. A whole home water filtration system installation solves this at the source, filtering water before it reaches a single tap, showerhead, or appliance in your house. It’s one of the most practical upgrades you can make, and many homeowners want to know if they can handle it themselves.
The short answer: it depends on your plumbing setup and comfort level with cutting into your main water line. This guide walks you through the full process, from choosing the right system and gathering tools to the actual step-by-step installation. We’ll also cover realistic cost breakdowns and help you figure out where the DIY line ends and professional help makes more sense.
At Home Therapist, we’ve been installing water filtration systems and handling plumbing work across the Greater Tampa Bay Area since 2011. We wrote this guide to give you an honest look at what the job involves, so whether you grab a wrench or grab your phone to call us, you’ll know exactly what you’re getting into.
Before you start: DIY vs plumber and costs
Before you pick up a pipe cutter, you need to be honest with yourself about two things: your plumbing skill level and your local permit requirements. A whole home water filtration system installation involves cutting into your main supply line, which means one wrong move can leave you without water or dealing with a slow leak inside a wall. That said, if you’re comfortable with basic plumbing tasks like soldering copper pipe or working with push-to-connect fittings, this project is doable on a weekend.
Can you realistically DIY this?
The biggest factor is what material your main water line is made of. Copper pipe requires soldering, which takes practice and the right torch setup. PEX and CPVC are more forgiving and work well with push-to-connect fittings that don’t require any heat. If your home has copper and you’ve never soldered before, that’s a strong reason to call a plumber rather than learn on your main supply line.
If you’re not sure what type of pipe runs to your main shutoff, inspect it carefully before committing to a DIY approach.
You also need to check whether your county requires a permit for this type of work. Some Florida counties require a plumbing permit for any modification to the main water line. Contact your local building department before you start. Skipping this step can create complications when you sell your home or file an insurance claim.
Here’s a quick breakdown of when DIY makes sense versus hiring a pro:
| Situation | DIY | Hire a pro |
|---|---|---|
| PEX or CPVC main line | Yes | Optional |
| Copper main line, no soldering experience | No | Yes |
| Tight or confined pipe access | No | Yes |
| Permit required in your county | Verify first | Recommended |
| Comfortable with pressure testing and shutoffs | Yes | Optional |
What does it cost?
The system itself is usually your biggest expense. A basic sediment filter runs $100 to $300. A multi-stage system that handles sediment, chlorine, and hard minerals can range from $400 to $1,500 or more, depending on the brand and number of filtration stages. Beyond the unit, budget $50 to $150 for fittings, valves, and mounting hardware like bypass valves, push-to-connect adapters, and filter housing brackets.
If you hire a licensed plumber, expect to add $200 to $600 in labor depending on the complexity of your main line access and the number of shutoff valves involved. In the Greater Tampa Bay Area, a complete professional installation typically runs $500 to $1,800 total, covering everything from cutting the line to final leak testing.
Step 1. Pick the installation spot and layout
The right location makes your whole home water filtration system installation significantly easier, both now and every time you swap out filter cartridges down the road. You want to install the system after the main shutoff valve but before the water heater, so every cold and hot water line in the house gets filtered. In most Tampa Bay homes, that spot is in the garage or utility room near where the main supply line enters the building.
Where exactly to tap in
Look for a straight, accessible run of pipe with at least 12 inches of clearance on either side. You need enough room to mount the filter housing, attach inlet and outlet fittings, and still reach the filter cap with a wrench when it’s time to change cartridges. Avoid placing the system near electrical panels, in tight crawl spaces, or anywhere that regularly gets wet.
Here are the key placement requirements to check off before you commit to a spot:
- Pipe orientation: Most whole-home filter housings mount vertically; confirm yours matches your pipe run
- Clearance below the housing: You need at least 6 to 8 inches to unscrew the sump and drop the cartridge out
- Distance from water heater: Install on the cold supply line before it branches to the heater
- Ambient temperature: Avoid unventilated outdoor spots in direct sun, which can degrade filter media faster
Planning your bypass loop
Before you cut anything, sketch a simple layout of how the filter will connect to your existing pipe. A bypass loop uses a three-valve setup: one valve before the filter, one after, and one bypass valve running parallel. This lets you isolate the filter for maintenance without cutting water to your entire house.
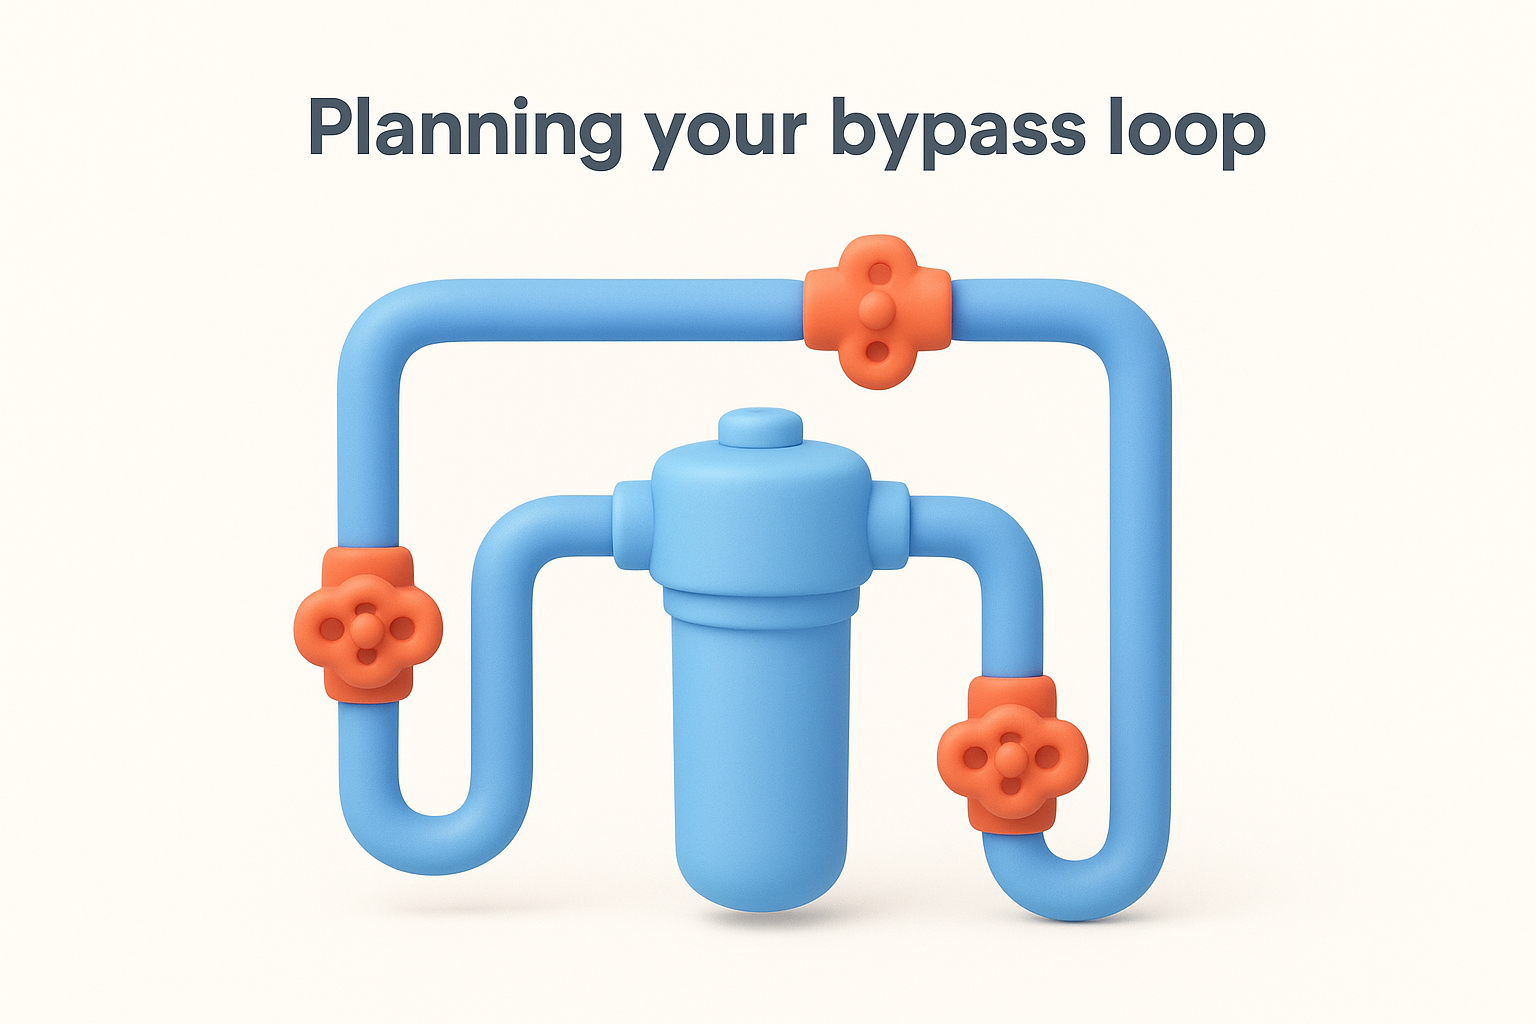
Always include a bypass valve in your layout. Skipping it means shutting off water to the whole house every time you change a filter cartridge.
Measure the total length of pipe the new assembly will occupy, including the filter housing, fittings, and valves, before you start cutting.
Step 2. Shut off water and prep the work area
Good prep work at this stage saves you from scrambling once you’ve made your first cut. Before your whole home water filtration system installation moves from planning to physical work, you need water out of the pipe and a clear, organized space to work in. Rushing this step is how a straightforward job turns into a bigger problem.
Turn off the main shutoff and drain the line
Find your main water shutoff valve, which is usually near the water meter or where the supply line enters your garage or utility room. Turn it fully clockwise until it stops. Once it’s off, open a faucet on the lowest floor of your house to relieve pressure and drain whatever water remains in the supply lines. Leave that faucet open while you work.
Test your main shutoff before you commit to this project. If it doesn’t fully close, replace it first or call a plumber, because a valve that only partially closes makes cutting the pipe extremely messy.
Watch the open faucet until water slows to a drip and stops before you touch anything. Even a small amount of residual pressure can push water out fast when you open the pipe, so don’t skip this wait.
Set up your work area before you cut
Lay down old towels or a plastic drop cloth under the work area to catch any remaining drips when you open the pipe. Keep a small bucket within reach to collect water that drains from the cut section of pipe. Have all your tools close by: pipe cutter, deburring tool, push-to-connect fittings, and your filter housing assembly.
Arrange your fittings and valves in the sequence you’ll install them so you’re not digging through a parts bag while your pipe drips. A few minutes of organization here keeps the actual cutting step clean and focused.
Step 3. Cut the main line and mount the filter
This is the most critical part of your whole home water filtration system installation. Once you make the cut, you’re committed, so have your fittings and filter housing staged and ready before the pipe cutter touches anything. Work deliberately and in order, and the rest of the installation follows naturally.
Make the cut cleanly
Use a pipe cutter sized for your line diameter rather than a hacksaw. A pipe cutter scores a clean, square edge that seats properly into push-to-connect fittings. Wrap the cutter around the pipe, tighten it slightly, and rotate it around the pipe one full turn. Tighten a quarter turn more and repeat until the pipe separates. Once cut, use a deburring tool or fine file to smooth the inside edge of both cut ends before inserting any fitting.
Here is the sequence for this step:
- Mark your two cut points using the total length measurement from Step 1
- Make the first cut, then the second
- Deburr both open ends completely
- Dry-fit your fittings and filter housing to confirm everything lines up before pushing connectors home
Push-to-connect fittings are unforgiving of rough pipe edges, so deburring both cuts completely before insertion prevents leaks and fitting failures later.
Mount and secure the housing
Once the pipe sections are cut, hold the filter housing in position against the wall or mounting surface and mark your bracket holes. Drill into a stud or use appropriate wall anchors, then screw the bracket in place before you connect any fittings. The housing needs to be level and stable since a crooked mount puts stress on the inlet and outlet connections over time.
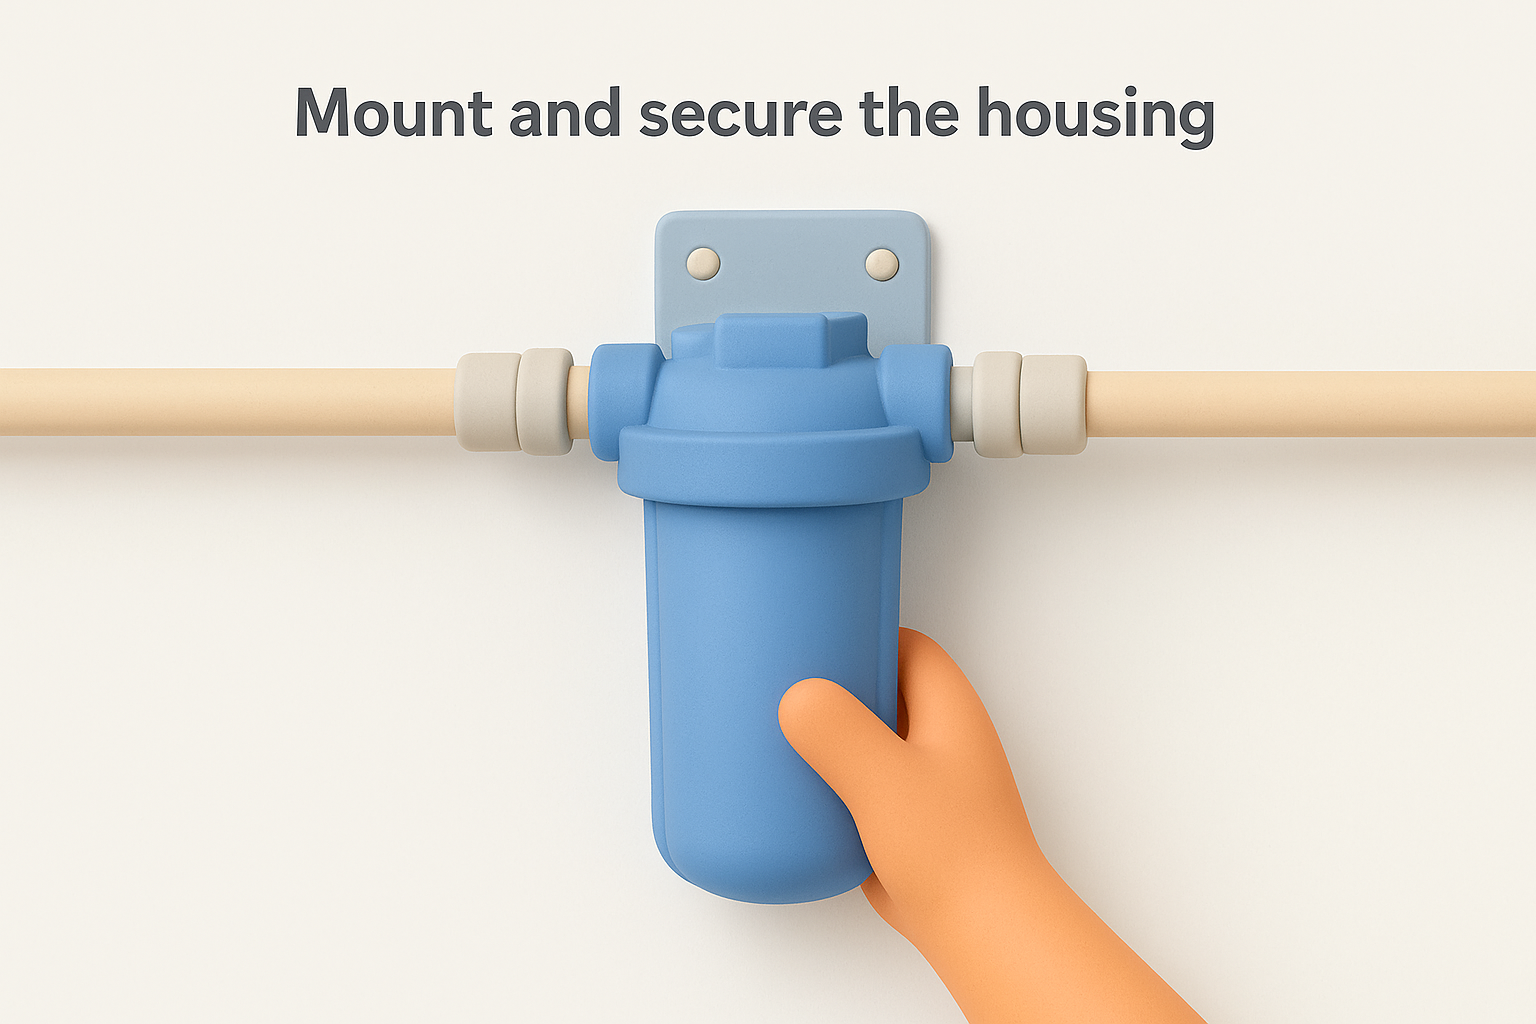
With the bracket secure, slide your inlet and outlet push-to-connect fittings onto the pipe ends and connect them to the filter housing ports. Push each fitting in fully until you feel it seat, then give it a firm tug to confirm it locked.
Step 4. Plumb valves, flush, and leak-test
With your filter housing mounted and the inlet and outlet connections seated, the final phase of your whole home water filtration system installation focuses on getting water flowing cleanly and safely through the new assembly. This step covers installing the bypass valves, flushing out manufacturing residue from the new cartridge, and confirming there are no leaks before you walk away.
Connect and set the bypass valves
Install your three bypass valves in the positions you planned in Step 1: one on the inlet side, one on the outlet side, and one on the parallel bypass line. Hand-tighten push-to-connect valves fully, then give each one a firm quarter-turn snug with pliers. Before you restore water, set all three valves to bypass position so water flows around the filter first, which lets you check the main line connections under pressure without sending water through the new cartridge yet.
Always pressurize the bypass line first and confirm it holds before routing water through the filter housing.
Flush the system and run a leak test
Open the main shutoff valve slowly to bring pressure back up. Walk the bypass loop and check every fitting connection for drips. Dry each fitting with a cloth so you can see new moisture clearly. Once the bypass line holds, switch the valves to filter position and let water run through the housing for two to three minutes to flush out carbon fines or filter media dust. This initial flush is standard for most cartridge types and keeps that residue out of your supply.
After flushing, open a cold-water tap at a sink downstream and let it run until the water runs clear. Check the filter housing connections one final time under full flow pressure. Tighten any fitting that shows moisture.
You’re set up for cleaner water at every tap
You’ve now completed a whole home water filtration system installation that protects every faucet, shower, and appliance in your home. With your bypass valves in place, your cartridge flushed, and your connections leak-tested, the system runs without any action needed on your end until your first cartridge change, which most manufacturers recommend every six to twelve months depending on your household water usage.
Keep a note of the installation date and cartridge model number somewhere accessible, like inside the filter housing bracket or in your phone. That small habit makes future maintenance straightforward and keeps your filtration performing at full capacity.
If any part of this project gave you pause, from cutting the main line to working with copper pipe, the licensed plumbing team at Home Therapist handles water filtration installations across the Greater Tampa Bay Area with same-day availability and upfront pricing. Reach out and we’ll take it from there.
