

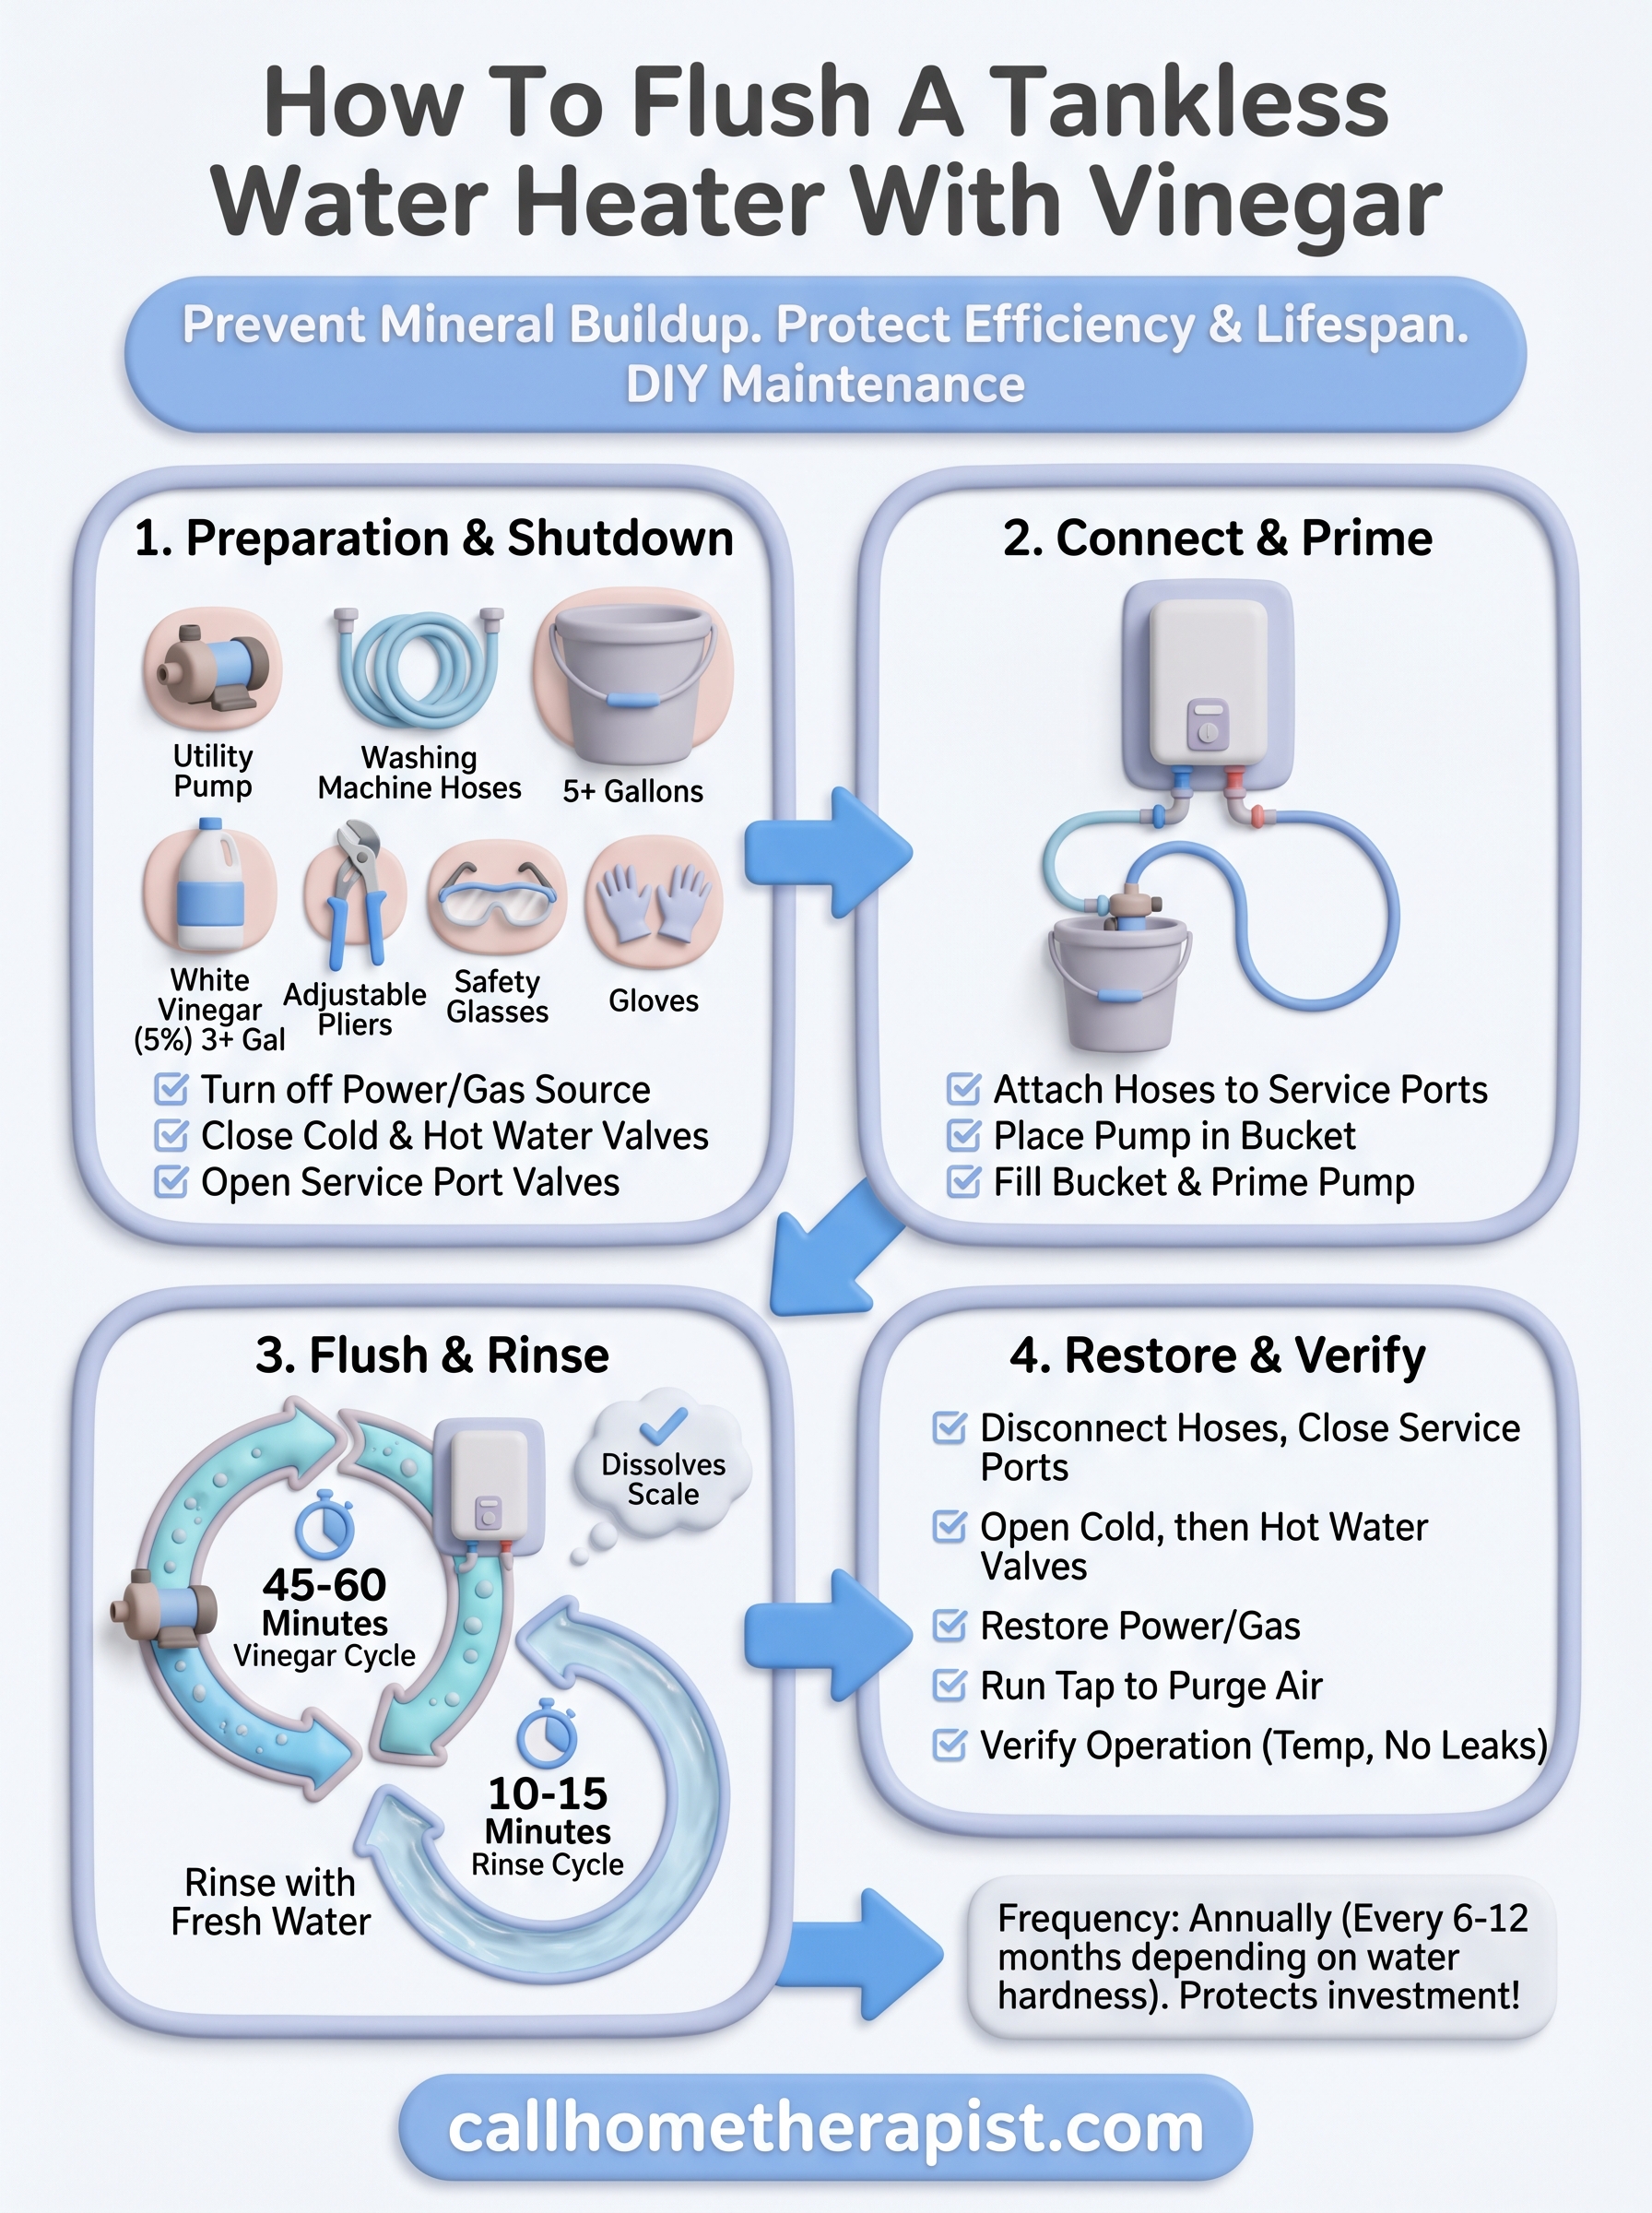
How To Flush A Tankless Water Heater With Vinegar
Mineral buildup inside your tankless water heater is a silent problem. Tampa Bay’s hard water accelerates scale deposits on the heat exchanger, and over time, that buildup reduces efficiency, raises energy bills, and can shorten the life of your unit. Knowing how to flush a tankless water heater with white vinegar is one of the most effective ways to prevent these issues before they become expensive repairs.
At Home Therapist, we’ve installed and serviced tankless water heaters across the Greater Tampa Bay Area since 2011. Our technicians see the consequences of skipped maintenance regularly, and flushing is the single most important thing you can do to protect your investment. The good news? With a few basic tools and about an hour of your time, you can handle this yourself.
This guide walks you through every step of the process: what you’ll need, how to safely circulate vinegar through the system, and how often to repeat the flush based on your water hardness.
What you need before you start
Before you start learning how to flush a tankless water heater, gather everything upfront. Stopping mid-flush to hunt for a missing part is more than an inconvenience; it can leave your system in an incomplete state and cause problems when you restore water flow. Most of these items are available at any hardware store, and some you may already own.
Having everything staged before you cut power or shut off water is the single best way to keep the job safe and efficient.
Tools and equipment
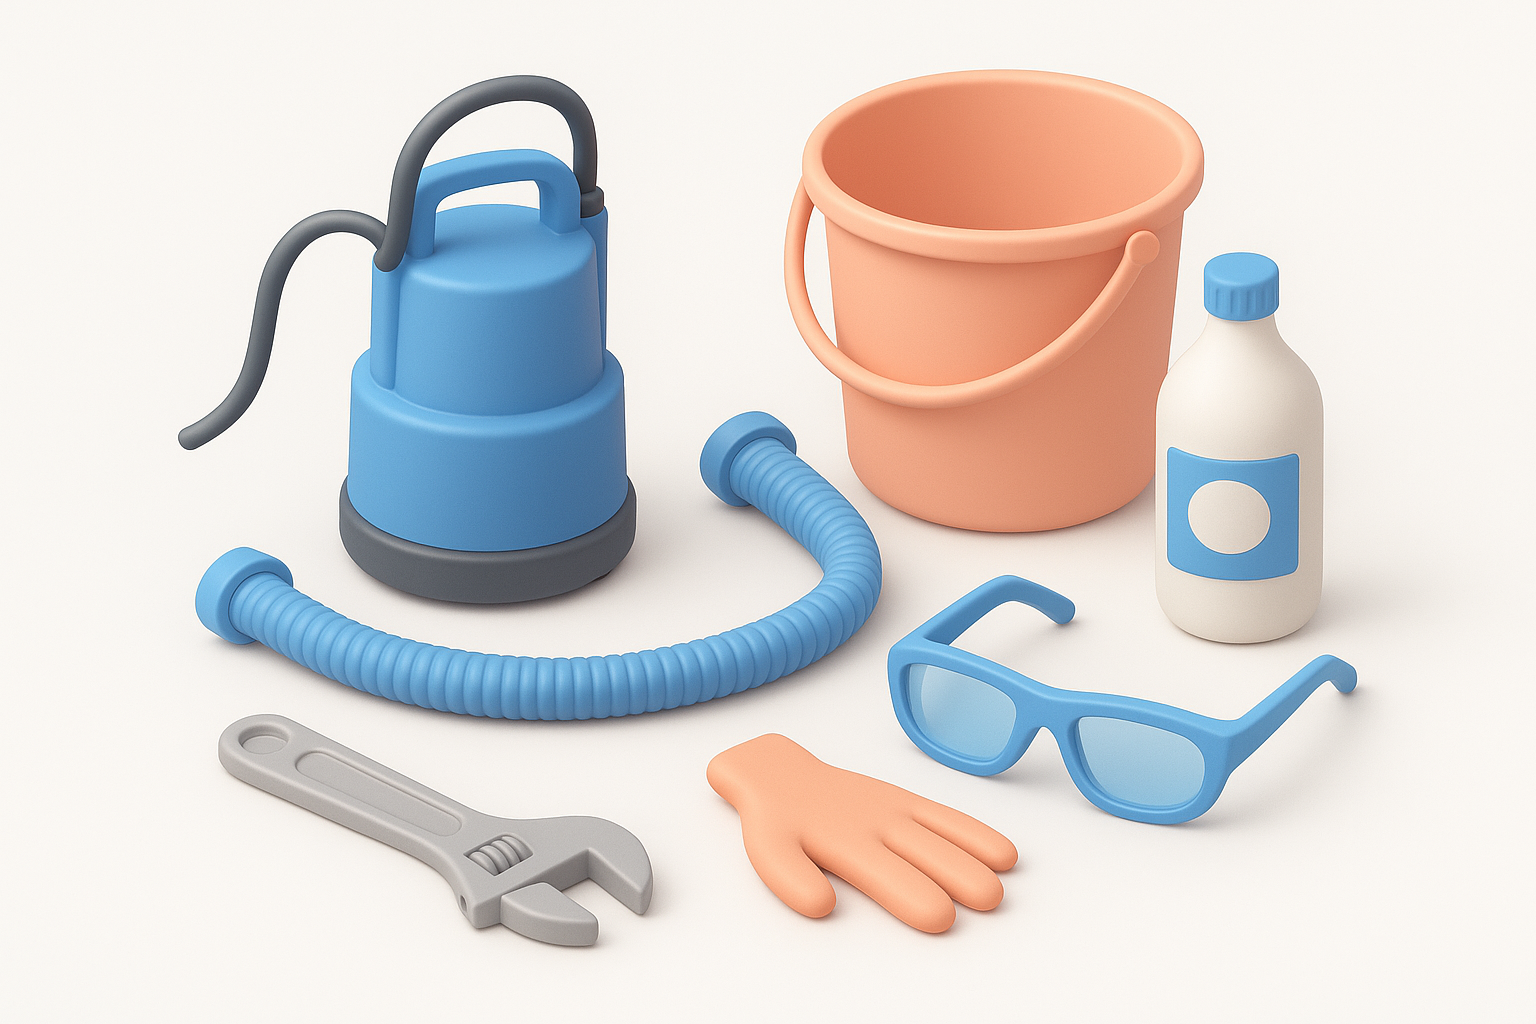
You’ll need a few specific items to circulate vinegar safely through the heat exchanger. A submersible utility pump and two washing machine hoses form the core of the setup, creating a closed loop between a bucket and the heater’s service ports. Make sure your bucket holds at least 3 to 5 gallons so the vinegar has enough volume to circulate without running dry during the flush.
Here’s everything you need before you turn off a single valve:
| Item | Spec / Notes |
|---|---|
| Submersible utility pump | Small sump-style pump works well |
| Two washing machine hoses | Standard 3/4-inch connections |
| 5-gallon bucket | Food-grade or utility bucket |
| White distilled vinegar | 2 to 3 gallons minimum |
| Adjustable wrench or pliers | For service port connections |
| Safety glasses and work gloves | Required throughout the job |
About white vinegar
White distilled vinegar is the safest descaling option for most homeowners because it is non-toxic, inexpensive, and effective against calcium and lime deposits. Do not substitute cleaning vinegar with acidity above 6%, as higher concentrations can degrade rubber seals and internal components over time.
Standard 5% distilled white vinegar from any grocery store is the correct choice. You do not need a specialty descaling solution for a routine flush, and vinegar leaves no harmful residue once you rinse the system thoroughly in the steps that follow.
Step 1. Shut down power, gas, and water
This step is non-negotiable when you learn how to flush a tankless water heater. Skipping the shutdown sequence can expose you to scalding water, live electrical components, or an active gas supply, all of which create serious hazards. Work through these shutdowns in the exact order listed below and do not move on until each one is confirmed.
Turn off power or gas
Electric units require you to flip the dedicated circuit breaker in your electrical panel before touching anything else. For gas-powered units, turn the gas supply valve to the off position and confirm the burner indicator light (if present) goes dark.
Never rely on the unit’s control panel power button alone. Cut power or gas at the source every time.
Close the water supply valves
Your tankless heater has three key valves on the service port connections: cold water in, hot water out, and the service ports themselves. Turn the cold and hot shutoff valves to the closed position first, then open the service port valves so the system is ready for hose connections in the next step. Verify no water flows from either line before moving forward.
Step 2. Connect hoses and set up the pump
With the valves in position, you’re ready to build the circulation loop that makes this flush work. This is the physical setup that lets vinegar travel from your bucket, through the heat exchanger, and back again in a continuous cycle. Connect the hoses and pump correctly before you add any vinegar to the bucket, and confirm every fitting is secure so you don’t lose fluid mid-flush.
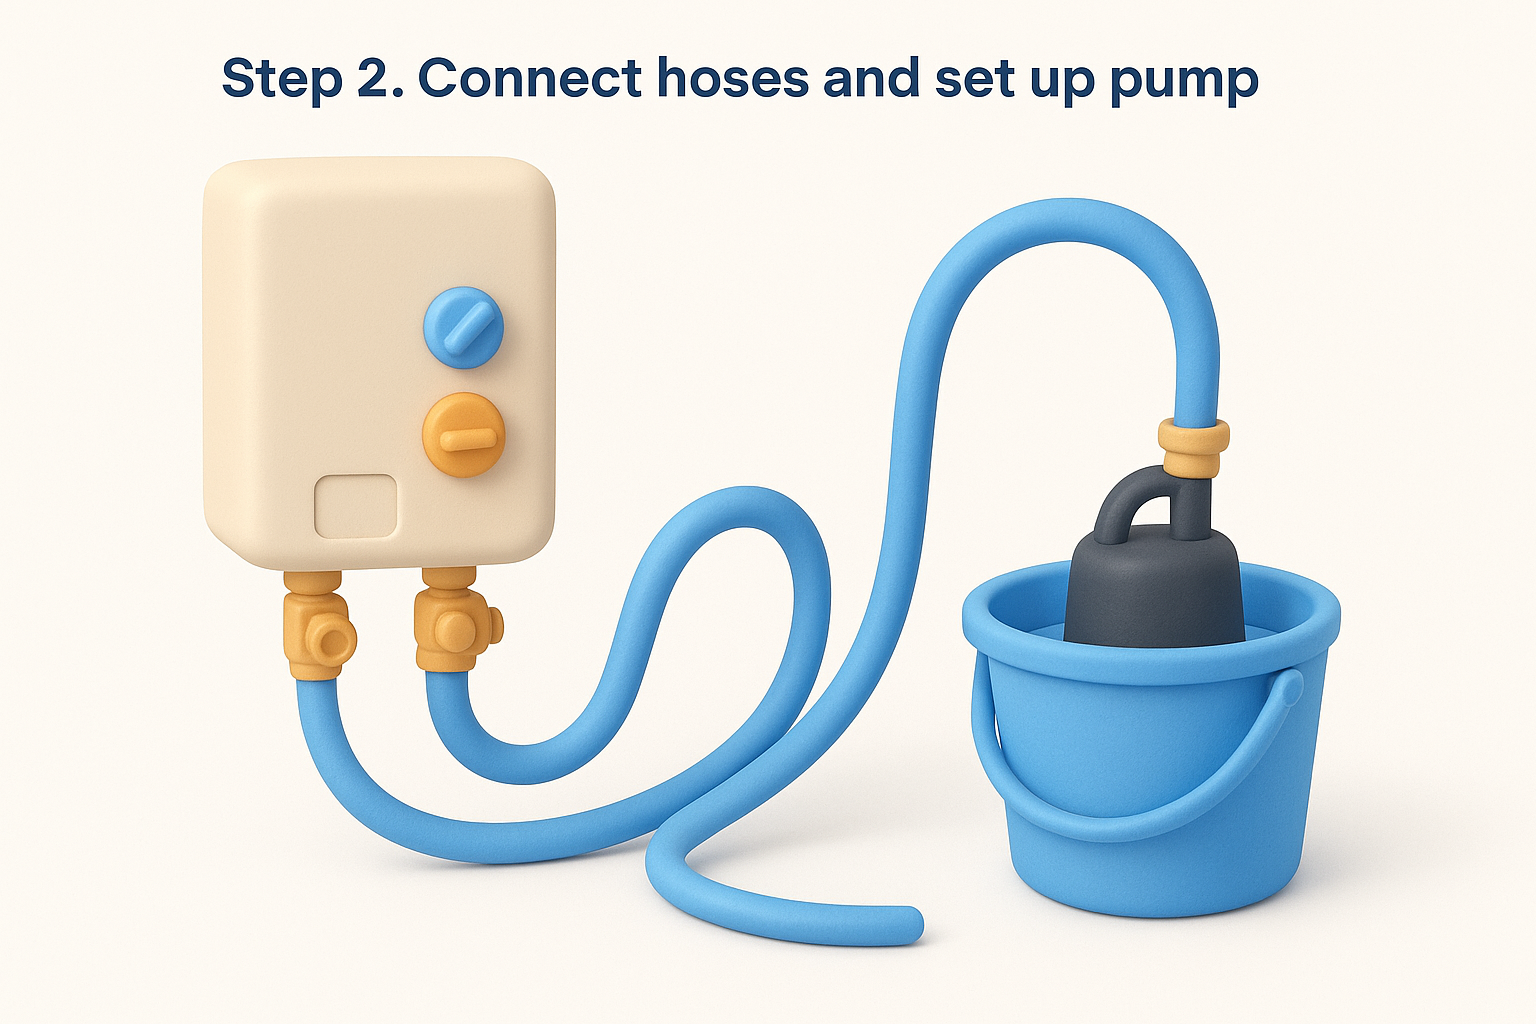
Attach the hoses to the service ports
Your unit’s service port valves are where the washing machine hoses connect. Thread one hose from the cold water service port down into your bucket, then run the second hose from the hot water service port back into that same bucket. Hand-tighten both connections first, then give each a quarter turn with your wrench to eliminate leaks during circulation.
A loose hose connection will spray vinegar the moment the pump runs, so pull gently on each fitting to confirm it holds before moving on.
Place and prime the pump
Drop the submersible pump into the bucket and connect it to the hose running toward the cold water service port. This pushes vinegar into the unit and pulls it back through the hot side, completing the loop described in every reliable guide on how to flush a tankless water heater. Fill the bucket with vinegar now, before you plug in the pump, so the intake never pulls air.
Step 3. Flush with vinegar, then rinse
This is the core of the process when learning how to flush a tankless water heater. Plug in the pump and let the vinegar circulate through the heat exchanger for a full 45 to 60 minutes. This contact time gives the acid enough exposure to break down calcium and lime deposits without damaging internal components.
Shorter flush cycles are a common mistake; 45 minutes is the minimum contact time to dissolve meaningful scale buildup.
Run the vinegar cycle
Keep an eye on the bucket level throughout the cycle. If the vinegar drops significantly, the pump may be losing prime, which means you have a loose connection somewhere. Top off the bucket as needed to maintain consistent flow. You do not need to run the unit’s burner during this step.
Rinse the system clean
Once the cycle completes, unplug the pump and dump the used vinegar from the bucket. Refill the bucket with clean fresh water and run the pump again for 10 to 15 minutes. This rinse pushes any remaining vinegar and loosened debris out of the heat exchanger completely before you restore normal operation.
Step 4. Put everything back and verify operation
With the rinse cycle done, you have completed the core work of learning how to flush a tankless water heater. Restoring the system in the right order matters just as much as the flush itself, and a quick verification test confirms the unit is running cleanly before you rely on it for hot water.
Disconnect hoses and restore valves
Remove both washing machine hoses from the service ports, then close the service port valves. Restore water flow by reopening the shutoff valves in this sequence:
- Cold water shutoff valve (fully open)
- Hot water shutoff valve (fully open)
- Run a hot tap for 30 to 60 seconds to purge air from the lines
Confirm the unit fires correctly
Restore power at the breaker (or reopen the gas supply valve for gas units), then turn on a hot water tap and let the unit run through its ignition sequence. Watch the control panel for a stable temperature reading and no error codes.
Check each service port fitting one final time for drips while the unit runs. Let hot water flow for two to three minutes to confirm consistent output before you consider the job complete.
If the unit displays an error code after restart, consult your owner’s manual before attempting another flush cycle.
You’re done
You’ve completed every step of how to flush a tankless water heater with vinegar, and your unit is now clear of scale buildup and ready to deliver consistent, reliable hot water. Most homeowners in the Tampa Bay area should repeat this flush once a year, though harder water may require every six months. Keeping to that schedule protects the heat exchanger, maintains efficiency, and extends the lifespan of your unit without major repair costs.
If the flush revealed a problem like low flow, persistent error codes, or visible corrosion at the service ports, those are signs that a professional inspection is the right next step. The Home Therapist team has serviced tankless water heaters across the Greater Tampa Bay Area since 2011 and can diagnose issues that a vinegar flush won’t fix. Same-day appointments and upfront pricing mean you get answers fast without any surprises on the invoice.


