

Pet hair HVAC cleaning tips for Tampa Bay pet owners
TL;DR:
- Pet hair accumulates inside HVAC systems, reducing airflow and increasing allergies and energy costs. Regular DIY cleaning, filter changes, and professional inspections prevent deep buildup and maintain indoor air quality. Consistent maintenance is essential, especially in pet households, to avoid costly system damage and health issues.
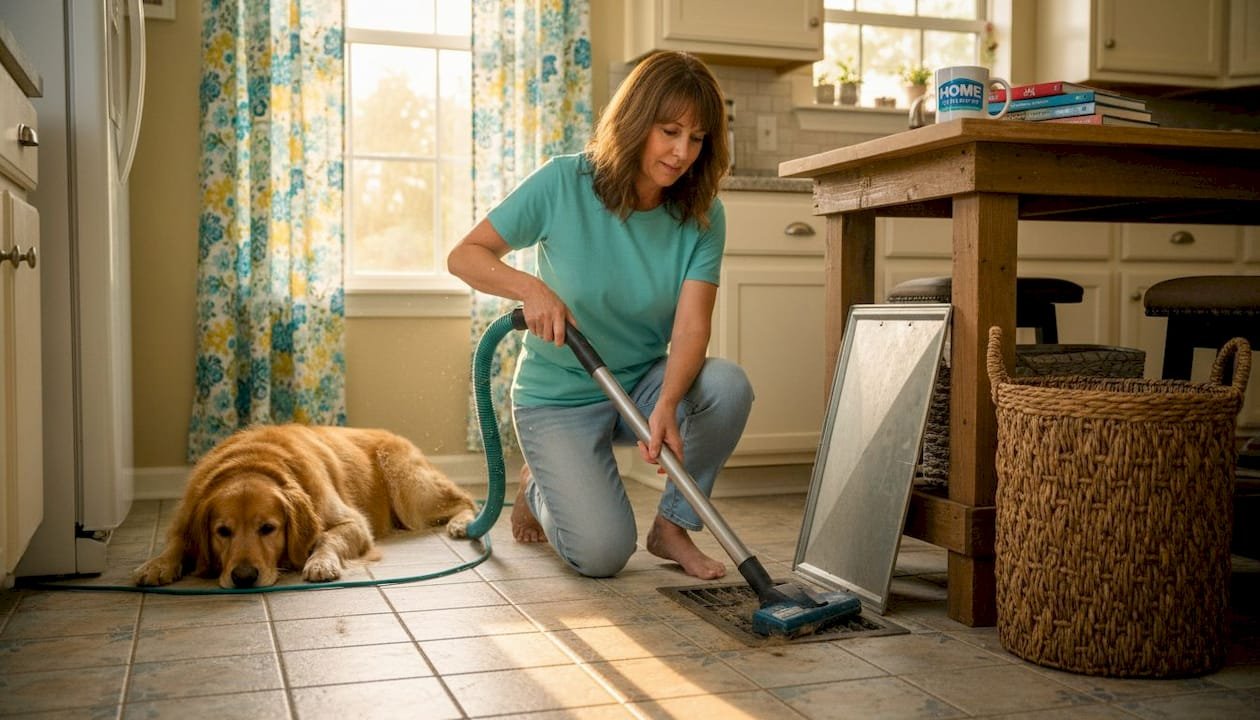
If you share your Tampa Bay home with a dog or cat, you already know the drill: fur on the couch, fur on the floor, and fur collecting around every vent in the house. What most pet owners don’t realize is that hair doesn’t just sit on the surface of those grilles. It gets pulled into the system, coats your filter, and eventually reaches components deep inside your HVAC unit, quietly reducing airflow, triggering allergies, and nudging your energy bills higher every single month. This guide walks you through exactly what to do about it, from gathering the right tools to knowing when a professional needs to step in.
Table of Contents
- What you need to clean pet hair from your HVAC system
- Step-by-step: Removing pet hair from vents and duct openings
- Filter fundamentals: Trapping pet hair before it enters the system
- When to call a pro: Deep cleaning ducts and internal components
- The hidden risks most pet owners miss in HVAC cleaning
- Connect with Tampa Bay’s HVAC experts for cleaner, fresher air
- Frequently asked questions
Key Takeaways
| Point | Details |
|---|---|
| Have the right tools | A proper vacuum, filters, and basic hand tools make cleaning more effective and safer. |
| Follow step-by-step care | Vacuum vents regularly, wipe covers, and check for blockages to keep air flowing cleanly. |
| Choose and maintain good filters | High MERV filters capture more pet hair and dander but require more frequent changes in pet homes. |
| Know when to call professionals | If DIY methods don’t fix smells, dust, or allergy symptoms, professional cleaning may be needed. |
| Consistency beats intensity | A regular, simple cleaning routine will dramatically improve your home’s air quality over time. |
What you need to clean pet hair from your HVAC system
Before you pull out a single vent cover, gather everything you need. Starting a cleaning job without the right supplies wastes time and risks pushing debris deeper into the system rather than removing it.
Essential tools for a pet hair HVAC cleaning session:
- Vacuum cleaner with a crevice tool and flexible hose attachment
- Soft-bristle brush (an old paintbrush or pastry brush works well)
- Microfiber cloths, dampened slightly
- Replacement air filter sized for your specific unit
- Phillips and flathead screwdrivers for removing vent covers
- Disposable trash bags for collecting debris
- A flashlight for inspecting inside duct openings
Understanding HVAC maintenance basics before you start gives you a clearer picture of what you’re dealing with. Many homeowners are surprised to discover how far pet hair can travel once it gets past a worn-out filter.
DIY tools vs. professional equipment
| Tool | DIY version | Professional version |
|---|---|---|
| Vacuum | Standard household vacuum with attachments | Truck-mounted or HEPA-rated commercial vacuum |
| Brush | Soft household brush | Rotary mechanical agitation brush |
| Filter | Store-bought MERV filter | Commercial-grade HEPA filtration units |
| Reach | Vent opening only (12-18 inches) | Full duct run, 20+ feet in each direction |
| Debris capture | Partial, at the surface | Source removal with sealed containment |
Vacuuming with attachments like a crevice tool or flexible hose is the right approach for register openings. It’s more controlled than a bare hose, and it pulls hair out instead of scattering it.
One step that often gets skipped: always turn off your HVAC system at the thermostat before you begin. Running the fan while you clean blows debris back into your face and recirculates it through the system.
Pro Tip: If you’re sensitive to dust, dander, or mold, wear an N95 mask during the entire cleaning process. Pet dander particles are microscopic, and stirring them up without respiratory protection can trigger symptoms even in people who don’t normally struggle with allergies.
Step-by-step: Removing pet hair from vents and duct openings
Now that you’re prepared, let’s walk through the hands-on process of cleaning pet hair from your vents and registers. Work room by room rather than jumping around the house. A systematic approach ensures you don’t miss any registers, and it helps you track which areas have the worst accumulation.
Step-by-step cleaning process:
- Turn off the HVAC system at the thermostat. Do not skip this.
- Remove the vent cover by unscrewing it or simply pulling it free if it’s a friction-fit style.
- Vacuum the vent cover itself, front and back, using the crevice tool.
- Vacuum the duct opening by inserting the crevice tool 6 to 12 inches. Go slowly. Pull debris toward you.
- Brush away remaining hair using your soft-bristle brush. Wipe dust from the inside walls of the opening with a slightly damp microfiber cloth.
- Inspect the opening with your flashlight. Look for clumps, discoloration (a sign of moisture or mold), or visible debris that your vacuum couldn’t reach.
- Reinstall the vent cover and wipe the outside surface with a clean cloth.
- Repeat for all registers, return air grilles, and floor vents throughout the home.
- Replace the air filter before turning the system back on.
- Run the system for 10 minutes and check that airflow from each vent feels normal.
Estimated time and effort per step
| Step | Estimated time | Difficulty |
|---|---|---|
| Remove and vacuum vent covers | 2-3 minutes per vent | Easy |
| Vacuum duct openings | 3-5 minutes per vent | Easy to moderate |
| Brush and wipe interiors | 2-3 minutes per vent | Easy |
| Inspect with flashlight | 1-2 minutes per vent | Easy |
| Replace air filter | 5-10 minutes total | Easy |
Safety warning: Stop immediately if your vacuum meets strong resistance inside the duct opening, or if you cannot remove a vent cover without forcing it. Forcing equipment into a duct can dislodge insulation or damage the ductwork itself. Call a professional before continuing.
Our DIY duct cleaning guide goes deeper into what homeowners can safely tackle on their own versus what requires specialized equipment.
Vacuuming register openings slowly while stopping if you hit blockages is the safest approach for DIY cleaning. Rushing or forcing the process causes more harm than good.
Pro Tip: After reinstalling a clean vent cover, wipe it down with a used dryer sheet. The anti-static coating left behind actually repels pet hair and dust, meaning your next cleaning session starts with less buildup than the last one.
Filter fundamentals: Trapping pet hair before it enters the system
Once surface pet hair is removed, your air filter becomes the most important ongoing defense. Choosing the right filter and changing it on the right schedule makes an enormous difference in how quickly hair and dander accumulate deeper inside your system.
Understanding MERV ratings for pet owners
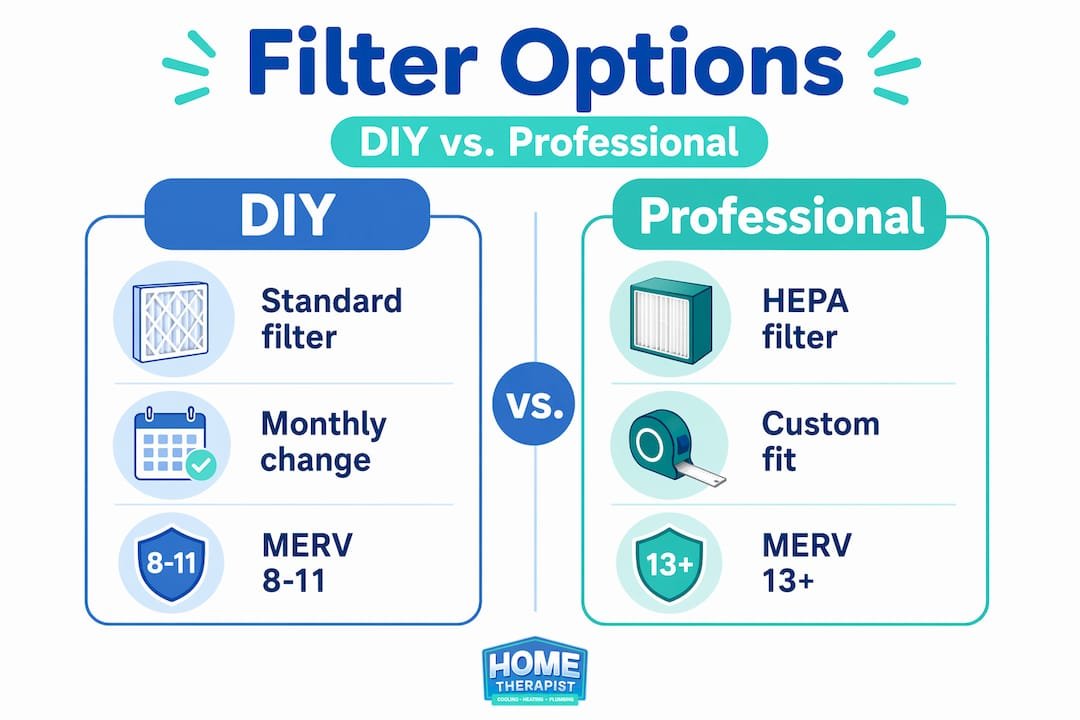
MERV stands for Minimum Efficiency Reporting Value. It’s a standardized scale from 1 to 20 that tells you how effectively a filter captures airborne particles. For most homes with pets, a MERV rating between 8 and 11 is the practical sweet spot. Filters rated MERV 13 or higher can capture finer particles, including pet dander, but they also restrict airflow more significantly. If your HVAC system isn’t designed to handle that resistance, a very high MERV filter can actually reduce efficiency and put strain on the blower motor.
Best filter options for homes with shedding pets:
- Pleated MERV 8-11 filters: Balance between particle capture and airflow; replace monthly in heavy-shedding households
- Electrostatic filters (washable): Attract pet hair and dander via static charge; require monthly washing rather than replacement
- HEPA-rated filters (MERV 13-16): Best particle capture but require HVAC compatibility check first
- Carbon-activated filters: Add odor control on top of particle filtration; especially helpful for multiple-pet households
Understanding the full role of HVAC filters helps you choose the right option for your specific unit and home size. Not every filter fits every system, so always check your HVAC manual or the label on your existing filter before purchasing a replacement.
How often should you change filters in a pet household?
The standard recommendation is every 90 days for a home without pets. With one pet, that drops to 60 days. With two or more pets, or a heavy-shedding breed like a Husky or Golden Retriever, replacing filters every 30 days is the right call. In Tampa Bay’s climate, where your AC runs almost year-round, the system moves a high volume of air daily, and filters load up faster than in cooler climates.
Key reminder: Consistent filter changes and regular vacuuming are the baseline that prevents hair and dander from migrating deeper into the system. Without this foundation, even occasional deep cleaning won’t keep your HVAC performing well.
Explore your best HVAC filter options to find products rated for pet households, including options that combine particulate filtration with odor control.
When to call a pro: Deep cleaning ducts and internal components
While regular DIY care helps, sometimes a professional is the only way to restore full system health. There’s a limit to how far a household vacuum can reach, and there are components inside your HVAC that most homeowners never see and certainly can’t clean on their own.
Signs you need professional duct cleaning:
- Visible debris, clumps of hair, or dust coming out of vents when the system runs
- Persistent pet odors even after cleaning vents and changing filters
- Allergy symptoms in household members that don’t improve despite regular DIY maintenance
- Noticeably reduced airflow from vents compared to prior months
- It has been more than 3 to 5 years since the last professional cleaning, especially with pets in the home
- Visible dust or debris accumulation on the supply grilles shortly after cleaning them
DIY cleaning vs. professional service
| Area covered | DIY cleaning | Professional cleaning |
|---|---|---|
| Vent covers | Yes | Yes |
| Register openings (6-12 inches) | Yes | Yes |
| Full duct runs (entire length) | No | Yes |
| Air handler/blower components | No | Yes |
| Evaporator coil | No | Yes |
| Return air plenum | No | Yes |
| Debris containment method | Partial (bag vacuum) | Sealed HEPA vacuum |
Professional duct cleaning uses HEPA vacuums and mechanical agitation tools to remove debris from the full depth of the system, not just the visible surfaces near registers.
What “source removal” means and why it matters
Source removal is the method endorsed by NADCA (National Air Duct Cleaners Association). It means debris is physically removed from the duct and captured in a sealed collection system, rather than being dislodged and redistributed. Not every service provider uses this method, so it’s worth asking specifically before you book.
The honest truth about spot cleaning: Wiping down vent covers and swapping filters is valuable maintenance, but it doesn’t address what’s coating the interior duct walls, the blower wheel, or the coil. Over time, those areas accumulate enough material to reduce efficiency by 5 to 15 percent, and in some cases they become a breeding ground for mold or bacteria. Spot cleaning alone can’t protect your HVAC or your household’s health in the long run.
For a full breakdown of what a professional visit involves, review the complete HVAC cleaning steps so you know exactly what to expect when a technician arrives. You can also look at a professional HVAC cleaning service comparison to understand the range of approaches and what questions to ask.
The hidden risks most pet owners miss in HVAC cleaning
Here’s the part most how-to guides won’t tell you directly: the homeowners who clean most religiously are sometimes the ones who feel most falsely confident. They wipe down the grilles every few weeks, they swap filters monthly, and they assume everything inside the ductwork must be fine. It usually isn’t.
The visible parts of your HVAC system are just the front porch. What lives inside the walls, in the return air plenum, around the blower wheel, and on the evaporator coil is a different story entirely. Pet hair doesn’t just float gently through the duct and land on the filter. It tumbles, sticks to oily film on duct walls, clumps with moisture from Tampa Bay’s humidity, and gradually builds a layer that no crevice tool will ever reach.
The real risk isn’t the filter getting clogged. That’s annoying but fixable in five minutes. The real risk is the slow accumulation in components that you can’t see or access. A blower wheel coated in a thin layer of hair and dander doesn’t spin as efficiently. An evaporator coil insulated by debris can’t transfer heat properly. Both problems cost you money on your electric bill long before you realize something is wrong.
Consistent vacuuming and filter changes are your baseline. Professional cleaning is the escalation step you reach for when visible contamination or persistent symptoms tell you the baseline isn’t enough.
What we’ve seen in Tampa Bay homes is that the biggest mistake pet owners make is treating HVAC cleaning as a one-time project rather than an ongoing habit. Check your calendar right now and set a recurring monthly reminder to inspect your filter. Set another for vent cleaning every four to six weeks. That consistency matters far more than any single thorough deep clean.
Pro Tip: Schedule filter checks on your phone calendar as a recurring monthly task. The habit of checking, even if the filter looks acceptable, keeps you from ever going three months without noticing that it’s completely clogged.
Professional cleaning doesn’t need to happen every year for every household. However, once pet hair buildup is visibly reaching components beyond the registers, or once allergy symptoms persist despite your best DIY efforts, escalating to professional service is not optional. It’s the responsible next step. Staying on top of your HVAC maintenance checklist year-round is the most practical way to keep that escalation rare.
Connect with Tampa Bay’s HVAC experts for cleaner, fresher air
Managing pet hair in your HVAC is genuinely manageable with the right routine, but some jobs call for more than a household vacuum and a bag of replacement filters. When it’s time for a professional set of eyes on your system, or when you want the peace of mind that comes from a certified technician inspecting every component, Home Therapist Cooling, Heating, and Plumbing is ready to help Tampa Bay pet owners breathe easier.
Our certified technicians specialize in HVAC maintenance services in Tampa and understand exactly what Florida’s climate does to systems that handle heavy pet hair and humidity every day. Whether you need a routine maintenance visit or a full HVAC system evaluation to assess how your equipment is holding up, we bring the expertise and equipment to get your indoor air quality back on track. As a family-owned business, we treat your home like our own. Contact us today and let’s put a consistent plan in place for your household.
Frequently asked questions
How often should I clean HVAC vents if I have pets?
If you have pets, vacuum or wipe your HVAC vents every 2 to 4 weeks and change your filter monthly for the best results. Consistent vacuuming and filter changes are essential in pet households to prevent buildup from reaching deeper components.
What are the signs I need professional duct cleaning?
Look for excessive dust, stubborn pet odors, visible debris in vents, or ongoing allergy symptoms that don’t improve with regular DIY maintenance. Professional cleaning is needed when contamination is visible or symptoms persist despite routine care.
Is it safe to use any household vacuum for vent cleaning?
Use a vacuum with a hose and crevice tool, go slowly, and stop immediately if you meet resistance inside the duct. Vacuuming with attachments is safe at register openings, but never force the hose deeper than 12 inches into the duct.
Can I avoid pet hair problems in my HVAC just by using a high-quality filter?
A high-quality filter helps significantly, but regular vacuuming and vent cleaning are still necessary to keep the full system clear. Consistent filter changes and regular vacuuming together form the baseline, and neither works well without the other.
Recommended
- Indoor Air Quality and Ductwork FAQ for Tampa Bay Homeowners | Home Therapist
- Step-by-step furnace cleaning guide for Tampa Bay homeowners
- Why Clean Air Ducts Matter for Tampa Homes
- HVAC Maintenance & Indoor Air Quality in Tampa, FL 33647 | Home Therapist
More Indoor Air Quality Articles
- Why change air filters? Boost HVAC efficiency now
- Why Balancing Home Humidity Matters for Tampa Bay Comfort
- Why We Physically Verify the UV Light on Every Visit: AC Maintenance on Amesbury Cir, Sun City Center FL 33573
- A 24/7 UV Light Belongs Inside the Air Handler: UV Light Installation in Tampa, FL 33634
- Mini Split Installation for Florida Rooms and Garages in Tampa, FL: What to Expect


