

Thermostat Installation Guide: Tampa Homeowners’ Plan
TL;DR:
- Upgrading to a smart thermostat can significantly improve energy efficiency and home comfort.
- Proper installation, compatibility checks, and scheduled use are crucial for maximum savings.
- Local Tampa professionals can assist with complex installs or system-specific challenges.
Tampa Bay homeowners know the struggle: the AC runs constantly from April through October, energy bills climb, and an outdated thermostat quietly wastes money every single day. Upgrading or installing a new thermostat is one of the fastest ways to take back control of your comfort and your budget. Smart thermostats save money most reliably for homeowners who set schedules and stick to them, which makes proper installation and setup critical from day one. This guide walks you through everything: what to gather before you start, how to install safely, how to fix common problems, and how to confirm your new thermostat is actually delivering results.
Table of Contents
- What you need for thermostat installation in Tampa homes
- Step-by-step thermostat installation instructions
- Troubleshooting common thermostat installation issues
- Verifying results and optimizing your new thermostat
- The uncomfortable truth: Most Tampa homeowners override settings, and lose savings
- Need help? Local Tampa pros make thermostat upgrades easy
- Frequently asked questions
Key Takeaways
| Point | Details |
|---|---|
| Prep before installing | Having the right tools and checking compatibility prevents costly mistakes and delays. |
| Follow each step | Step-by-step instructions ensure safe, effective installation and avoid common errors. |
| Troubleshoot wisely | Knowing how to fix frequent issues can save time and keep your HVAC running efficiently. |
| Maximize efficiency | Optimal settings and consistent use unlock the full energy savings potential of your thermostat. |
| Local help available | Tampa Bay homeowners can rely on professional services for installations and upgrades. |
What you need for thermostat installation in Tampa homes
After previewing what this guide covers, your first move is making sure you have everything on hand before touching a single wire. Running back to the hardware store mid-installation in Tampa’s summer heat is nobody’s idea of a good time.
Tools and materials you’ll need:
- Flathead and Phillips screwdrivers
- Voltage tester (non-contact style is safest)
- Needle-nose pliers
- Masking tape and a marker for labeling wires
- Level (for straight mounting)
- Your new thermostat and its included hardware
- Smartphone for photographing the existing wiring
- Drill with wall anchors if your new thermostat’s base doesn’t align with existing holes
Beyond tools, compatibility is the issue that trips up most Tampa homeowners. Not every thermostat works with every HVAC system. If you’re upgrading thermostats in Tampa, you need to confirm your system uses a common wire (called a C-wire) to power a smart thermostat. Many older Tampa homes don’t have one, which means you’ll either need an adapter kit or a different thermostat model.
Tampa’s humidity also matters more than most people realize. Tampa’s climate impacts thermostat choice significantly, so prioritizing models with built-in humidity sensing and adaptive cooling thresholds will serve you far better than a basic programmable unit.
| Feature | Basic thermostat | Smart thermostat |
|---|---|---|
| Humidity sensing | No | Yes (most models) |
| Remote access | No | Yes |
| Schedule automation | Limited | Full customization |
| Energy reporting | No | Yes |
| C-wire requirement | Usually no | Often yes |
If you’re considering smart thermostat upgrades, check your HVAC manual or the manufacturer’s compatibility tool online before purchasing. Returning a thermostat because it doesn’t fit your system adds unnecessary frustration to the project.
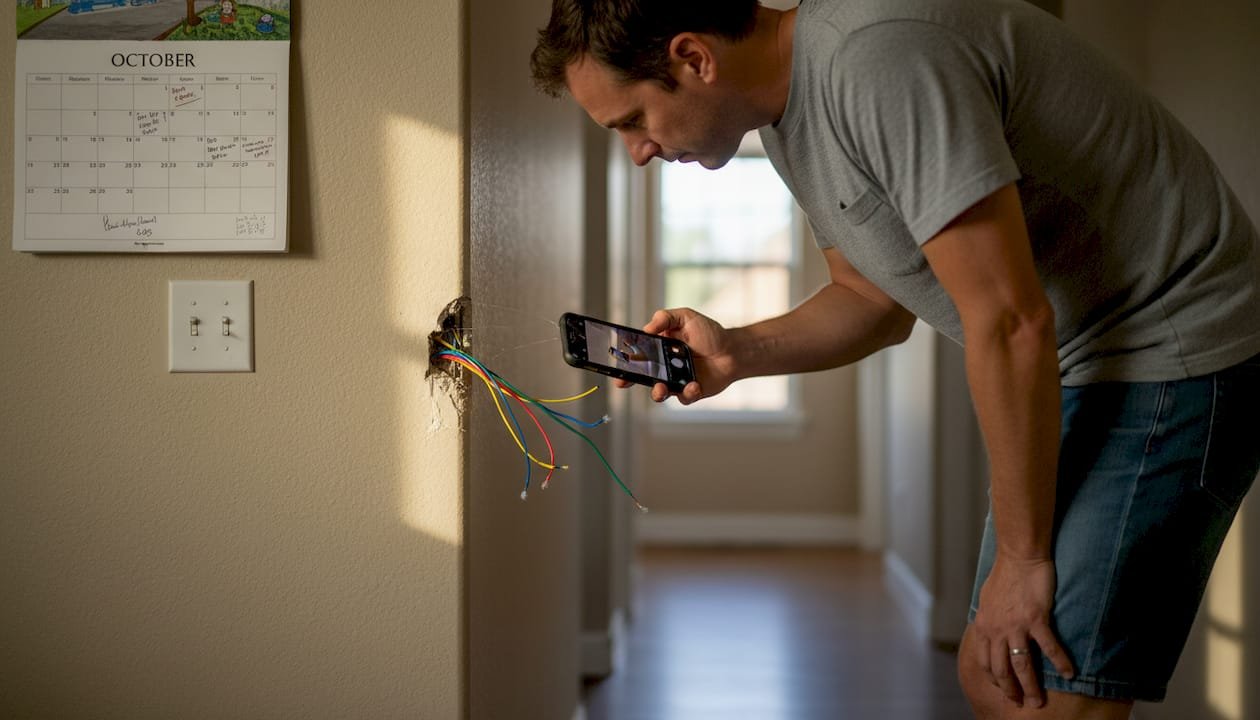
Pro Tip: Take a photo of your current thermostat’s wiring before removing anything. This is your insurance policy if something goes wrong during the swap.
Step-by-step thermostat installation instructions
With everything ready, follow these proven steps for safe and successful installation. Don’t skip steps to save time; rushing thermostat work leads to HVAC headaches that cost far more to fix later.
- Turn off power at the breaker. Find the breaker that controls your HVAC system and switch it off. Verify power is off using your voltage tester at the thermostat wires.
- Remove the old thermostat cover and take a clear photo of every wire and its labeled terminal before touching anything.
- Label each wire with masking tape and a marker using the terminal letters shown (R, G, Y, W, C, etc.).
- Detach wires from the old base one at a time, keeping them from falling back into the wall by wrapping them around a pencil or securing with tape.
- Remove the old base from the wall and set it aside.
- Mount the new thermostat base using the included screws and a level to ensure it’s straight.
- Connect wires to the matching terminals on the new base, referencing your photo and wire labels.
- Snap the new thermostat display onto the base and restore power at the breaker.
- Follow the on-screen setup prompts to configure your system type, location, and initial schedule.
- Test heating and cooling modes to confirm both respond correctly.
Incorrect installation reduces efficiency and can create real safety hazards, so that voltage tester is non-negotiable. Knowing professional installation expectations can also help you decide whether DIY is right for your situation.
| Step | Key action | Safety check |
|---|---|---|
| Power off | Breaker switch | Verify with voltage tester |
| Wire documentation | Photo and labels | Confirm all terminals noted |
| Wire connection | Match labels to terminals | No loose or crossed wires |
| Power on | Restore breaker | Test both heat and cool modes |
Safety reminder: Never work on thermostat wiring with the power on. Even low-voltage wiring can damage your HVAC system or cause electrical shorts if handled live.
If your installation feels more involved than expected, reviewing installation pricing Tampa Bay for professional service is worth a quick look before committing further.
Pro Tip: Use your phone’s camera, not just notes. A detailed photo of the original wiring setup has saved countless Tampa homeowners from a frustrating troubleshooting session later.
Troubleshooting common thermostat installation issues
Even careful installations can run into snags. Knowing what to look for and how to fix it quickly will save you a service call.
Most frequent installation problems:
- Loose wire connections: A wire that looks seated but isn’t fully pushed into its terminal will prevent the HVAC from responding. Push each wire firmly until it clicks or holds tension.
- Mislabeled wires: If you skipped the photo step, a wire in the wrong terminal is the most common cause of a system that blows the wrong air or doesn’t run at all.
- Missing C-wire: If the thermostat display is dim or unresponsive, lack of a C-wire is the likely culprit. A C-wire adapter kit, available online for under $30, solves this without rewiring.
- Compatibility mismatch: Some older Tampa HVAC systems, particularly single-stage systems over 15 years old, don’t communicate well with newer smart thermostats. Check common smart thermostat issues for a deeper breakdown of compatibility problems.
What happens when the HVAC simply won’t respond after installation? Start by resetting the circuit breaker and the thermostat itself. If the unit powers up but the system still doesn’t cycle, shut everything down and recheck every wire connection against your original photo.
Expert insight: Settings frequently overridden reduce expected savings dramatically, but a thermostat that won’t hold settings at all usually points to a wiring error, not a software problem.
Getting help with installation from a certified technician is the smart call when the HVAC system is behaving unpredictably after your install.
Pro Tip: Before calling for help, check whether your thermostat’s app or display has a firmware update available. A surprising number of post-installation glitches disappear after a simple software update that takes less than five minutes.
Verifying results and optimizing your new thermostat
Once your thermostat is in place and trouble-free, here’s how to fine-tune it for the best results Tampa’s climate demands.
Functional verification checklist:
- Cooling mode cycles on within 3 to 5 minutes of a setpoint change
- Heating mode responds correctly (yes, Tampa winters do get chilly)
- Humidity readings display accurately on the thermostat or app
- App connection is active and shows real-time data
- Schedule is programmed for your actual daily routine
- Energy usage reports are accessible in the app
Once you’ve confirmed the basics work, it’s time to customize. Tampa homes benefit most from cooling schedules that pre-cool during off-peak electricity hours, typically late evening or early morning. Set the thermostat to allow temperatures to rise slightly while you’re away and cool back down 30 minutes before you return.
Humidity features for Tampa homes deserve special attention during setup. Set your humidity threshold between 45% and 55% relative humidity to keep your home comfortable without running the AC harder than necessary.
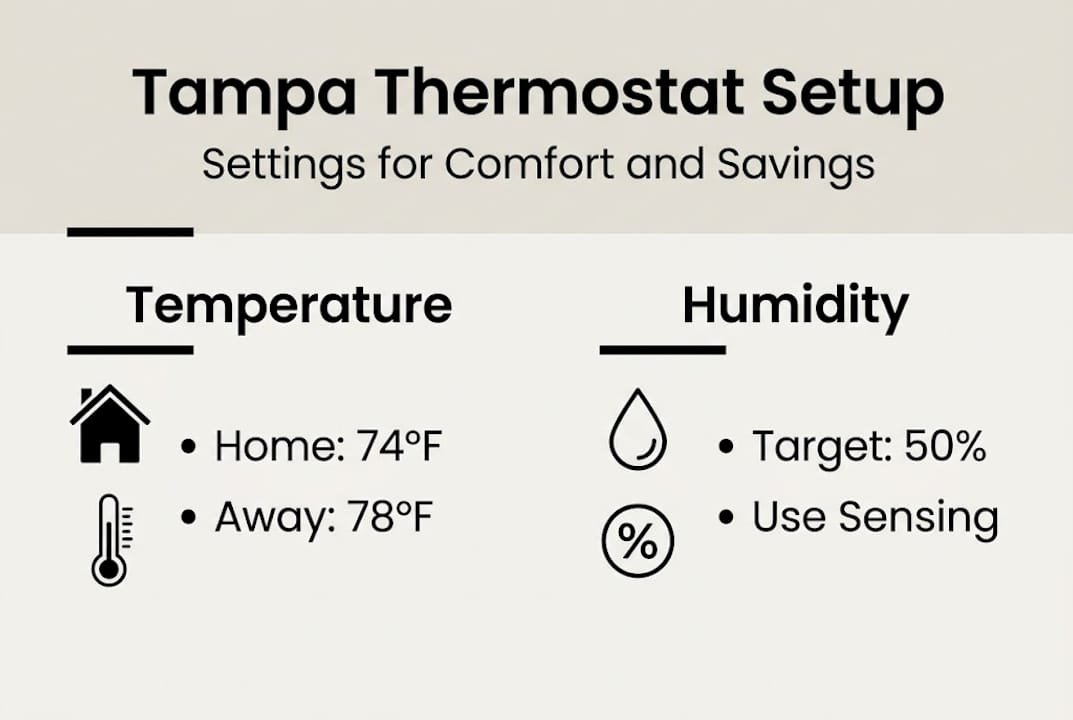
| Setting type | Default | Optimized for Tampa |
|---|---|---|
| Cooling setpoint | 72°F constant | 78°F away, 74°F home |
| Humidity control | Off or basic | 45-55% active threshold |
| Schedule | None or simple | Pre-cooling before peak heat |
| App alerts | Off | On for filter and maintenance reminders |
Proper settings are vital for capturing real savings; homeowners who use full scheduling and humidity control report noticeably lower cooling costs compared to those who leave defaults in place. Reviewing installation cost insights alongside expected savings can help you calculate your payback period accurately.
The uncomfortable truth: Most Tampa homeowners override settings, and lose savings
Here’s something we see constantly in the field: a homeowner invests in a quality smart thermostat, installs it correctly, and then manually bumps the temperature every afternoon because the house feels a degree too warm. Within a month, the thermostat is essentially a fancy manual unit, and the promised savings never materialize.
The technology isn’t the problem. The habits are. Savings are lost when thermostats are frequently overridden, and Tampa homeowners override more than most because the heat here is relentless and patience runs thin fast.
Our honest advice: treat your new thermostat like a set-and-forget tool for the first 30 days. Let it learn your home, trust the schedule you programmed, and resist the urge to override. After a month, review your energy report and make small adjustments based on data rather than impulse.
This shift in mindset, not the thermostat model you choose, is what separates homeowners who see real bill reductions from those still wondering why upgrading thermostats didn’t deliver what they expected.
Need help? Local Tampa pros make thermostat upgrades easy
Sometimes a DIY installation hits a wall, whether it’s unexpected wiring, an incompatible HVAC system, or simply a schedule that doesn’t leave time for the project. That’s exactly where we come in.
At Home Therapist Cooling, Heating, and Plumbing, our certified technicians handle thermostat installations across the Tampa Bay area every day. We know the local HVAC systems, the humidity challenges, and the quirks that older Tampa homes throw at you. Whether you want to upgrade your HVAC with a full smart thermostat setup or you just need a second opinion on a tricky wire, we’re ready to help. Explore our AC maintenance guide Tampa Bay or learn about our full HVAC maintenance Tampa services and book your appointment today.
Frequently asked questions
How long does thermostat installation take in a Tampa home?
Most installations are completed within one to two hours when wiring is compatible and no unexpected problems come up. Complex installation challenges like missing C-wires or incompatible systems can add time.
Are smart thermostats really worth it for Tampa’s climate?
Yes, especially for the long cooling season, but savings depend heavily on how consistently you use scheduling and avoid manual overrides rather than the thermostat brand alone.
What are common mistakes to avoid during thermostat installation?
Mislabeling wires, skipping the power-off step, and ignoring compatibility checks are the top errors. Incorrect installation creates hazards for your HVAC system and can void warranties.
Do I need a pro for thermostat installation or can I DIY?
DIY works well if you’re comfortable with basic electrical steps and have a compatible system, but professional installation expectations show that complex setups benefit from certified technician experience.
Recommended
- Smart Thermostat Installation: Upgrade Your Home – Home Therapist Cooling, Heating, and Plumbing
- Discovering Smart Thermostat Installation Costs in Tampa Home Therapist Cooling, Heating, and Plumbing
- Smart Thermostat Installation and Upgrades in Tampa, FL – What to Expect from Home Therapist Cooling, Heating, and Plumbing Home Therapist Cooling, Heating, and Plumbing
- Common Problems to Expect When Installing a Smart Thermostat in Your Tampa Home Home Therapist Cooling, Heating, and Plumbing
- Top tips to upgrade your home HVAC for better comfort – Akita AC


